Integrations
-
Heimdal for Endpoint Integration Guide
See moreWhat is Heimdal EPP?
Heimdal Endpoint Protection Platform (EPP) is a comprehensive cybersecurity solution that provides advanced threat detection, prevention, and response capabilities. It integrates seamlessly with the Timus platform to collect, monitor, and analyze data from devices within your network, helping to enforce security policies and ensure a strong security posture.
How Heimdal EPP Integration Works?
- Data Collection: Heimdal collects endpoint data such as device status, threat detections, and more.
- Data Transmission: This data is securely transmitted to Timus via APIs.
- Policy Enforcement: Timus uses this data to enforce Device Posture Checks and manage user access based on security policies.
- Security Posture Management: Administrators can monitor the security status of devices in real-time and take proactive actions if necessary.
Obtain the Necessary Credentials from Heimdal
Before you can integrate Heimdal EPP with Timus, you’ll need to gather the following details from your Heimdal Management console:
- Customer ID
- The Customer ID is a unique identifier assigned to your account by Heimdal.
- Sign in to your Heimdal Management Console
- Go to Guide -> Your Heimdal API Key
- Copy Current selected customer ID value
- The Customer ID is a unique identifier assigned to your account by Heimdal.
- API Key
- The API Key is generated from the API section within the Heimdal Management console.
- Sign in to your Heimdal Management Console.
- Go to Guide > Your Heimdal API Key
- Copy Your Personal API Key value
- This key is used to authenticate requests made by Timus to the Heimdal API.
- The API Key is generated from the API section within the Heimdal Management console.
- Management URL
- The Management URL is the base URL you use to access your Heimdal Management Console (e.g.
https://rc-dashboard.heimdalsecurity.com/api/heimdalapi). - This URL allows Timus to send and receive data from Heimdal by communicating with the correct server.
- The Management URL is the base URL you use to access your Heimdal Management Console (e.g.
Integrate with Timus
Once you have gathered all the necessary credentials and completed setup on the Heimdal side, follow the steps below to integrate Heimdal EPP with Timus:
-
Access Timus Manager:
- Sign in to Timus Manager.
- Go to Settings -> Integrations.
-
Manage Heimdal Integration:
- Click Manage under Heimdal.
- Fill in the fields with the copied Customer ID, API Key and URL values.
Testing and Verification
After completing the integration setup:
- Test the Integration: Ensure that Timus can successfully communicate with Heimdal by checking if device data is being collected and displayed in the Timus Manager.
- Verify Policies: Configure a simple Device Posture Check using the data from Heimdal to ensure policies are enforced as expected.
-
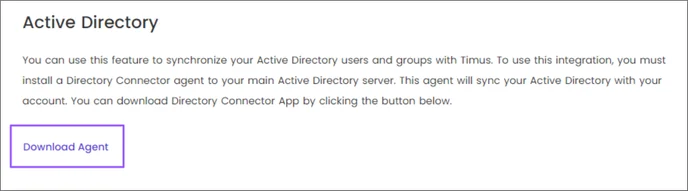
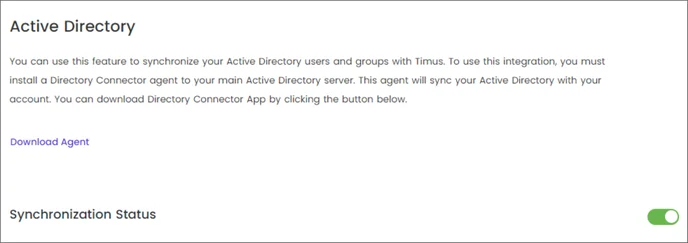
(AD) Active Directory
See moreThis article explains the process of synchronizing your Active Directory users and groups with Timus Manager
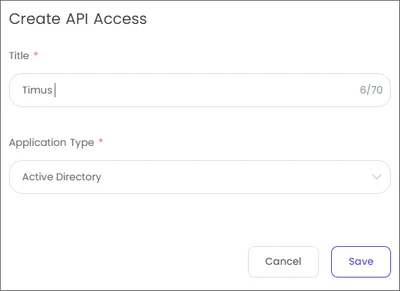
To use this integration, you must install the Directory Connector Agent to your main Active Directory server. This agent will sync your AD with your Timus Manager account.Before initiating the synchronization process and downloading the agent, follow the steps below:- Create API Access by going to Timus Manager -> Settings -> Configuration -> API Access tab.
- Click Create API Access on the top right of the page.
- Enter a Title.
- Choose the Application Type. (Active Directory/ Custom)
- Click Save.
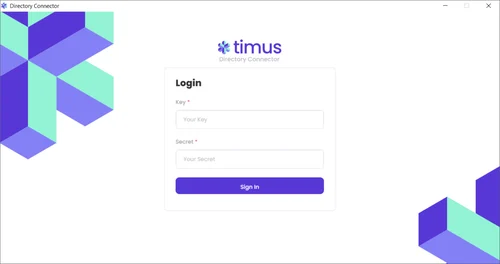
- After creating an API Access, you will view the required information to log in to Directory Connector.
- Copy and Save this Client ID and Client Secret you see on the screen.
- Go back to the Active Directory integration screen and click on Download Agent.
- Open Timus Directory Connector Agent.
- Enter the key and secret here.
- Click the Sign in button.
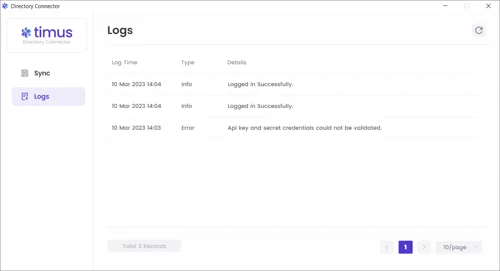
- When you open the Timus Directory Connector, you will be presented with the main screen that features two tabs: Sync and Logs.
- Enter the requested AD domain and admin credentials in the Synchronization tab.
- Click Save.
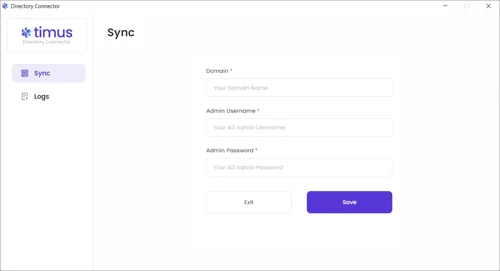
In the Logs tab, you can view all traffic on the agent under Log Time/ Type and Details parameters.
- Navigate to the Active Directory integration area in Timus Manager and enable the Synchronization Status.
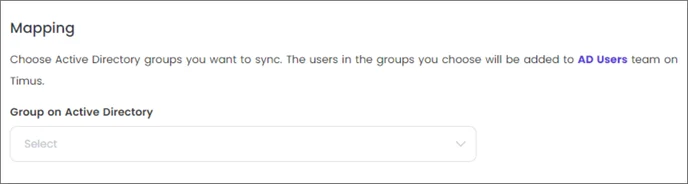
- Groups transferred from the directory can now be viewed here.
- Map groups with Timus Manager.
- Select the Remote Access that users will be able to connect to.
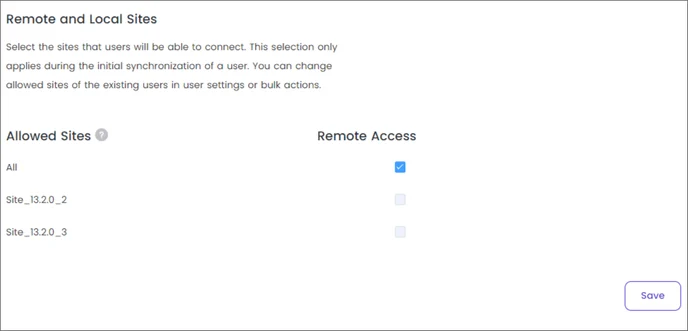 Select the sites that users will be able to connect. This selection only applies during the initial synchronization of a user. You can change the allowed sites of the existing users in user settings or bulk actions.The synchronization process may require up to 30 minutes, but it could potentially take longer.The duration of the synchronization depends on the amount of information you are synchronizing from Active Directory.
 -
Bitdefender for Endpoint Integration Guide
See more-
Log in to BitDefender GravityZone:
- Use your administrative credentials to access the BitDefender GravityZone at https://gravityzone.bitdefender.com/.
- Navigate to API Keys:
- Once logged in, click on your username at the upper right corner of the console and select 'My Account'.
- Go to the 'API keys' section.
- Generate an API Key:
- Click on the 'Add' button in the API keys section.
- Enter a description for the API key and select the Network API.
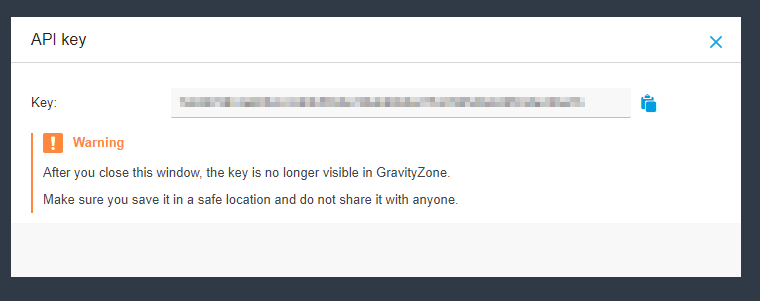
- Click 'Generate'. Ensure you copy and save your API key as it is crucial for the integration.
- Copy the Management URL:
- The Management URL is generally the URL you use to access the GravityZone control panel, like https://cloud.gravityzone.bitdefender.com
- You might also find the specific API endpoint URLs under the API section if your integration requires targeting specific services.
- Enter your details in Timus Manager portal:
- To be able to enable Bitdefender you need to go to the page Settings -> Integrations and click the “Enable” button of Bitdefender integration.
- Enter your API Key and Management URL, and click the “Confirm” button.
To integrate Bitdefender for using the
getManagedEndpointDetailsandgetEndpointListAPI calls, you need to follow these steps:1. Obtain API Access
Step 1: Access the Bitdefender GravityZone Console
- Log in to your Bitdefender GravityZone console.
Step 2: Create an API Key
- Navigate to the API section in the GravityZone console.
- Generate an API key if you don't already have one.
- Note down the API key as you will need it to authenticate your API calls.
2. Assign Necessary Permissions
To use the
getManagedEndpointDetailsandgetEndpointListAPI calls, ensure the API key has the following permissions:- Endpoints: Read access to retrieve endpoint details.
- Network: Read access to retrieve the list of managed endpoints.
3. Permissions Summary
Ensure your API key has the following permissions:
- Read access to the Endpoints and Network sections in the Bitdefender GravityZone console.
By following these steps, you should be able to integrate Bitdefender and use the
getManagedEndpointDetailsandgetEndpointListAPI calls effectively.- Endpoints: Read access to retrieve endpoint details.
- Network: Read access to retrieve the list of managed endpoints.
- Read access to the Endpoints and Network sections in the Bitdefender GravityZone console.
Now, you are ready to integrate with Timus. Please continue the article below to complete the integration. Device Posture Check and EPP
-
Log in to BitDefender GravityZone:
-
Device Posture Check and EPP
See moreThis article explains the process of enabling EPP and Device Posture Check configurations on Timus Manager.- Please complete the EPP integration guide(s) below before taking any actions on the Timus Manager. Without taking the needed permission configuration actions of the EPPs below, the EPP integrations will not work as expected.
Microsoft Defender for Endpoint Integration Guide
SentinelOne for Endpoint Integration Guide
Bitdefender for Endpoint Integration Guide
-
To be able to enable the EPPs, BitDefender, SentinelOne or Microsoft Defender, you need to go to the page Settings -> Integrations.
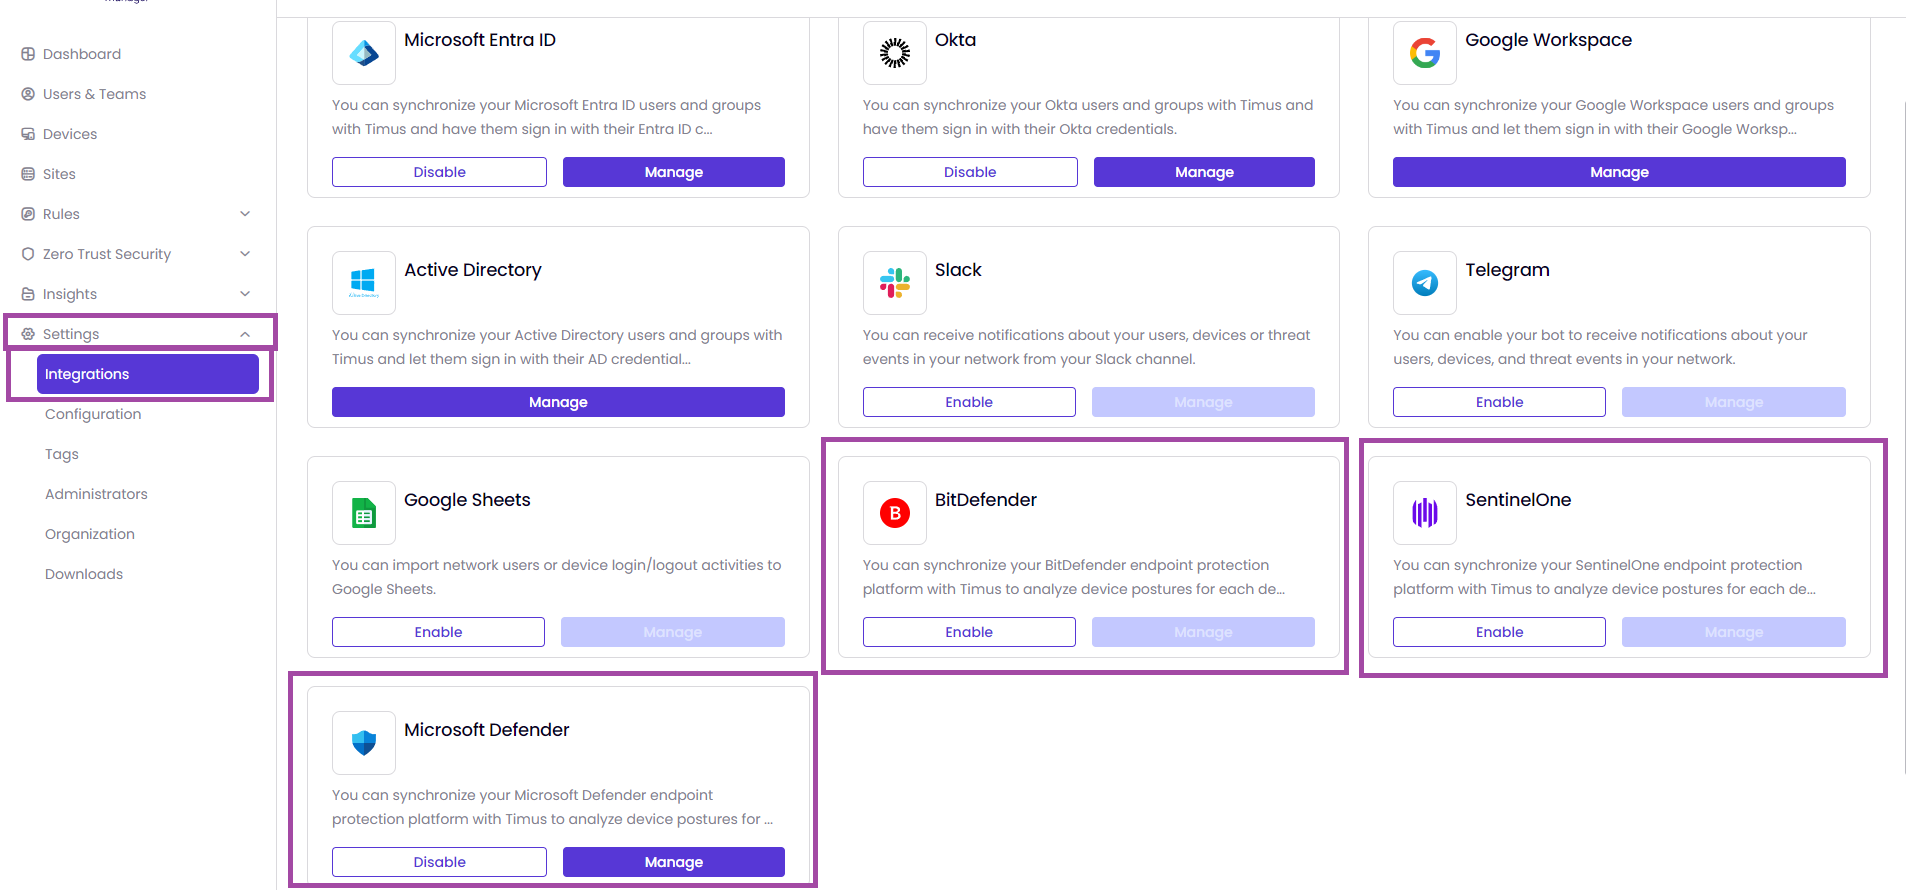
BitDefender:
- Once you enable BitDefender, you need to enter the API Key and Management URL to activate it. After entering the needed fields, you need to click on Confirm.

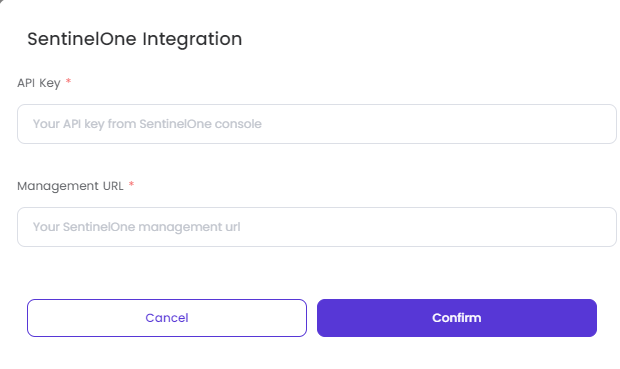
SentinelOne:
- Once you enable SentinelOne, you need to enter the API Key and Management URL to activate it. After entering the needed fields, you need to click on Confirm.
Microsoft Defender:
- Once you enable Microsoft Defender, you need to enter the Tenant ID, Client ID and Client Secret to activate it. After entering the needed fields, you need to click on Confirm.

- After enabling the EPP, you will be allowed to configure the Device Posture Checks. In order to configure it, you need to go to the page Zero Trust Security -> Device Posture Checks.
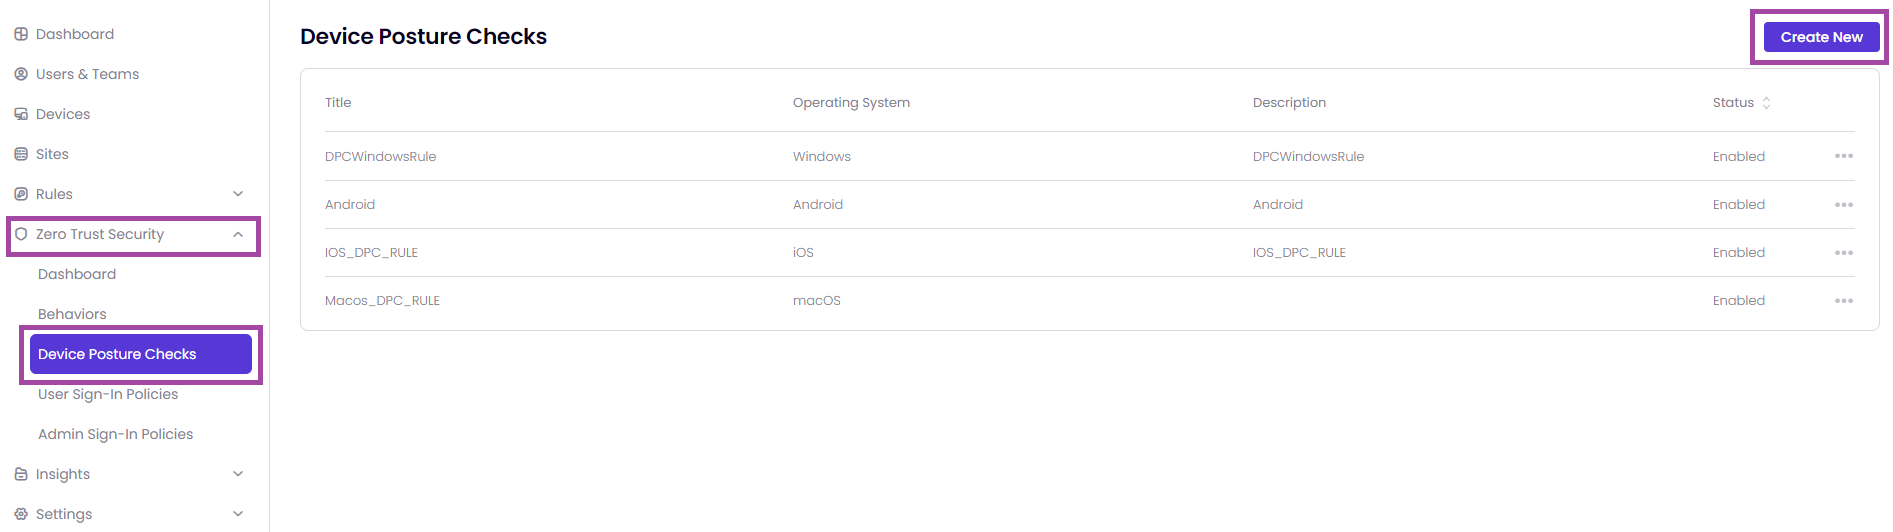
- If you want to create new Device Posture Checks, you need to click on Create New as shown in the image above. If you have already got some Device Posture Checks, it will be listed as shown in the image above as well.
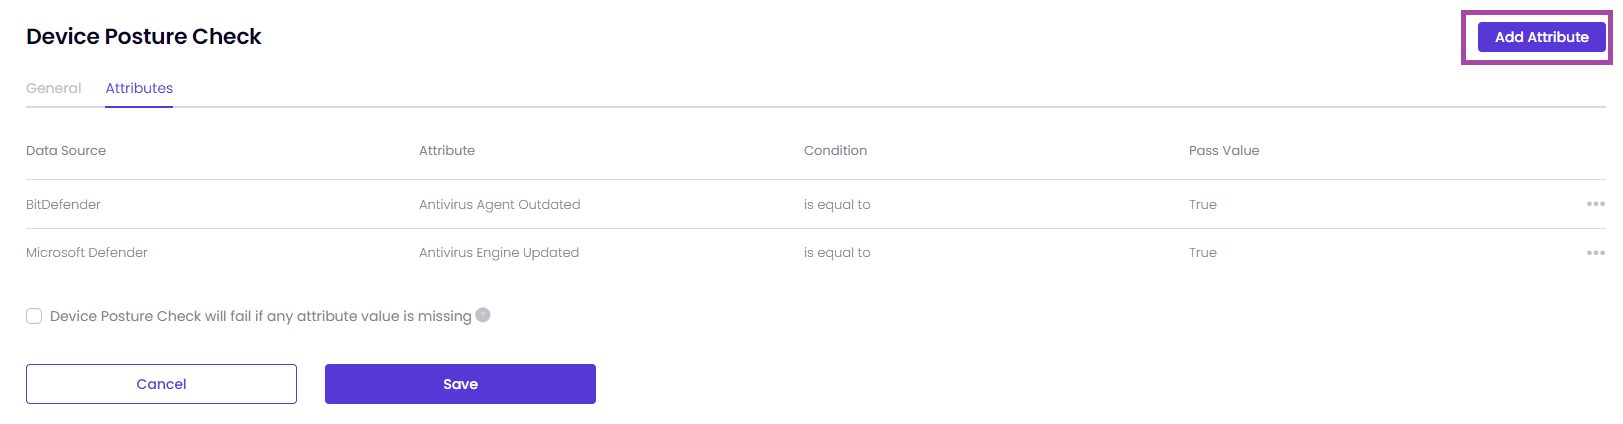
- Once you click on Create New, you will see the page as shown in the image below. This page has 2 tabs, General and Attributes. Without entering the field on the tab General, you are not allowed to skip to the Attributes tab.
Assigned Operating Systems:
Select the operating system for which you wish to perform device posture check. Please note that only one posture check can be created for each operating system.
- Windows
- macOS
- Linux
- Windows Server
- iOS
- Android

- After you assign the Operating System and enter the required fields, you can click on Save. You will be able to configure the tab Attributes now. You need to click on Add Attribute as shown in the image below.
-
Device Posture Check will fail if any attribute value is missing: Enable this option to fail the device posture check if any attribute values are missing, ensuring only complete datasets pass the check.
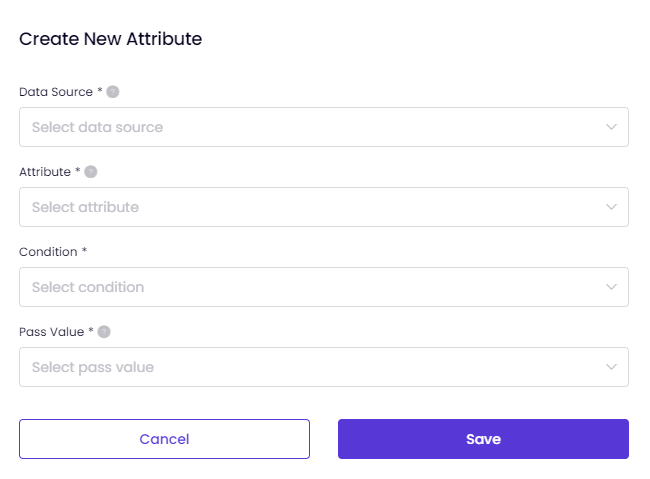
Data Source:
Select the source from which the attribute data is retrieved. This data source provides the information used to evaluate the device posture.
- BitDefender
- Microsoft Defender
- SentinelOne
Attribute:
Choose the specific attribute that is gathered from the data source.
The Attributes if the Data Source has been selected as either BitDefender or Microsoft Defender.
- Antivirus Agent Outdated
- Antivirus Agent Signature Outdated
- Antivirus Agent Signature Update Disabled
- Antivirus Agent Update Disabled
- Device Infected
- Disk Encryption
- Agent Installed
- Malware Detected
- Operating System
- Risk Score
The Attributes if the Data Source has been selected as SentinelOne.
- Antivirus Agent Outdated
- Device Infected
- Disk Encryption
- Agent Installed
- Operating System
Condition can be is any of or is equal to depending on the Attribute you have selected.
Pass Value: Define the expected value that the attribute must have to pass the check. It can two options, True and False.
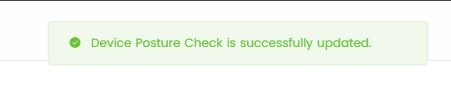
After you define the Attribute successfully, you will see a pop-up as shown in the image below.
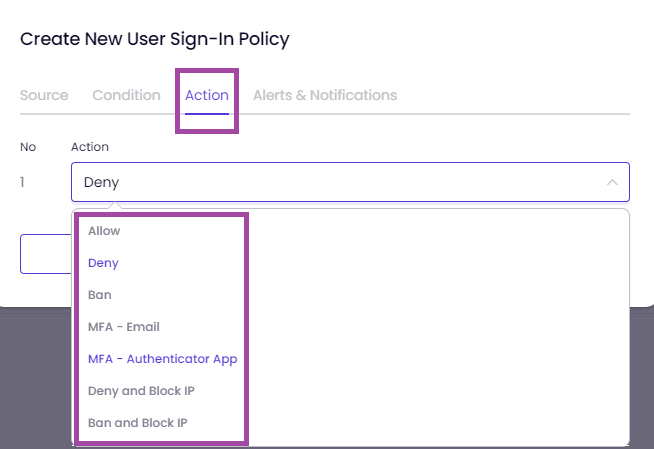
After completing the Device Posture Checks process, you can use ZTNA to apply some policies for the users. To be able to do it, you need to go to the page Zero Trust Security -> Behaviors -> Create New as shown in the image below.
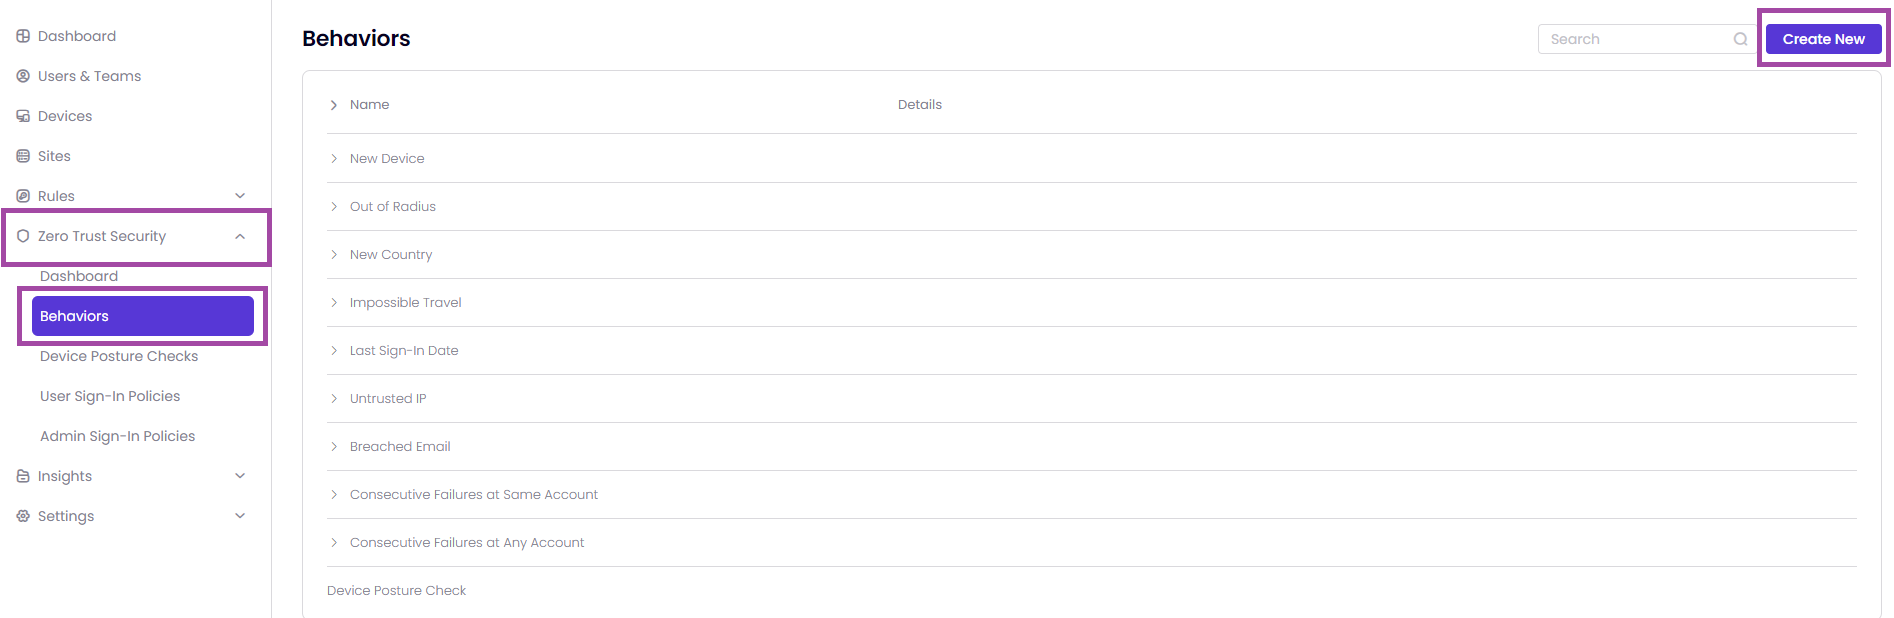
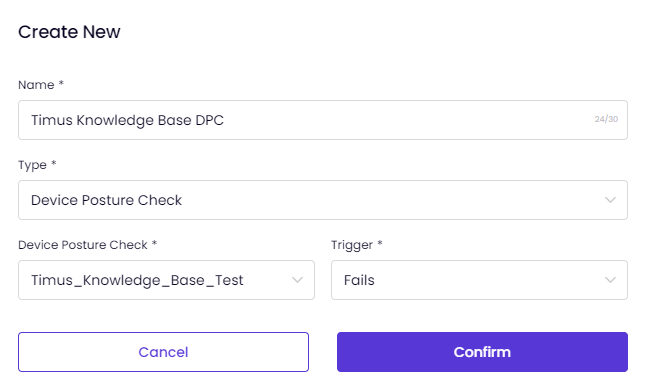
Once you click on Create New, you need to enter a Name and select Device Posture Check as a Type.
And, you need to select your Device Posture Check, which you have named it, and decide if the Trigger is Passes or Fails as shown in the image below.
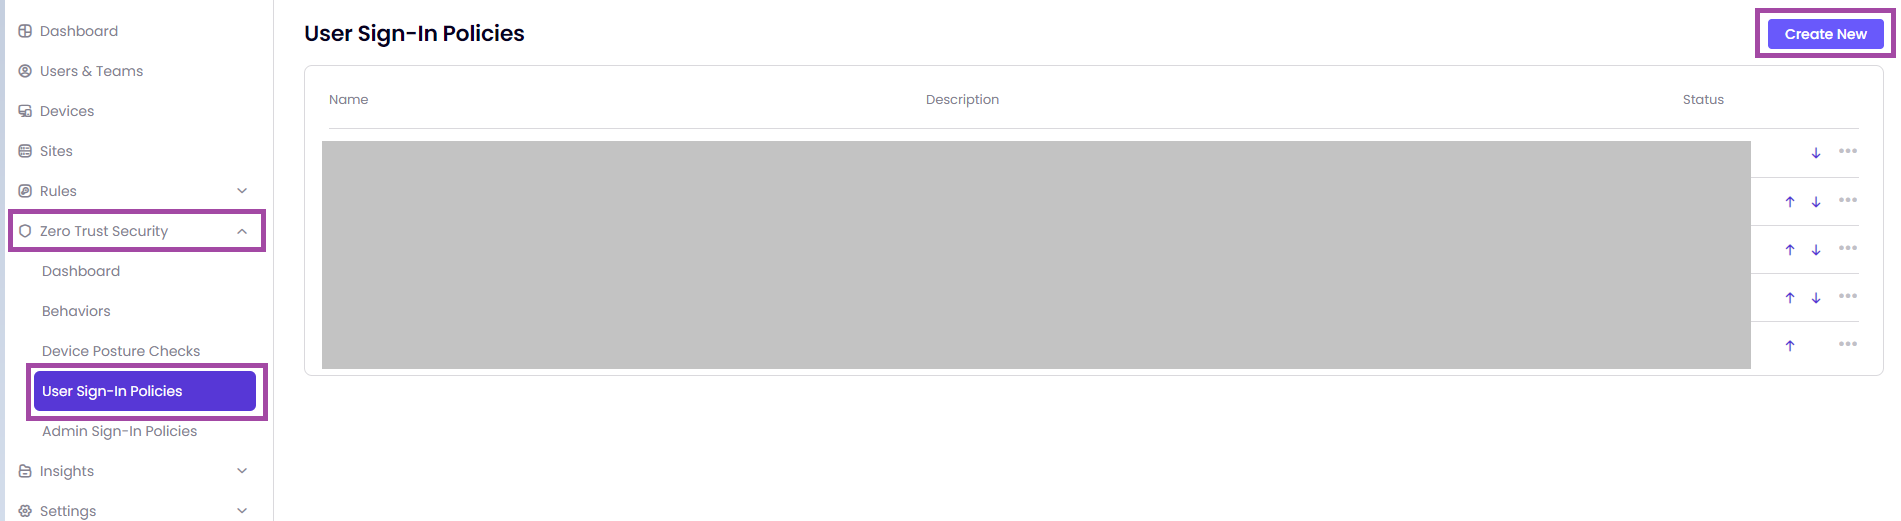
After creating the behavior, you need to go to the page Zero Trust Security -> User Sign-in Policies -> Create New as shown in the image below.
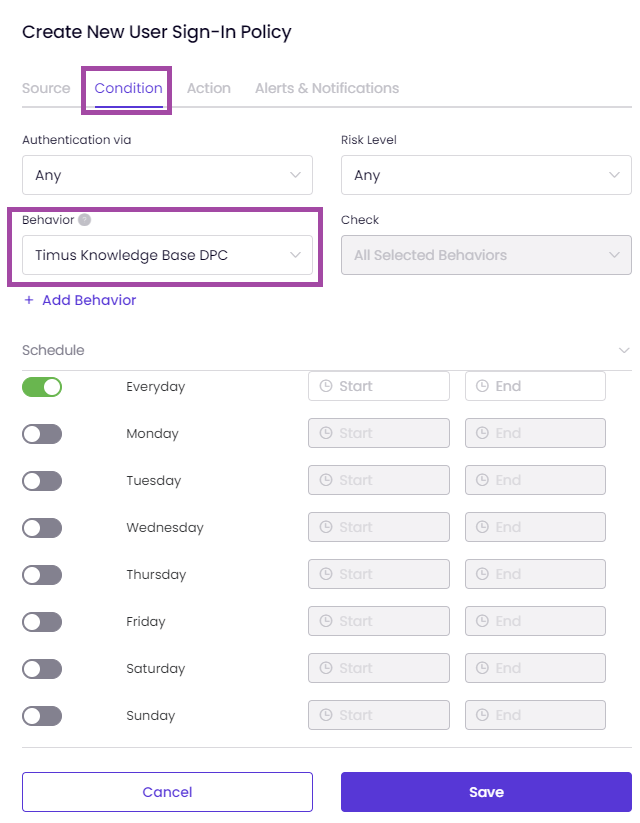
After clicking on Create New, you will be able to see the pop-up, which will allow you to define some ZTNA policies based on the behavior, which you have created, based on the Device Posture Check.
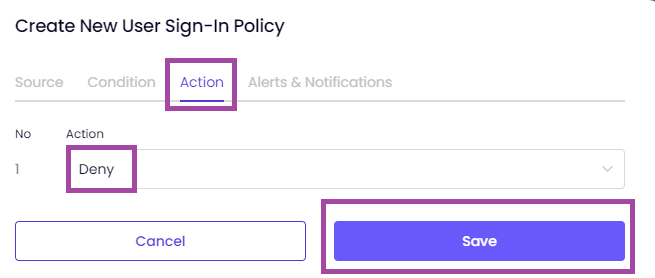
You can modify the example policy as shown in the image below according to your needs.
Here is an example ZTNA policy based on the Device Posture Check below.

If you would like to get more details regarding ZTNA policies in general, you can take a look at the article User Sign-In Policy.
-
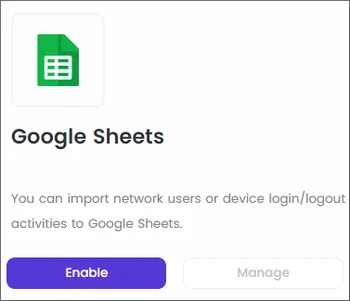
Google Sheets
See moreThis article explains the process of enabling Google Sheets on Timus Manager.
Timus Manager integration lets you import network users or device login/ logout activities to Google Sheets.- Click Enable.
- Click the Authorize button.
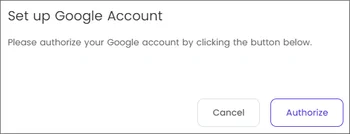
- This will redirect you to the page where you can complete the synchronization of your Google account with Timus.
- Click Enable.
-
Google Workspace
See moreThis article explains how you can integrate Timus with Google Workspace to enable users to log into your corporate network using their Google Workspace credentials.Use your Google credentials in Timus applications.To integrate your Google Workspace users with Timus and allow them to log in to your network using their Google credentials, you need to configure Google Workspace through Google Cloud Console:Go to the Manage Resources page in the Google Cloud console. https://console.cloud.google.com/cloud-resource-manager- On the Select Organization drop-down list at the top of the page, Select the organization resource in which you want to create a project.
- Click Create Project.
- In the New Project window that appears, enter a Project Name.
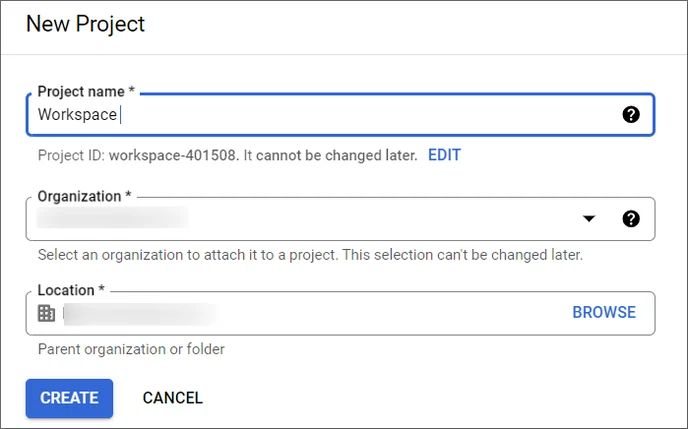
- Select an Organization to attach it to a project.
- Enter the Parent Organization or folder resource in Location.
- When you are finished entering new project details, click Create.
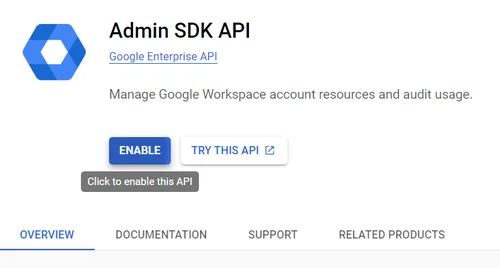
Enable Admin SDK API
- Type Admin SDK in the Search bar of the
- Select the Admin SDK API option in the Marketplace drop-down list at the bottom of the page.

- Click the Enable button on the page that opens.
Client ID
-
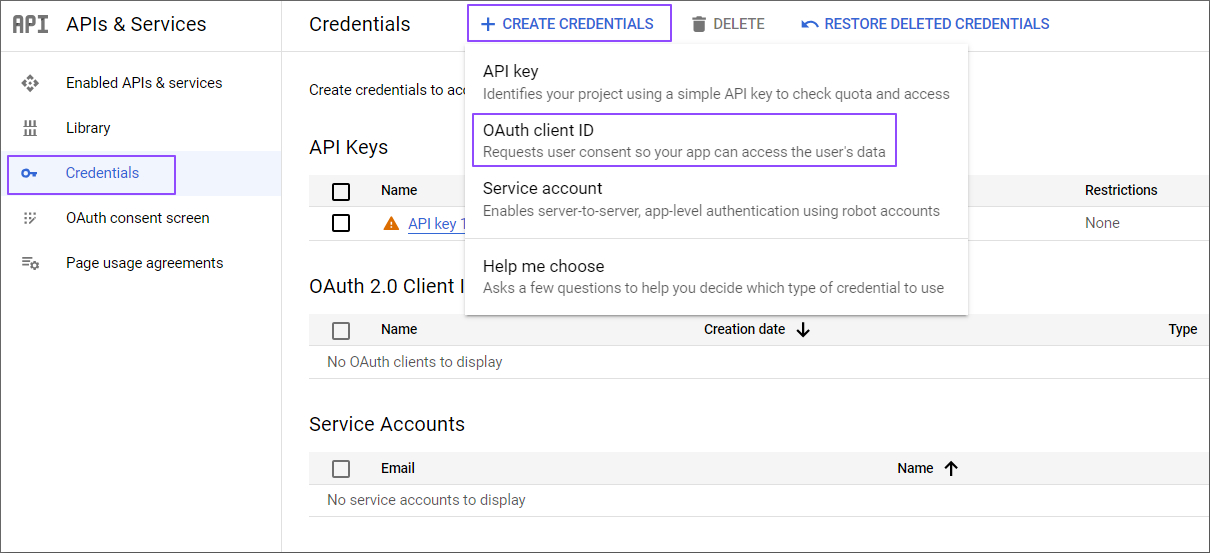
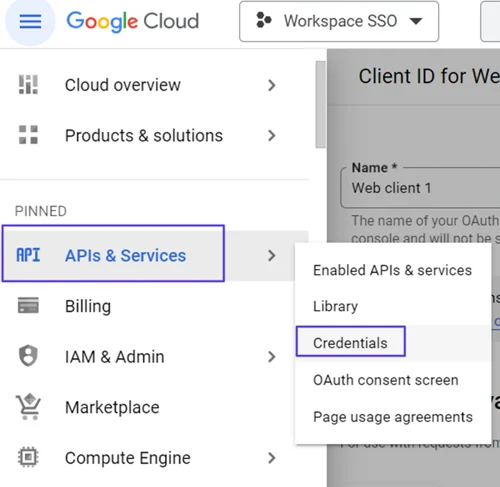
After enabling it, click Credentials from the APIs & Services menu on the left.
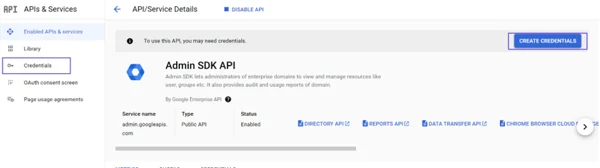
- On the screen that opens, click the Create Credentials button.
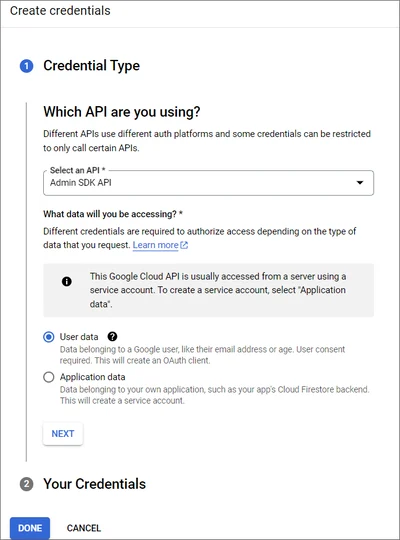
- In the Credential Type pop-up window, you will see the Select an API section. Please select Admin SDK API for this.
- Select User Data for: What data will you be accessing?
- Click Next.
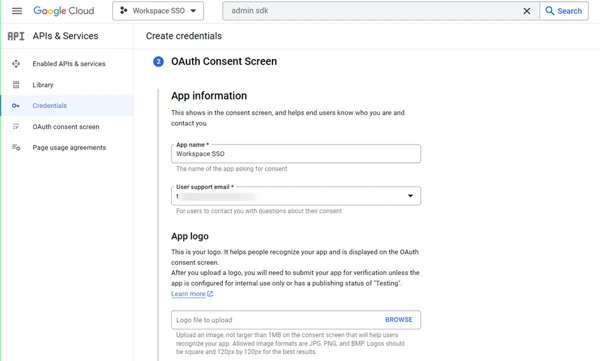
- In the next step, enter App Information on the OAuth Consent Screen.
- Upload a Logo for the application
-
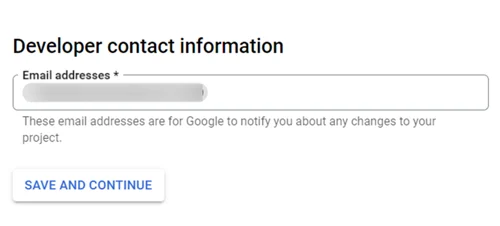
Enter email addresses for Developer Contact Information
-
Select Web application for the OAuth Client ID step.

-
Enter an URL for Authorized redirect URls.
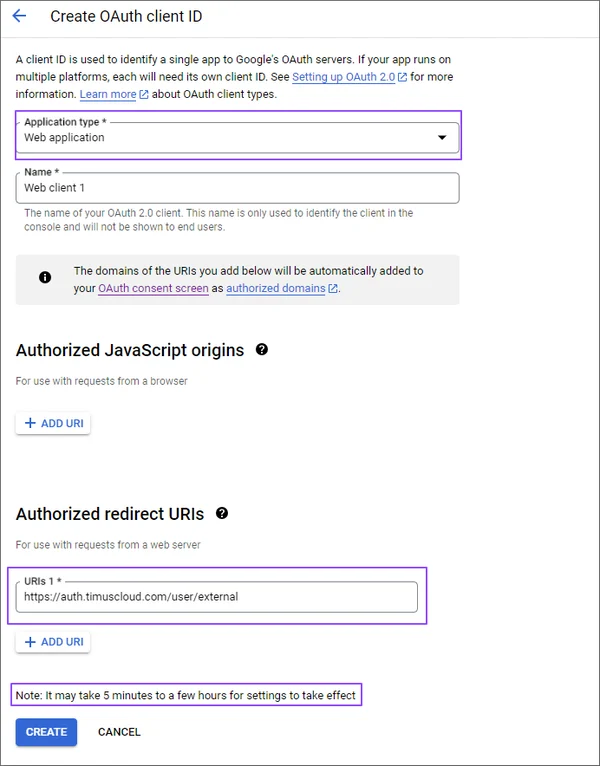
-
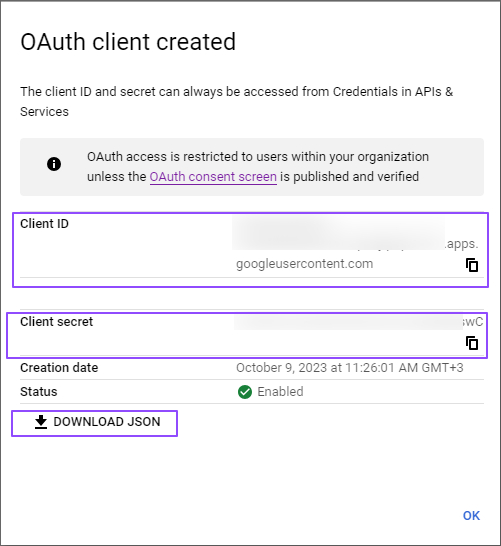
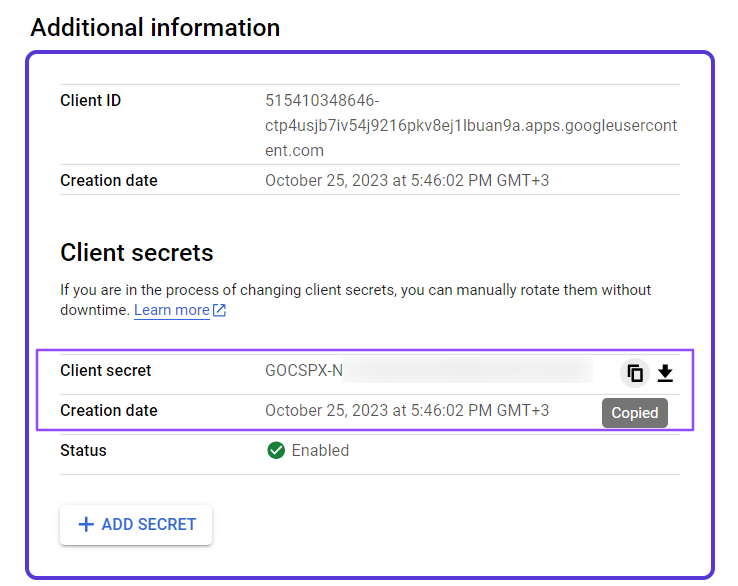
Copy and save Client ID under Download your credentials in the Your Credentials step.

- Click Done.
Client Secret
-
Go to APIs & Services> Credentials screen from the left menu.
- Click on OAuth 2.0 Client IDs you just have created.
- Click on Web Client.
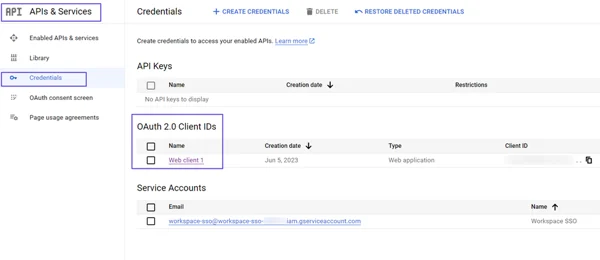
- You can view Client Secret on the left of the Client ID for Web Application screen.
- Copy and save to the client secret before leaving the page.
Service Account
-
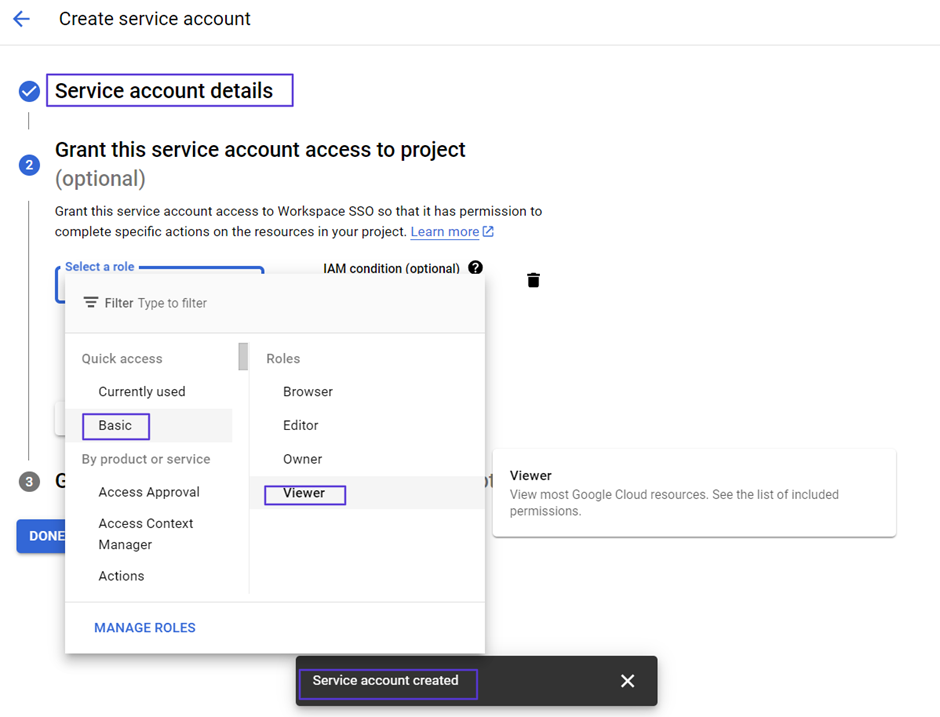
Go to the IAM & Admin> Service Accounts screen from the left menu.

- Click the Create Service Account button.

- In the Service Account Details step on this screen, enter the information requested from you.
- Click Create and Continue.
- In the step Grant this service account access to project, select a role as Basic> Viewer.
- Continue and click Done.
- At the end of the page, you will view the Service account created text box.
JSON Key
- Click on the Service Account name you have just created.
- On this screen that opens, click the KEYS tab.
- Click the ADD KEY button here.
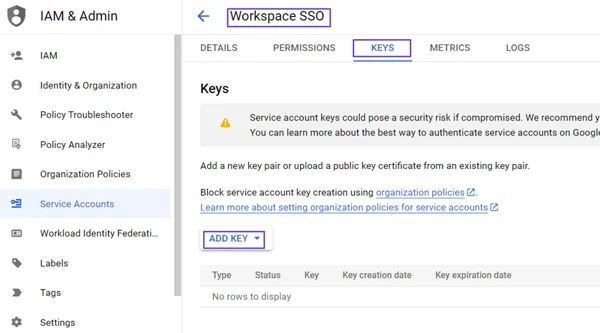
- Select Create New Key from the Create private key for “Workspace” screen that opens.
- Choose JSON as Key type.
- Click Create.
- The JSON key will be automatically downloaded to your device after this step.
Assign Admin Roles
- Open the Google Workspace Admin page https://admin.google.com/
- Click the Account> Admin Roles title on the left menu.
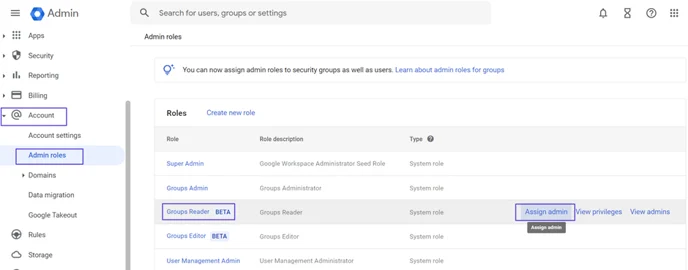
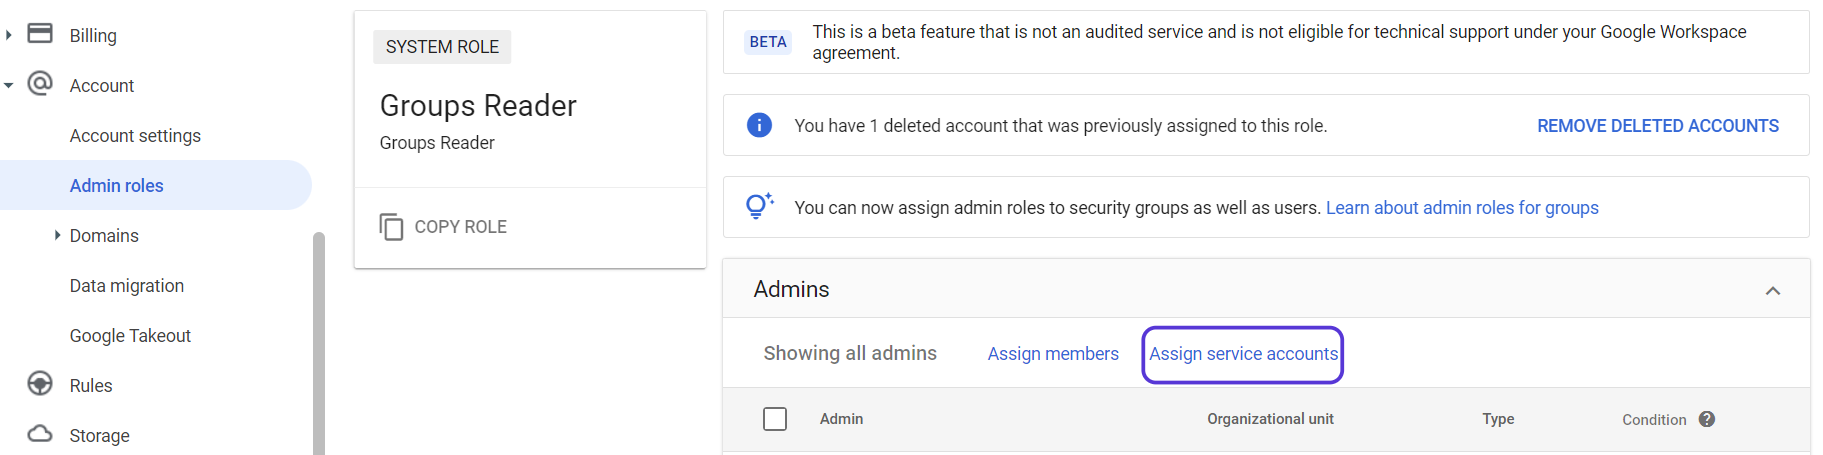
- Select the Group Reader role and and click the Assign Admin button at the right of the page.
- On the Admins section that opens, click the Assign Service Accounts text.
 Click on Assign Service Accounts text on here.
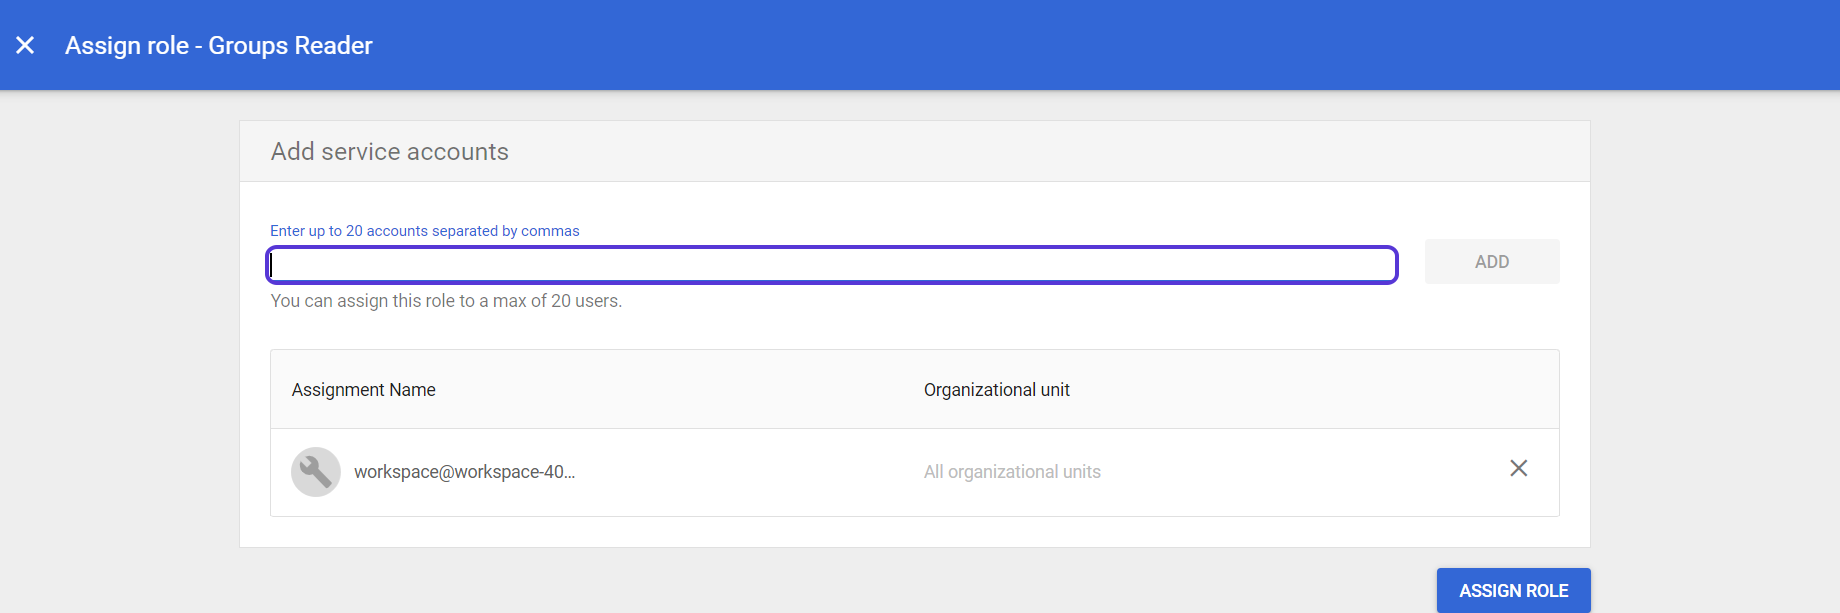
- You will see the Assign role- Groups Reader window on the screen.
- Go to the Service Accounts page. You can see the service account you have just created and its email address under the Email title. Copy this email address and go back to the Assign role- Groups Reader window.
- Paste this email address text into the Assign role- Groups Reader window and click the ADD button.
- Then click the "Assign Role" button to complete the process.
Similarly, select User Management Admin on the same screen and click the Assign Admin button.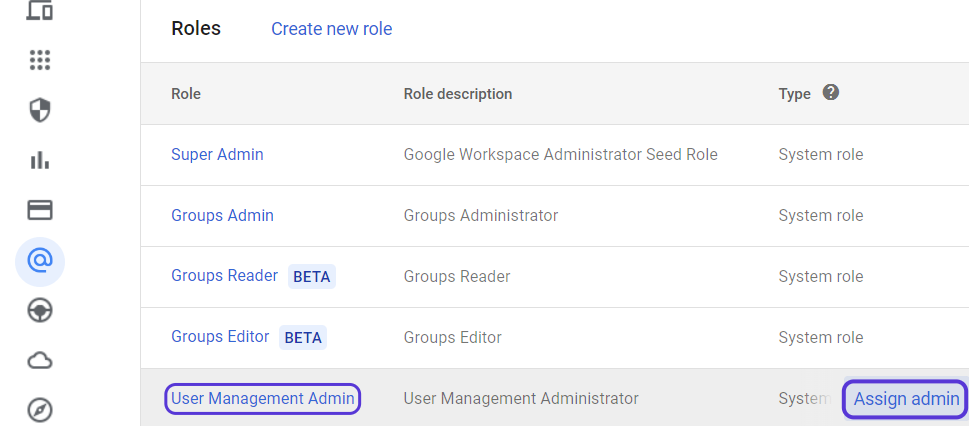 Click on User Management AdminPaste the email address text you have copied into the Assign role-User Management Admin window and click the ADD button. Then click the "Assign Role" button to complete the process.
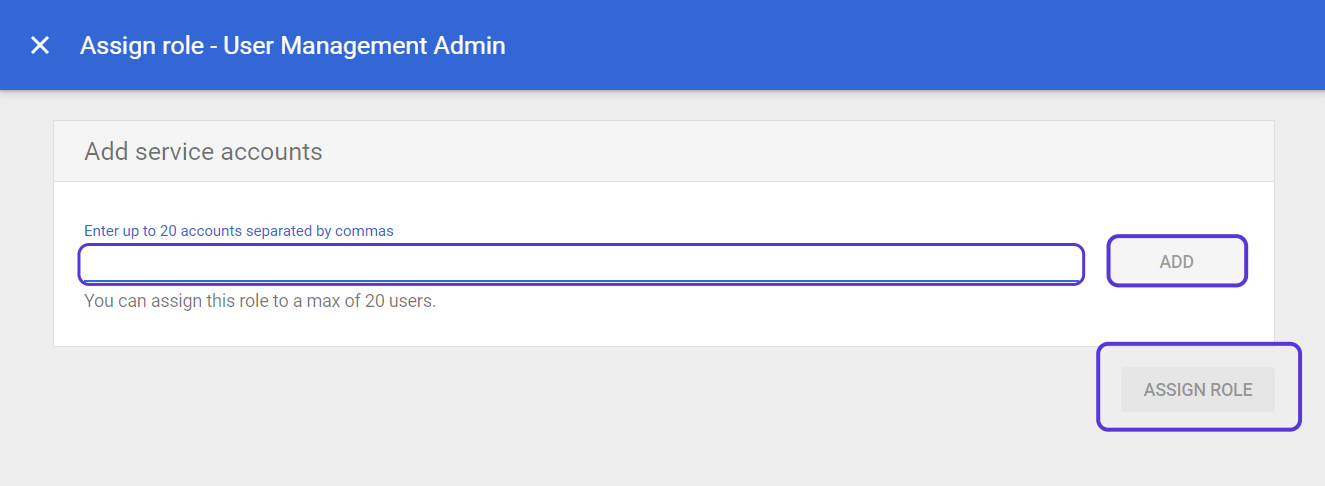 Click on Enter up to 20 accounts separated by commas
Customer ID
To copy and save Customer ID:- Go to Account> the Account Settings page.
- You will view Customer ID on the page.
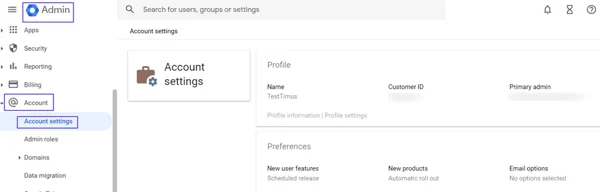
- Please copy and save the ID and open Timus Manager on your browser.
Google Workspace Integration on Timus Manager
To integrate Google Workspace with Timus Manager, follow these steps:- Go to Settings on Timus Manager and select Integrations.
- You will see a list of integrations, including Google Workspace. Click the Enable button next to it.
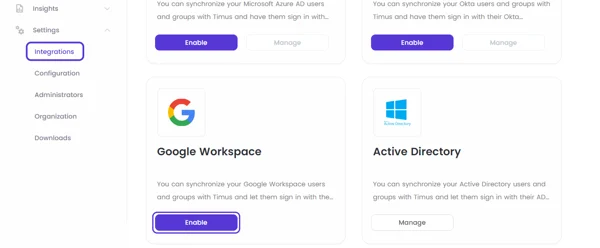 Click on Enable
-
On the Google Workspace Integration screen that opens, enter the information you received from the Google Cloud Console. This includes your Client ID, Client Secret, and Customer ID that you have copied and saved.
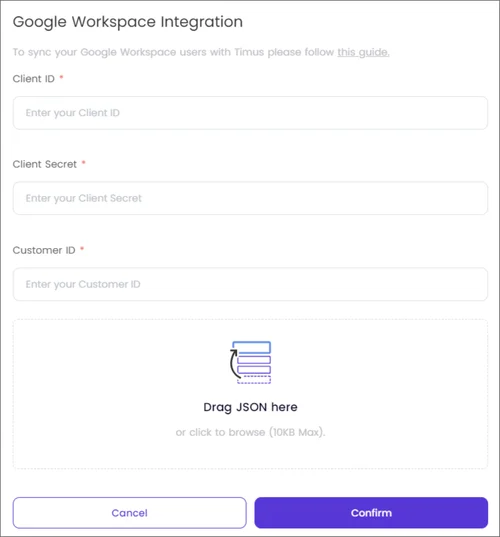
- To synchronize your Google Workspace users with Timus, drag and drop the JSON file (no more than 10 KB) or click to browse and select the file.
- After uploading the file, click Confirm to complete the integration.
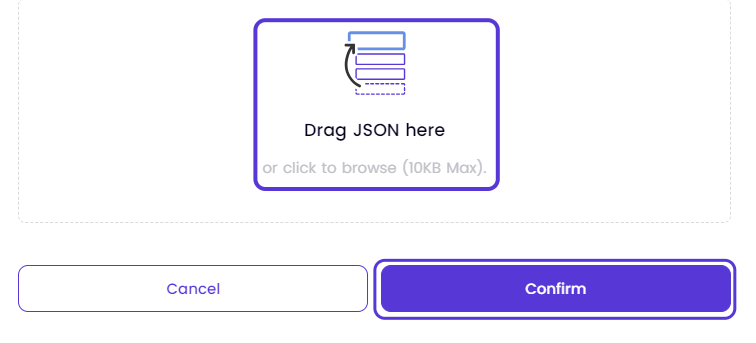 Click on ConfirmThe synchronization process may require up to 30 minutes, but it could potentially take longer.The duration of the synchronization depends on the amount of information you are synchronizing from the Google Workspace.
Google Workspace Integration Preferences
- To enable Synchronization Status, go to the Preferences tab on the integration window.
- In this tab, you can view your Last Synchronization date and select the groups you want to synchronize with the Mapping feature.
- Any users in these groups that you select will be added to the Google Workspace Users team on Timus and tagged with the name of their associated Google Workspace group.
-
Microsoft Entra ID (Azure AD)
See moreThis article explains how you can integrate Timus with Microsoft Entra ID to enable users to sign in to your corporate network using their Microsoft Entra ID(Azure AD) account credentials.
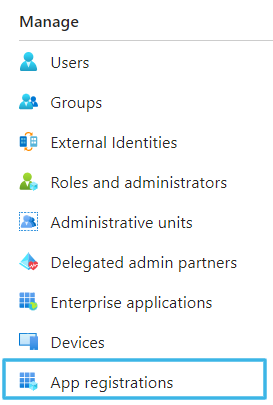
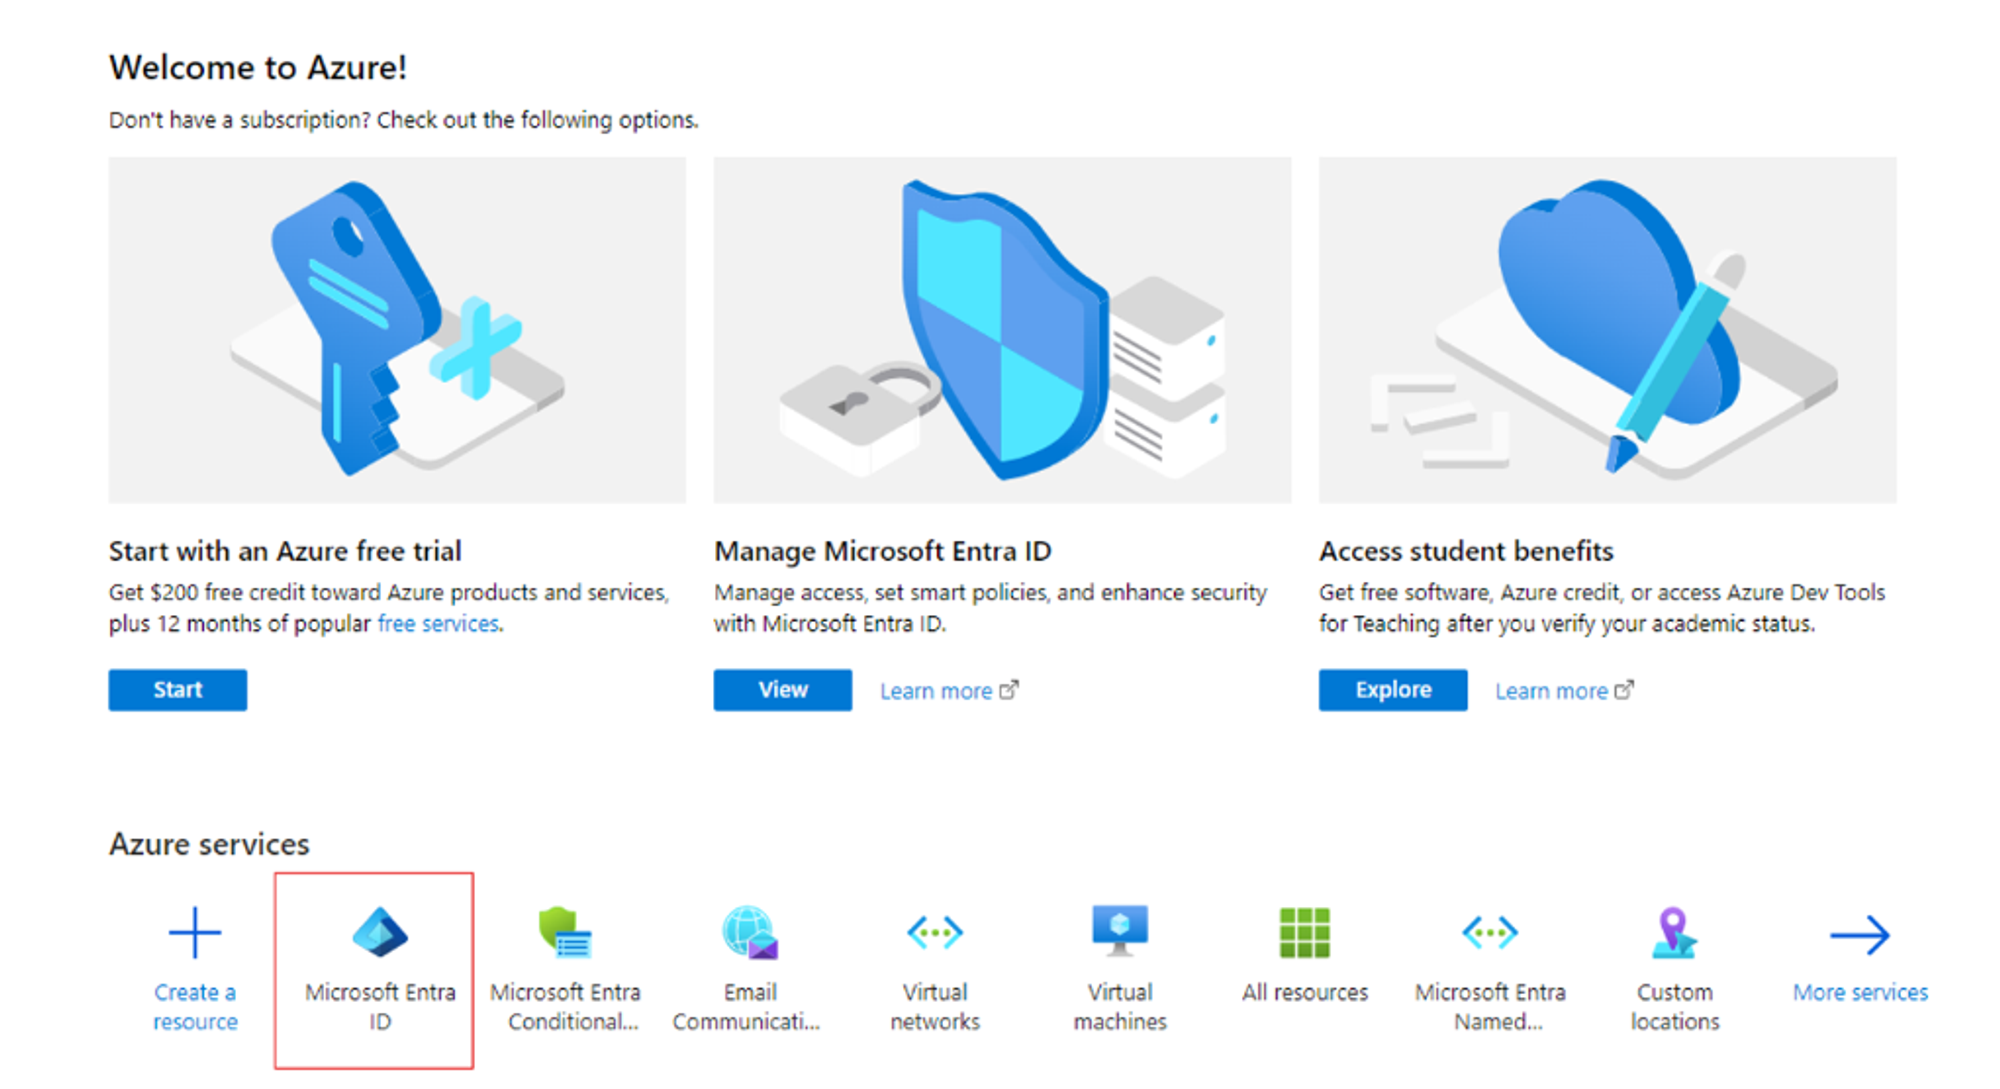
By creating an app registration for Timus on Microsoft Entra ID, you can integrate all your Microsoft Entra ID users with Timus quickly and start monitoring and controlling user logs through Timus Manager.You can always sign in with one of your company's Office 365 accounts at any time to access the Microsoft Entra ID management portal.Follow the steps below to register Timus Manager with Microsoft Entra ID:- Click on Microsoft Entra ID under the heading Microsoft Entra ID Services on the Homepage or select Microsoft Entra ID from the left Portal Menu of the Microsoft Entra ID Portal.

- Select App Registrations from the menu on the left of the open page. Click + New registration.

- Enter a user-facing display name for Timus apps.
- Choose the most suitable option for your account from first three supported account types.
- Accounts in this organizational directory only (Default Directory only - Single tenant)
- Accounts in any organizational directory (Any Microsoft Entra ID directory - Multitenant)
- Accounts in any organizational directory (Any Microsoft Entra ID directory - Multitenant) and personal Microsoft accounts (e.g., Skype, Xbox)
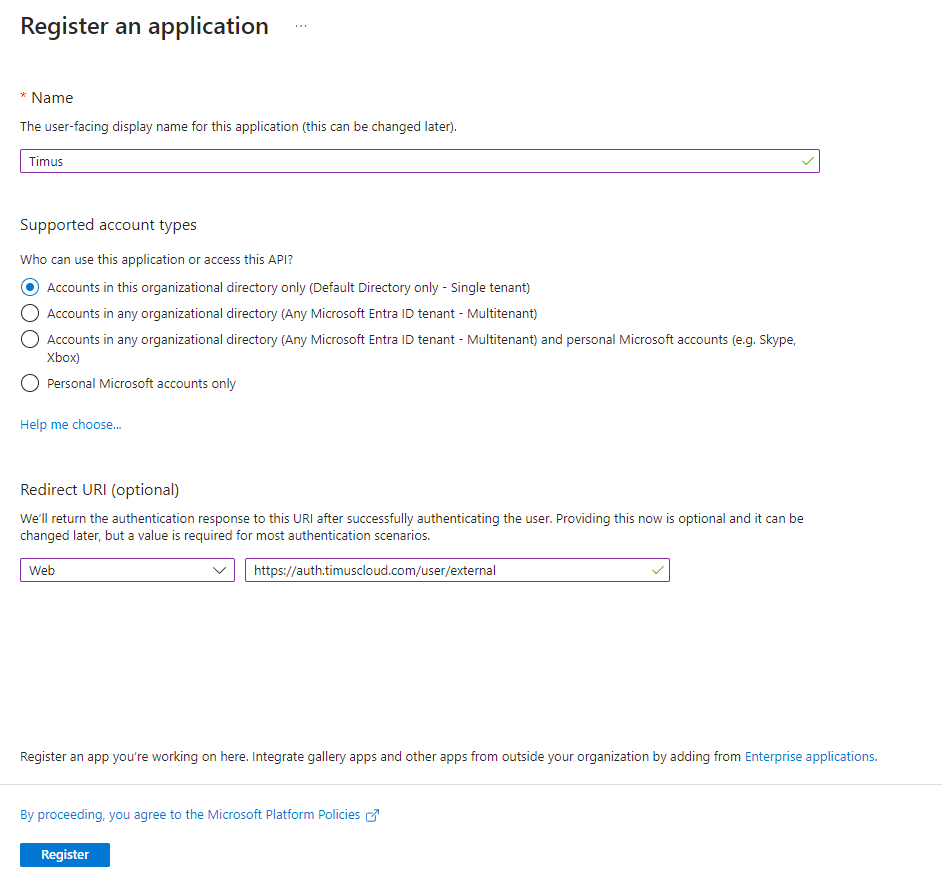
- For Redirect URL, choose a platform. In Timus's case, it would be the Web option. After that, enter this link: https://auth.timuscloud.com/user/external
- Click the Register button.
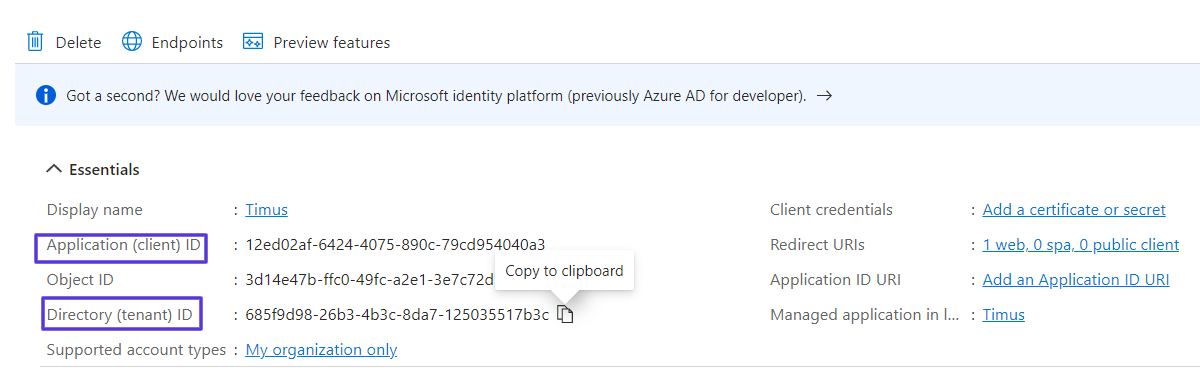
- After you click the register button, you have successfully created a new application on Microsoft Entra ID.
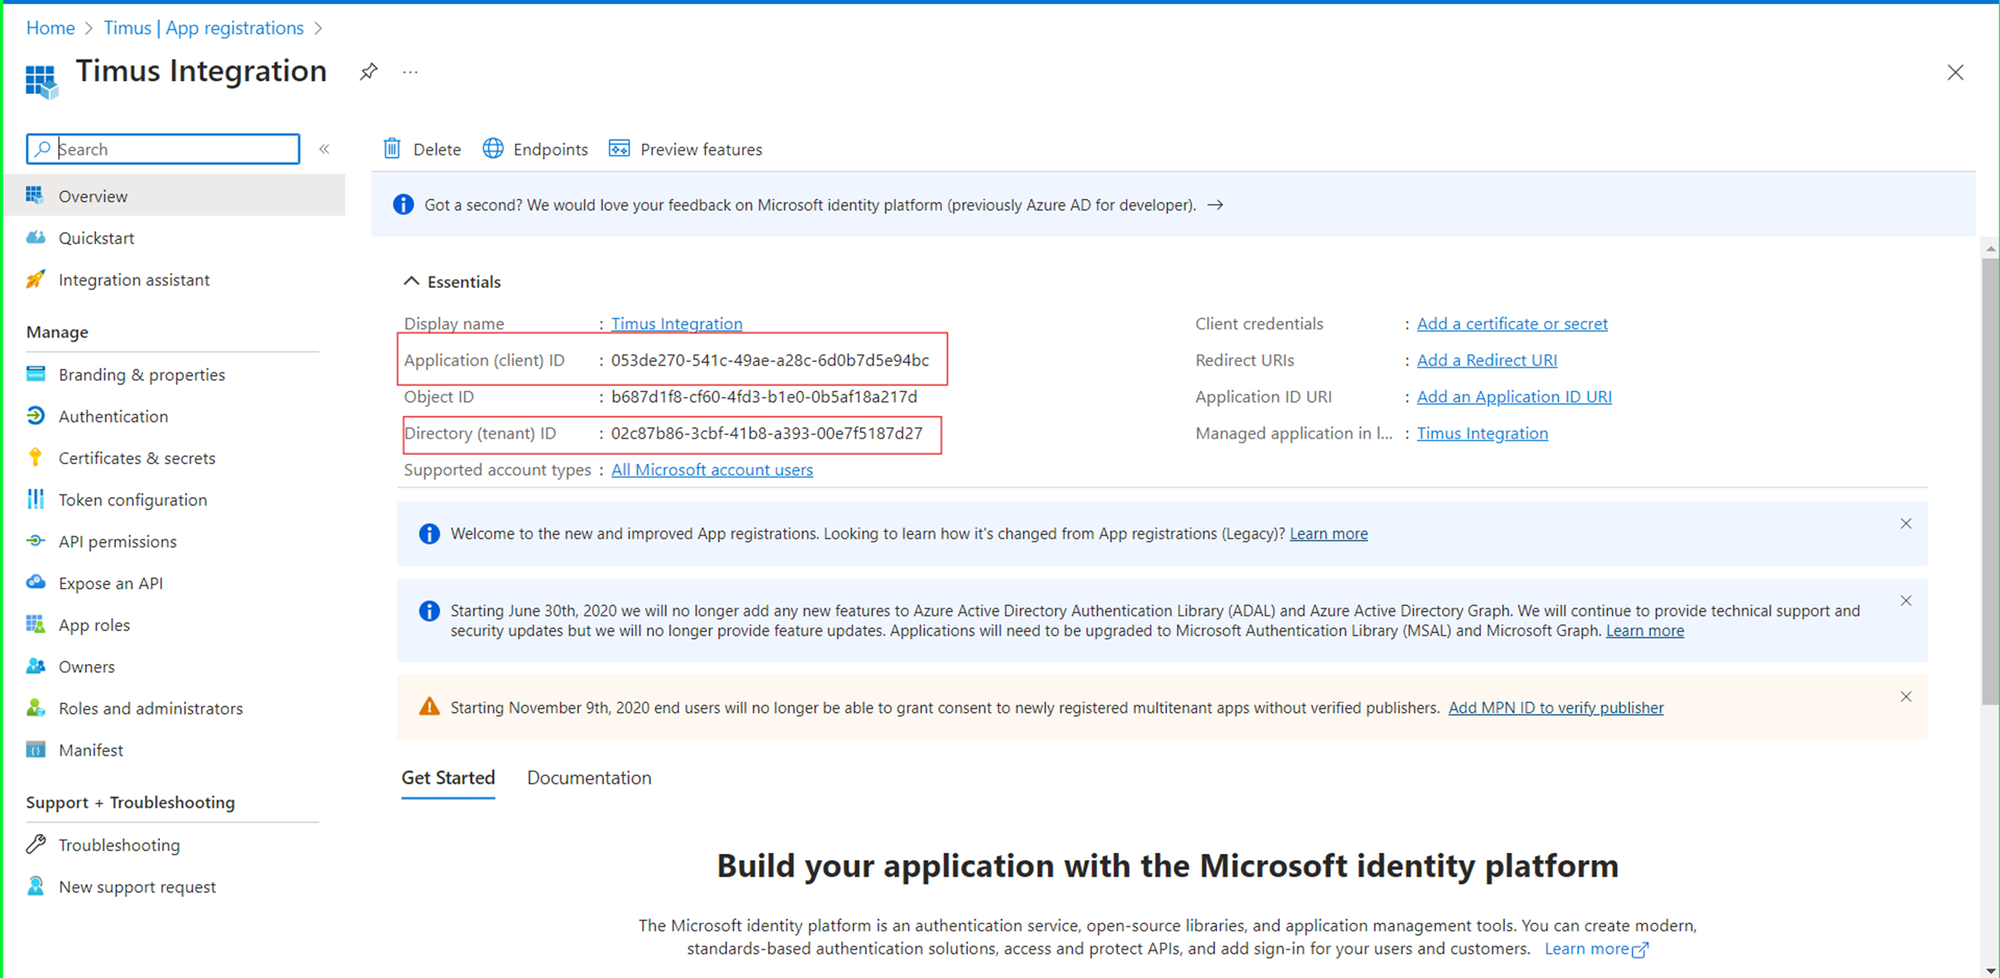
- The opened page displays on the screen with Tenant ID and Client ID, which you need to enter the Microsoft Entra ID Configuration screen on Timus Manager.
-
For Redirect URL, choose a platform. In Timus's case, it would be the Web option. After that, enter this link: https://auth.timuscloud.com/user/externalClick the Register button.
- After you click the register button, you have successfully created a new application on Microsoft Entra ID.
- The opened page displays on the screen with Tenant ID and Client ID, which you need to enter the Microsoft Entra ID Configuration screen on Timus Manager.
-
The opened page displays on the screen with Tenant ID and Client ID, which you need to enter the Microsoft Entra ID Configuration screen on Timus Manager.
- For Client Secret, you see Certificates and Secrets at the far left of the Timus page on the Microsoft Entra ID portal.
- Please click on it and go to this Certificates and Secrets page.
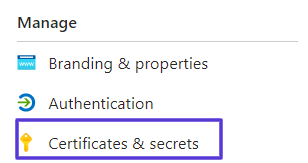
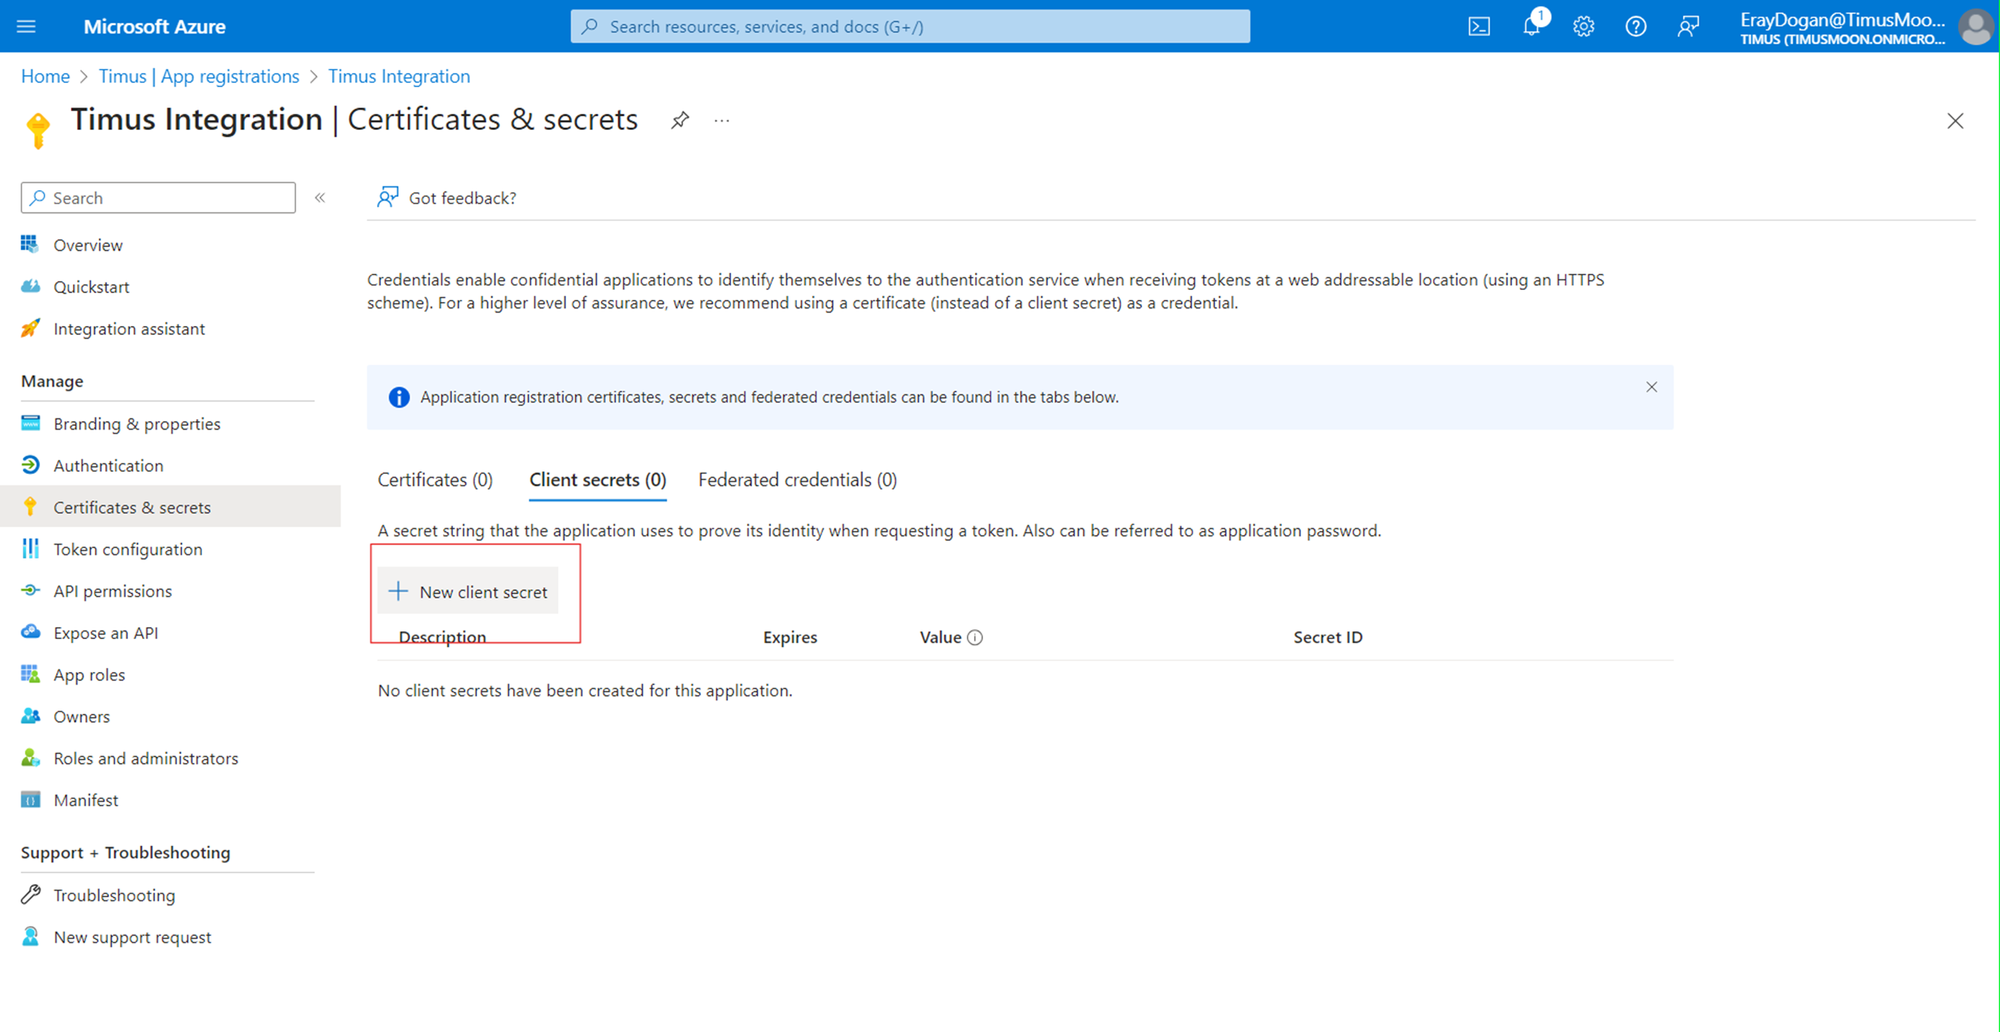
- On this page, click on + New Client Secret.

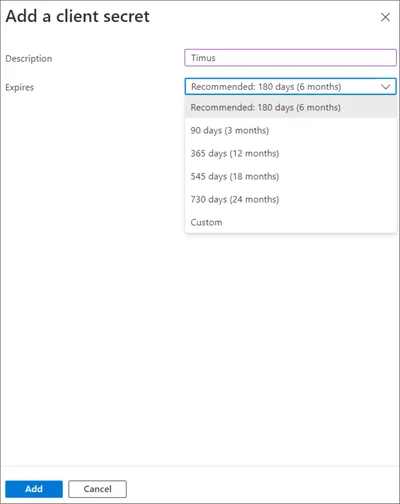
- The Add a Client Secret popup is on the screen.
- Enter a name for the new client secret you are about to create here. Choose an expiration date, which is recommended to be 730 days (24 months) by us.
Microsoft Entra ID does not allow you to create a client secret more than 730 days (24 months), so that you are going to have to renew your client secret after two years.The maximum duration of the client secret on Microsoft Entra ID is two years even if you choose custom expire date as shown in the image below: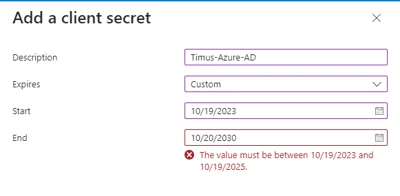
- Click Add.
- After clicking Add, you will see Client Secret Value on the page.
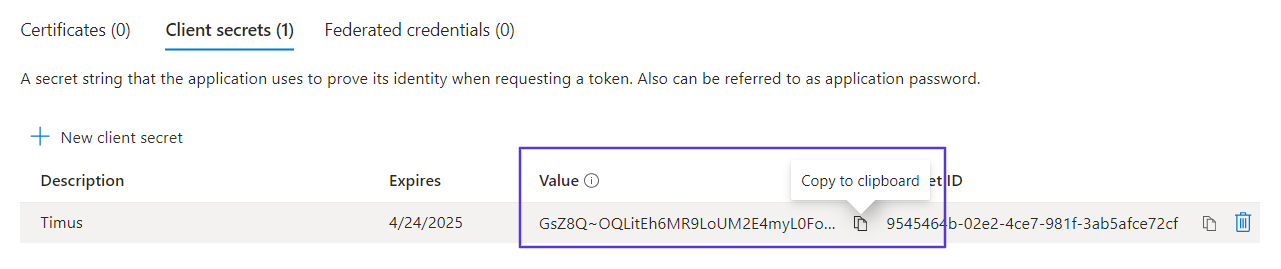 Client secret values cannot be viewed, except for immediately after creation. Be sure to copy and save the secret when created before leaving the page.Do not forget to grant API permissions before exiting the Microsoft Entra ID dashboard:
Please note that Delegated: User.Read permission has to be granted by default. Otherwise, the sync cannot be done successfully.
- Click App Registrations from the shortcut list on the left of the Dashboard.
- Click on the app you created for Timus on the page.
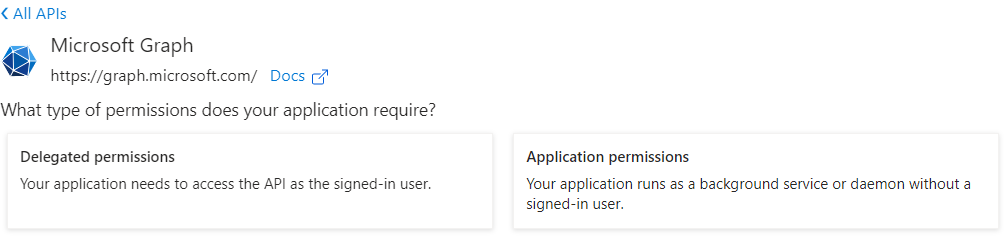
- Click on API Permissions that you will view on the left of the page that opens.
- Select Application Permissions.
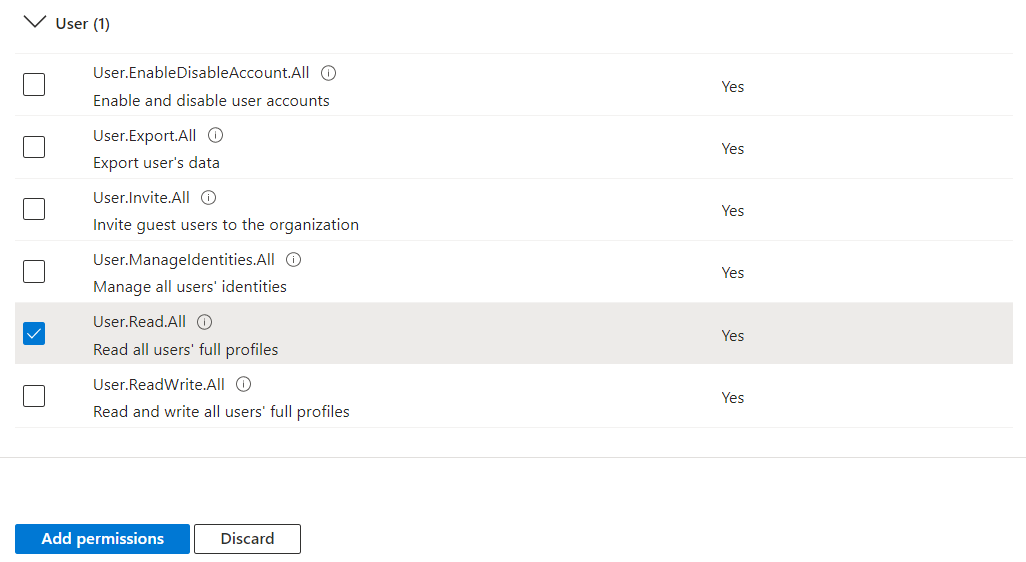
- Click User from the list under the Select Permissions heading and check User.Read.All.
- Then, click Group from the list and check Group.Read.All.
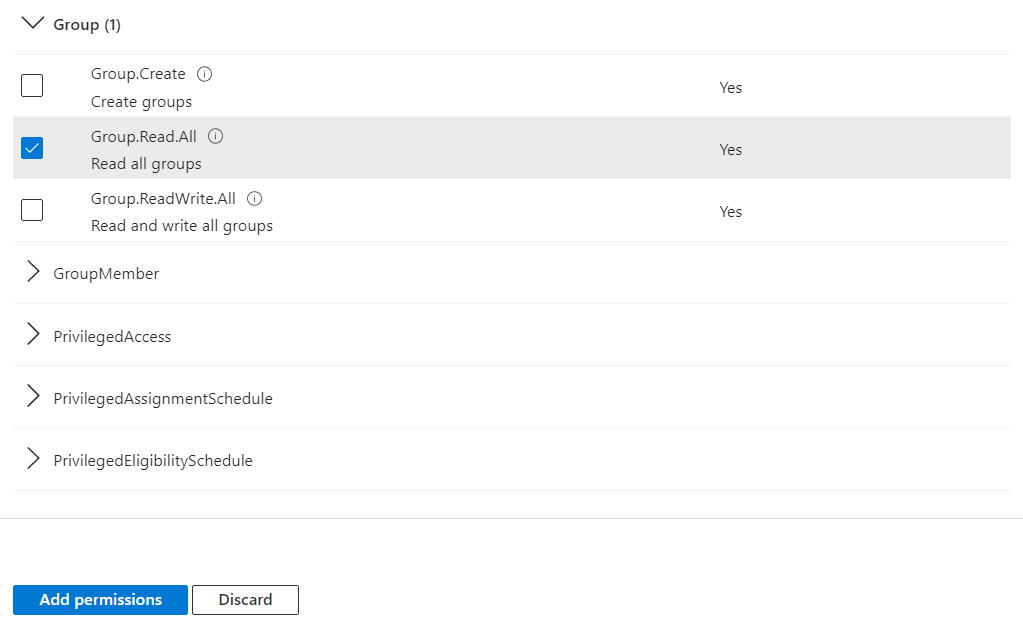
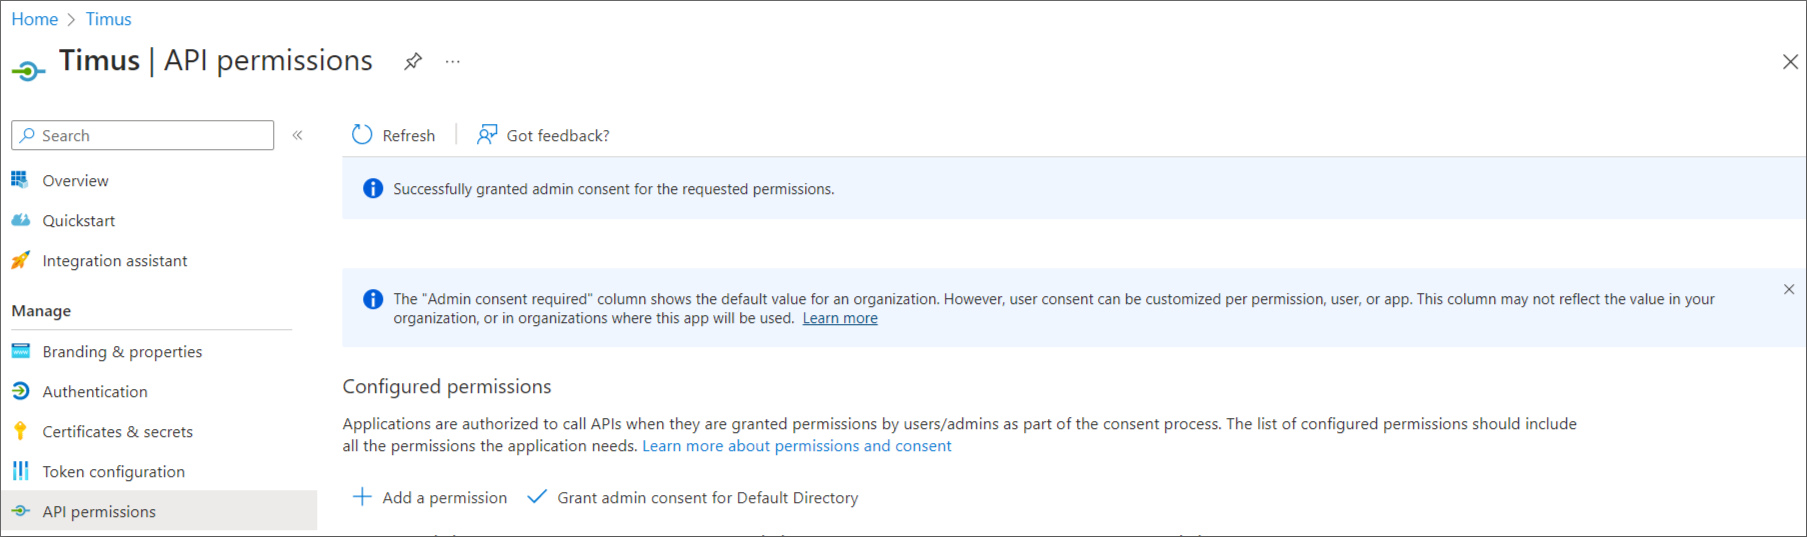
- Click the Add Permissions button.
- Grant Admin Consent for Default Directory from the same screen for your added API permissions.

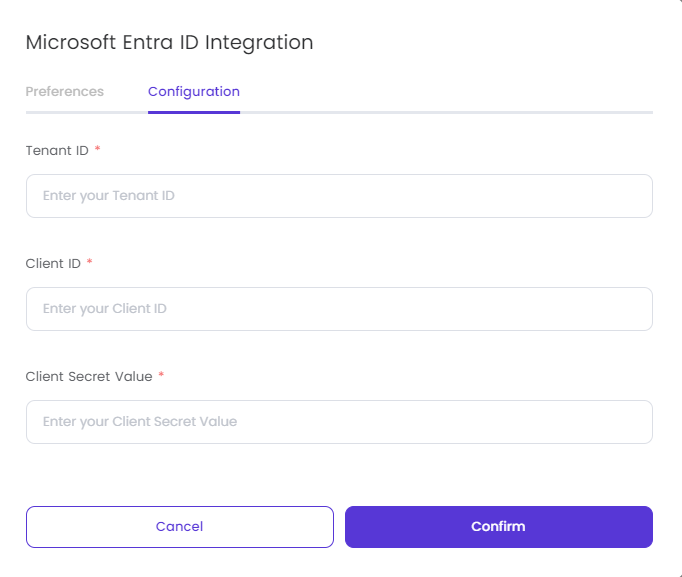
- Go to Timus Manager -> Settings -> Integrations -> Microsoft Entra ID -> Enable screen.
- Copy and Paste Tenant ID, Client ID, and Client Secret Value you have created into the empty fields on the Microsoft Entra ID Integration screen.
- Click Confirm.
 In the Microsoft Entra ID Integration window, you will see the two tabs, Preferences and Configuration.
- Enable Synchronization ON from the Preferences.
- Under Mapping, Choose the Microsoft Entra ID groups you want to synchronize. Users in the groups you choose will be added to the Microsoft Entra ID Users team on Timus.
- Click Confirm.
- You can change your Microsoft Entra ID credentials from the Configuration page.
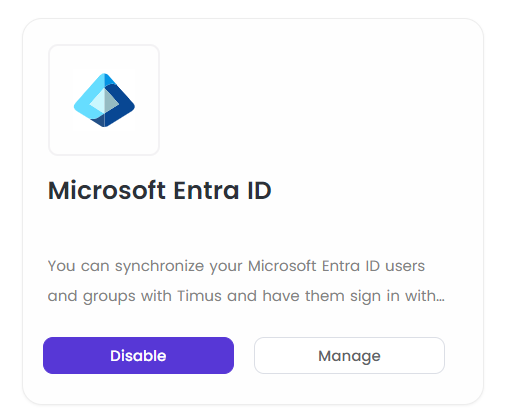
- You can disable the integration with the Disable Integration button from the Integrations page.
You have integrated your Timus and Microsoft Entra ID Users.The synchronization process may require up to 30 minutes, but it could potentially take longer.The duration of the synchronization depends on the amount of information you are synchronizing from the Microsoft Entra ID. -
Microsoft Defender for Endpoint Integration Guide
See moreMicrosoft Defender for Endpoint Integration Guide:
To integrate Microsoft Defender EPP with Timus, you need the following Microsoft products:- Microsoft 365 Business Premium: This includes advanced security and device management capabilities.
- Azure Active Directory: For identity and access management.
- Microsoft Defender for Endpoint: Provides the necessary security features for endpoint protection.
Defender Endpoint Protection must be up and running on the devices you want to sync. Please checkout following link to deploy Defender to your devices.Click on the “New Registration” and register a new application.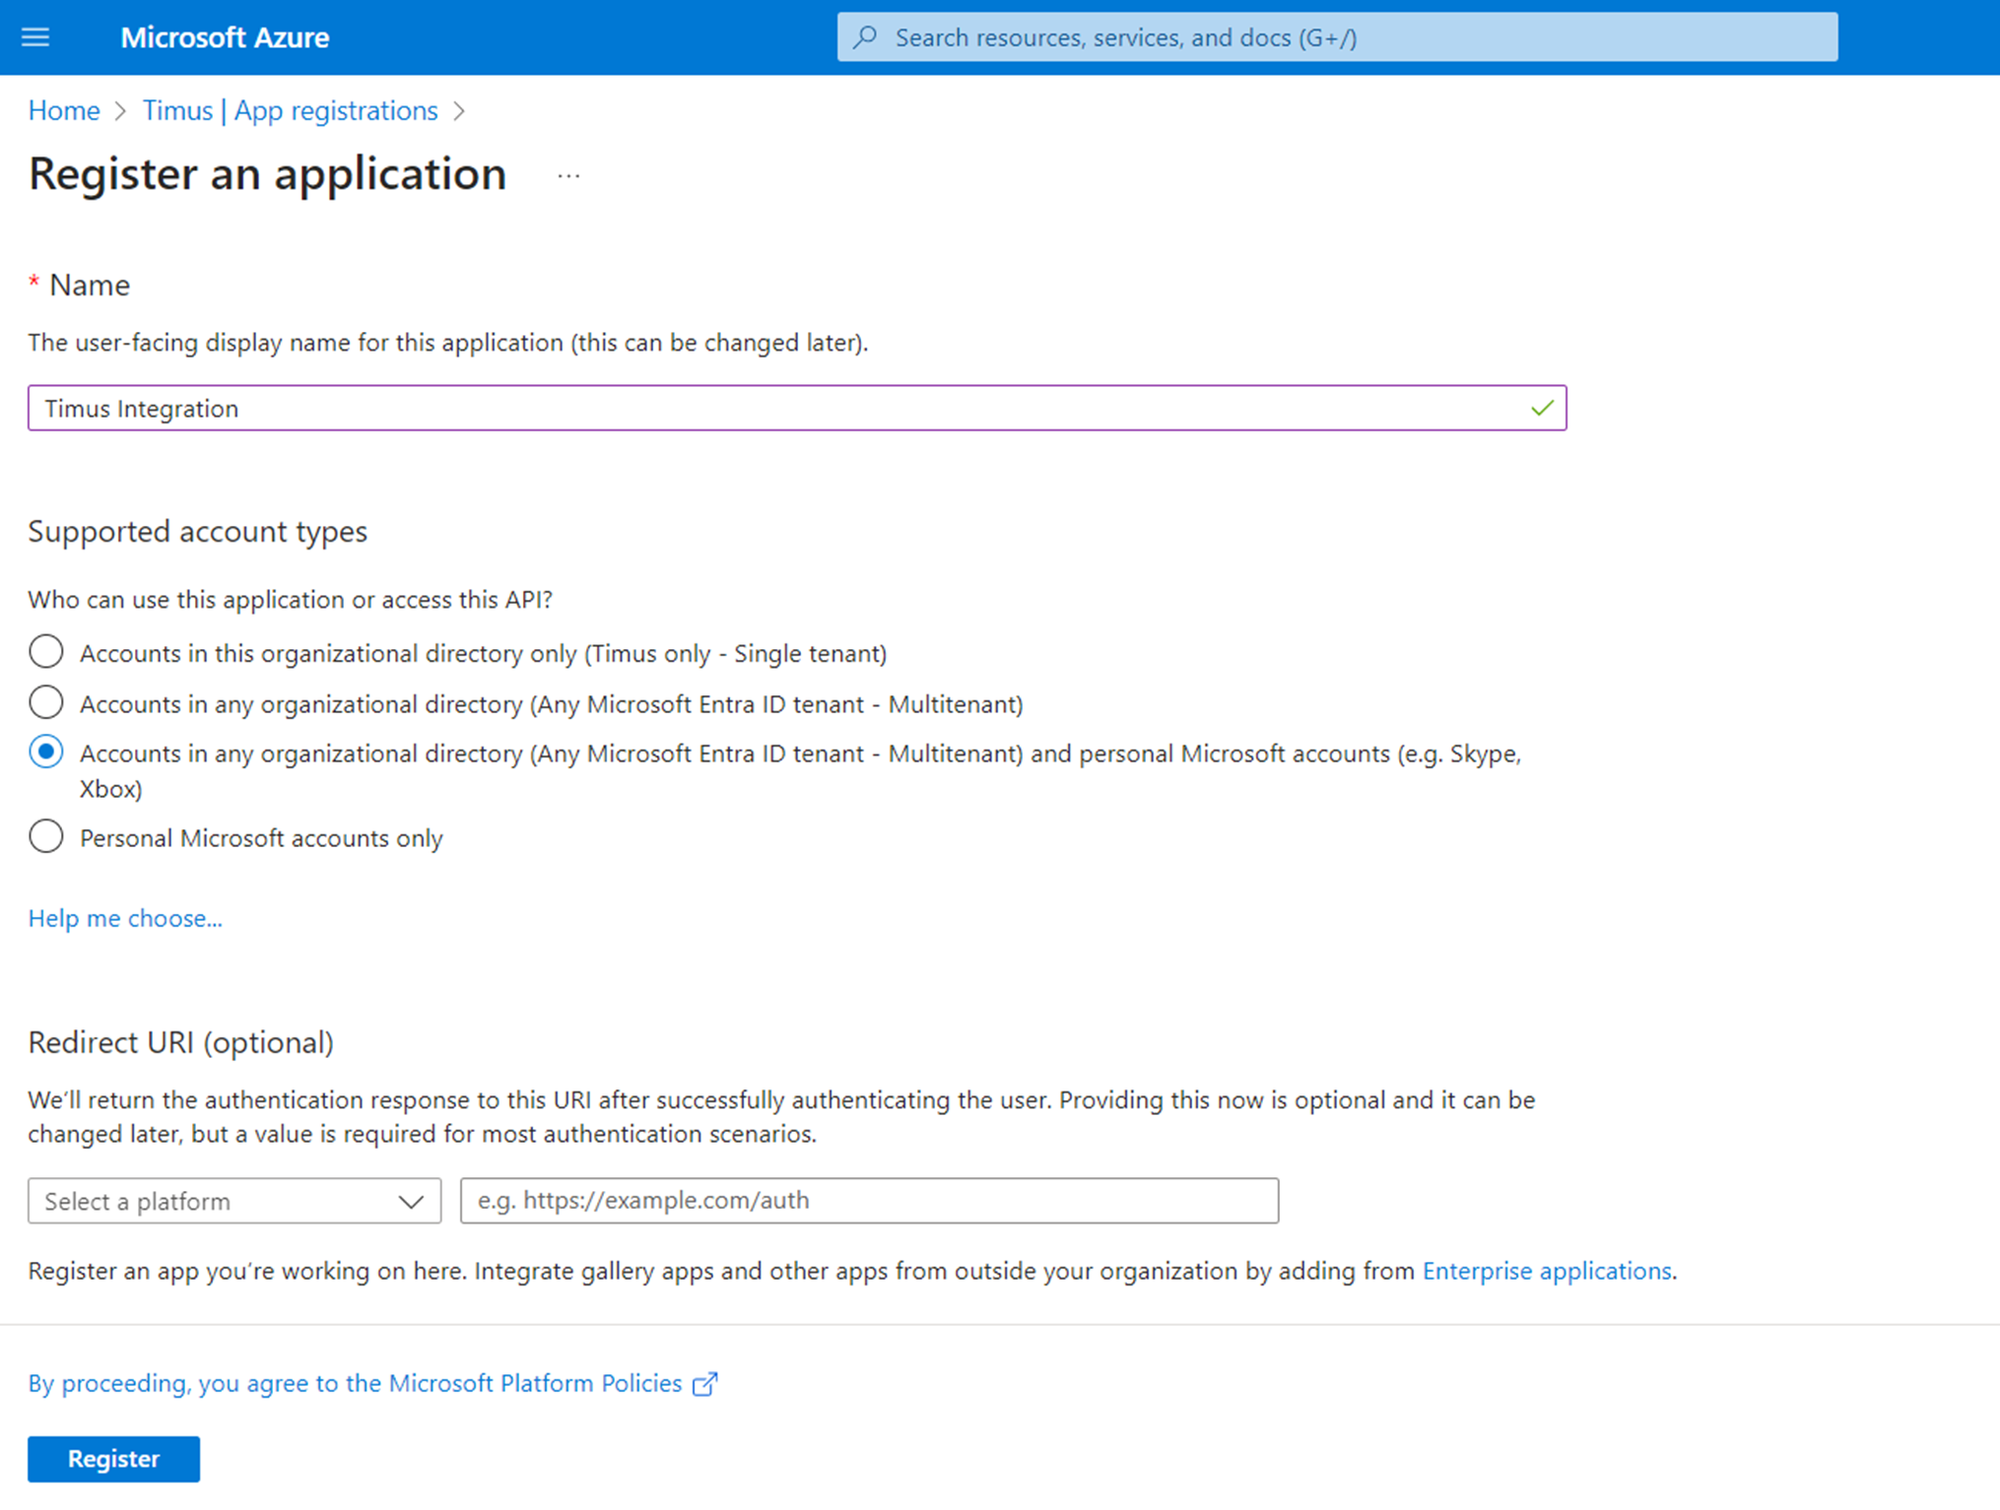
- After doing that you will get your Client and Tenant ID’s.,
- To get client secret value, you will need to click on the “Certificates & secrets” button. And create a new client secret.
- Note: This secret is shown once it is created. Please note it carefully.
-
After noting down Client Secret, Tenant ID and Client ID, you need to give following permissions on Entra ID. To do that please navigate to “API Permissions” and click on the “Add a permission” button.
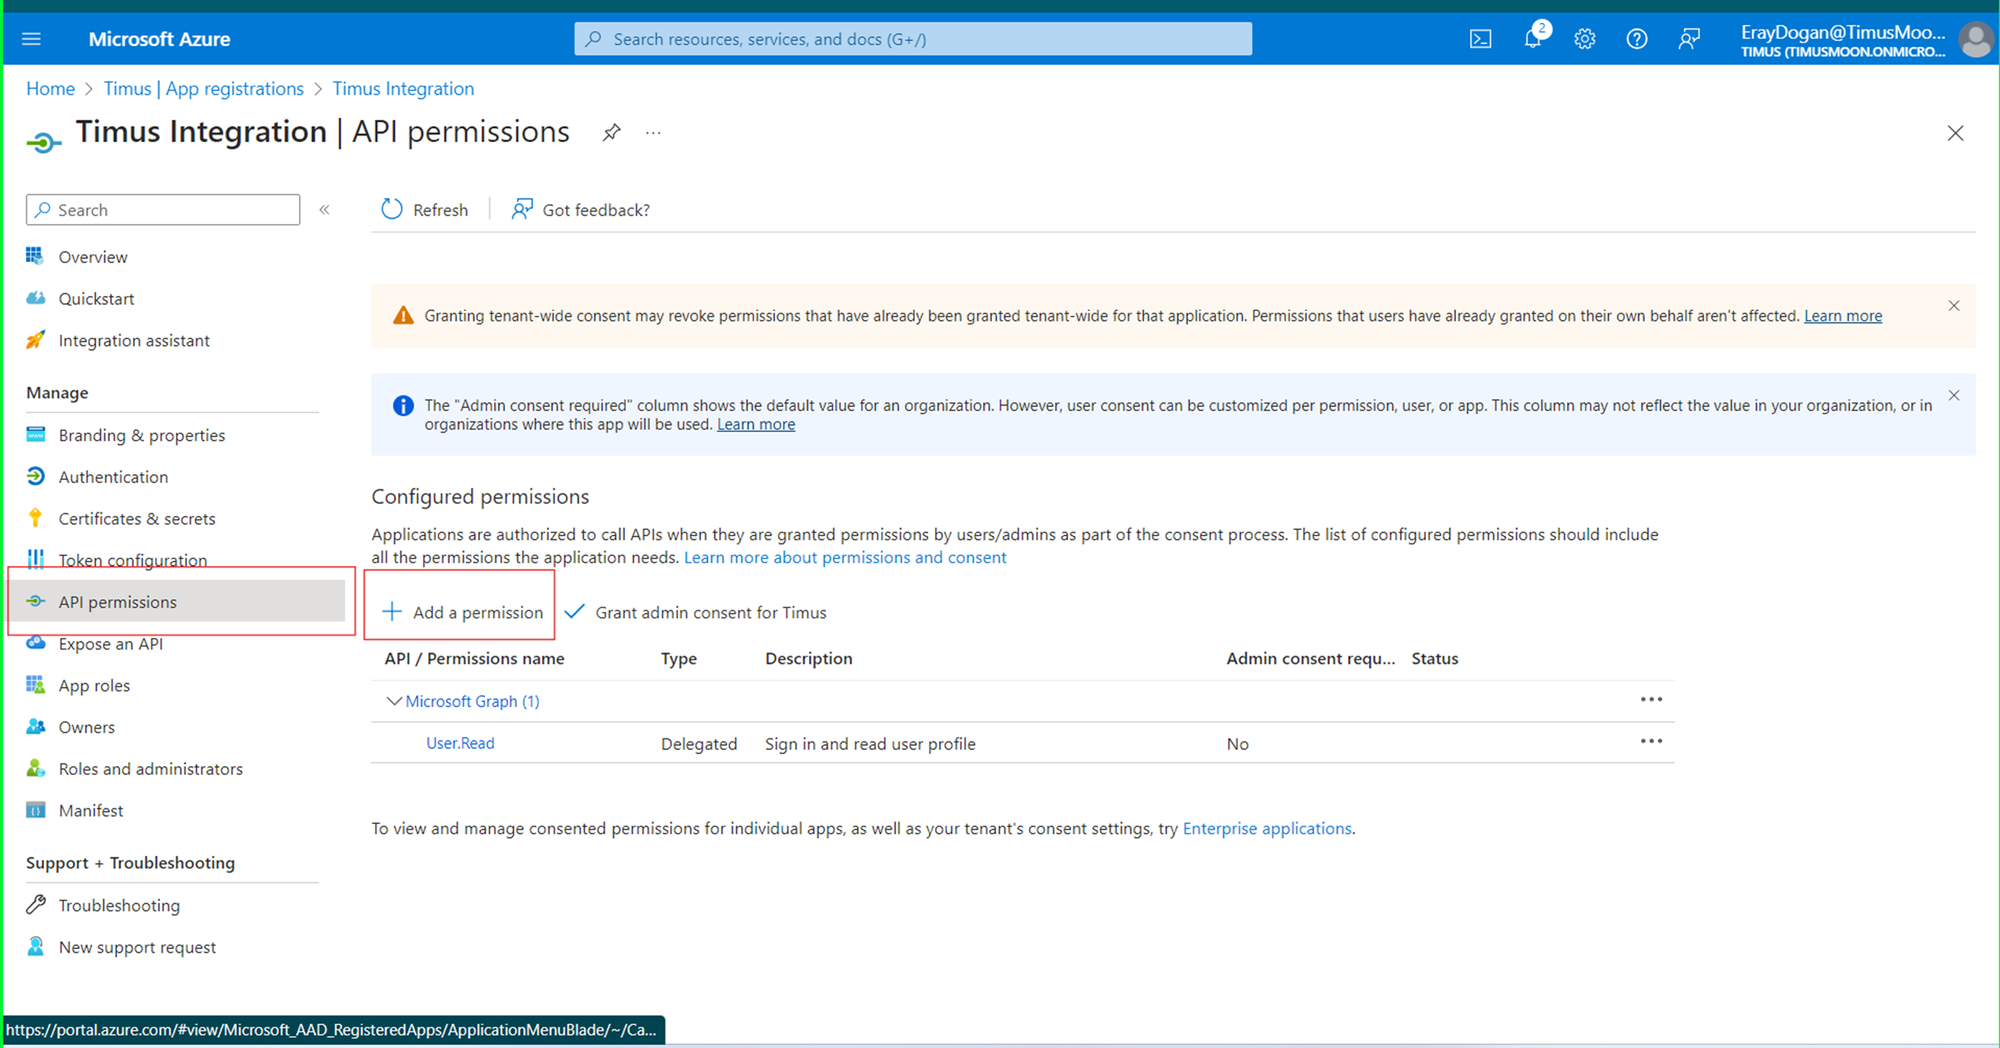
-
Move on to the “APIs my organization uses” tab and search for “WindowsDefenderATP” and click on it.
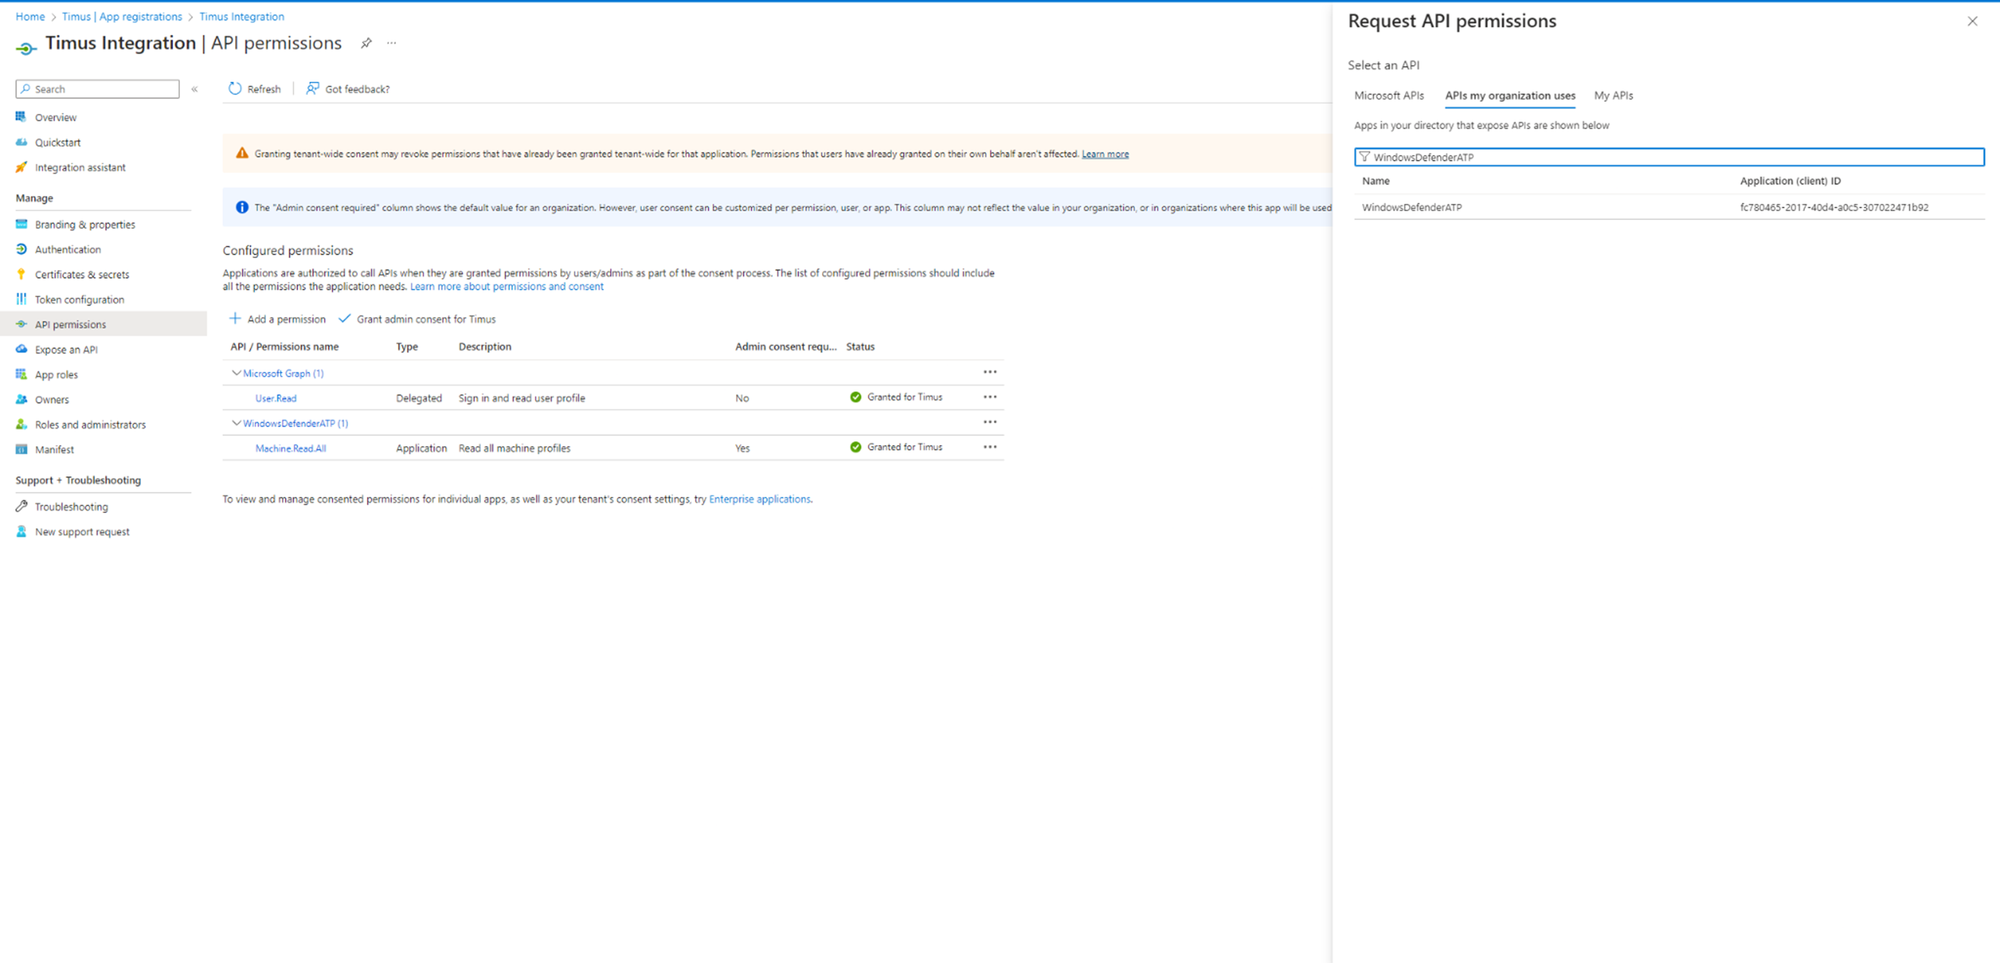
-
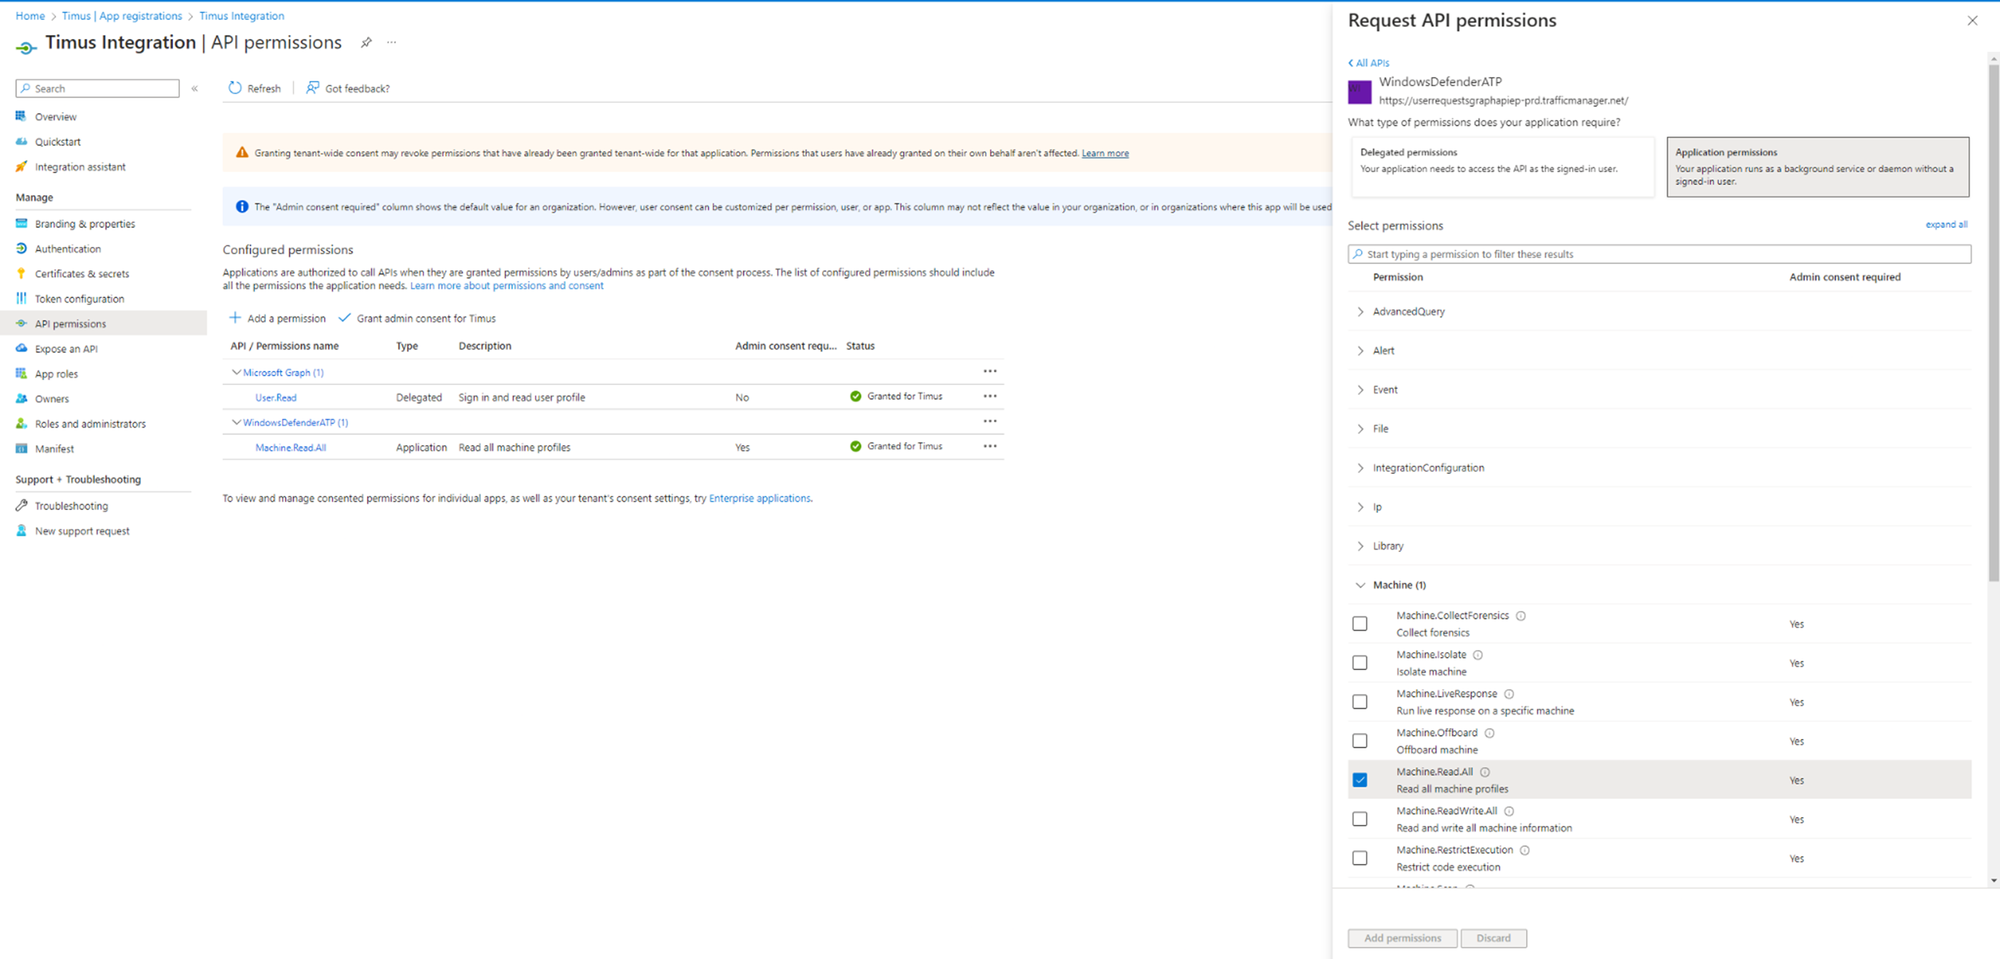
Select “Application permissions”. Navigate to “Machine” and give “Machine.Read.All” permission.
-
Grant admin consent for the application.
- Now, you are ready to integrate with Timus. Please continue the article below to complete the integration. Device Posture Check and EPP
-
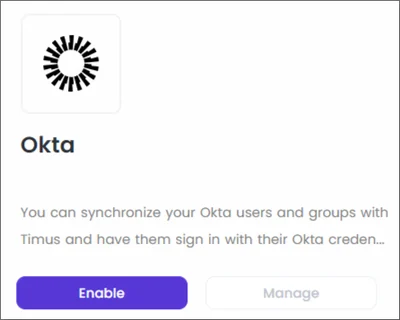
Okta
See moreThis chapter explains how you can integrate Timus with Okta to enable users to log into your corporate network using their Okta account credentials.
To integrate your Okta Users with Timus and create an app integration on Okta:- Go to https://www.okta.com/login/.
- Click Login.
- Enter your organization's address. Okta will send you to your login page, where you can access your account directly.
- Log in to your Okta account.
- You will see the general Okta Dashboard on the screen.
Before setting up an app integration on Okta to connect your users with Timus, please verify that your Okta plan includes an SSO license that allows synchronization through the API gateway, like access gateway and API access management plans on Okta.- Click the Admin button at the top right of the Dashboard page.

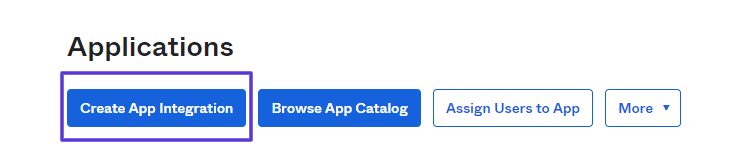
- Click Applications in the list of shortcuts on the left of the open page.
-
Click the Create App Integration button on the Applications screen.
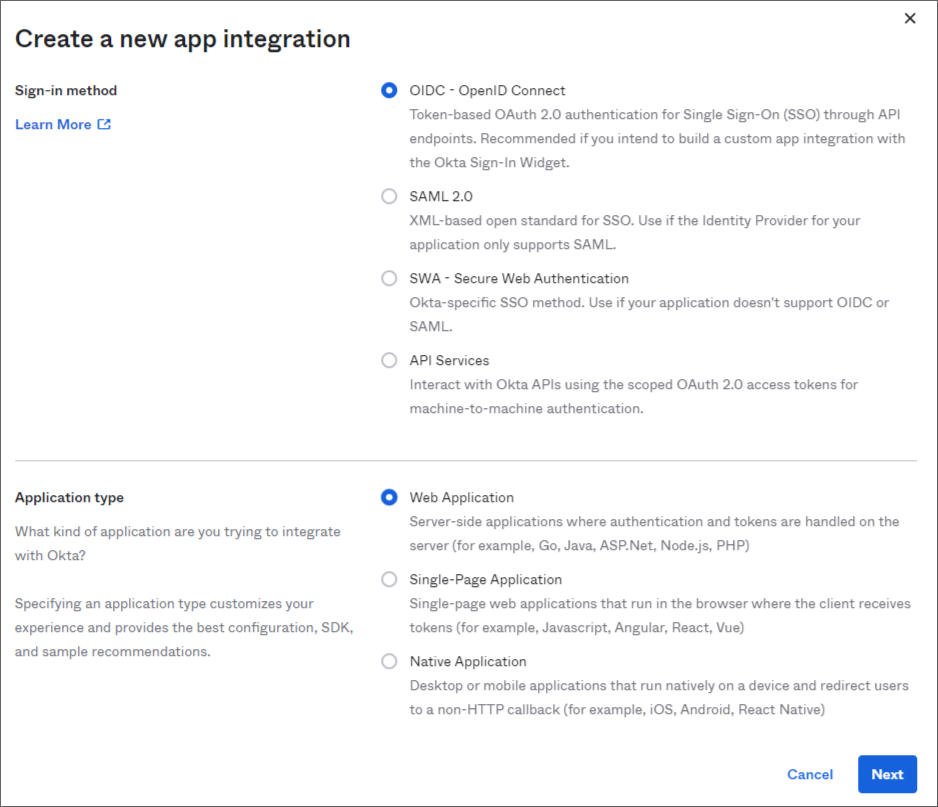
- In the Create a New App Integration popup, select OIDC (OpenID Connect) - OpenID Connect as the sign-in method.
- Select Web Application as the Application Type and click Next.
 After clicking on Next, you will able to see the page, which you need to enter your App Integration Name.You need to write https://auth.timuscloud.com/user/external into the Sign-in redirect URLs field.
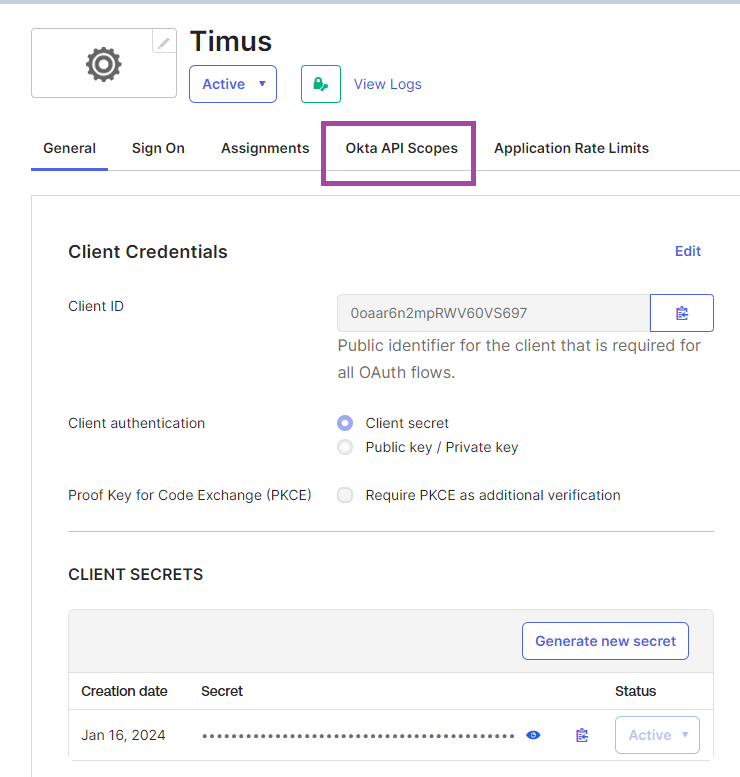
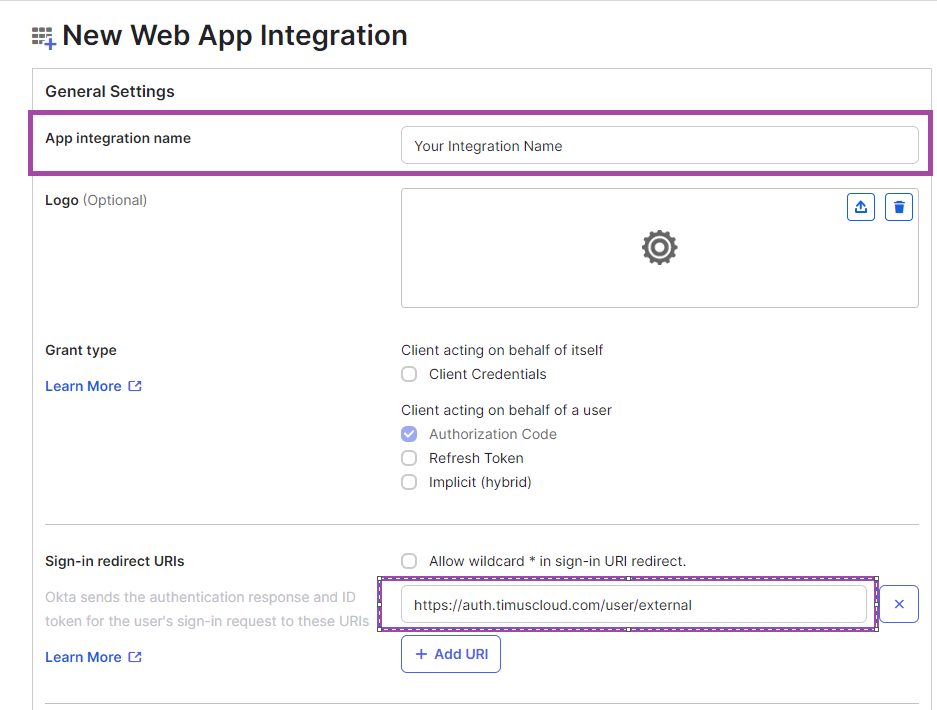 After clicking Save, you can view the page with information about your web app.Client ID and Client Secret are under the headings Client Credentials and Client Secrets.
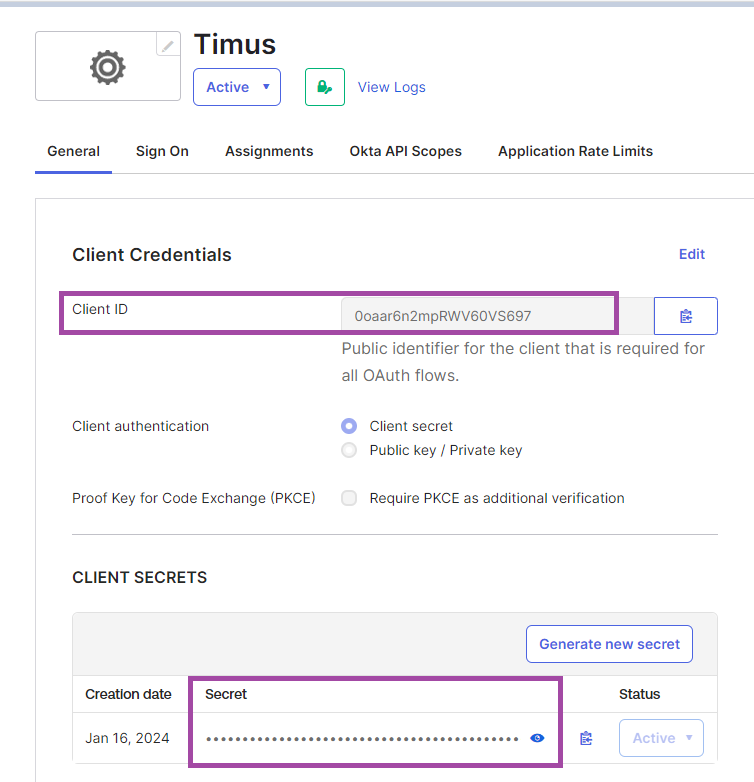
- On the same tab, which you get your Client Secret and Client ID, you need to configure your Okta API Scopes as shown in the image below to give the needed permissions for your Okta integration.
 Once you have clicked on the Okta API Scopes tab, you need to grant the okta.groups.read and okta.users.read permissions as shown in the image below.
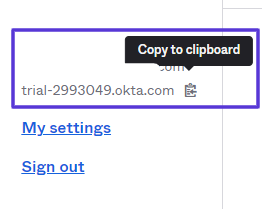
- Domain ID information can be copied from under the Okta Account Name at the upper right corner of the Okta screen.
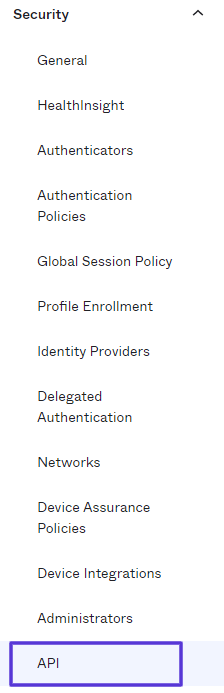
 Click Security from the shortcuts list on the left side of the page for API tokens:
- Click API at the bottom of the drop-down list.
- Click the Tokens tab on the API screen.
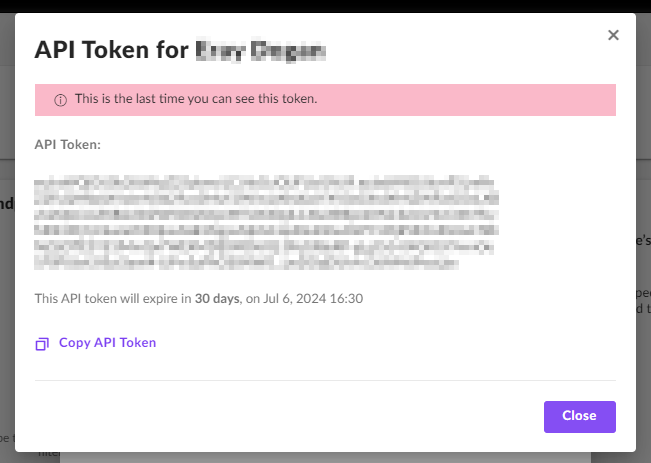
- Click the Create Token button.
- In the Create Token popup, enter a name for the token.
- Click Create Token.
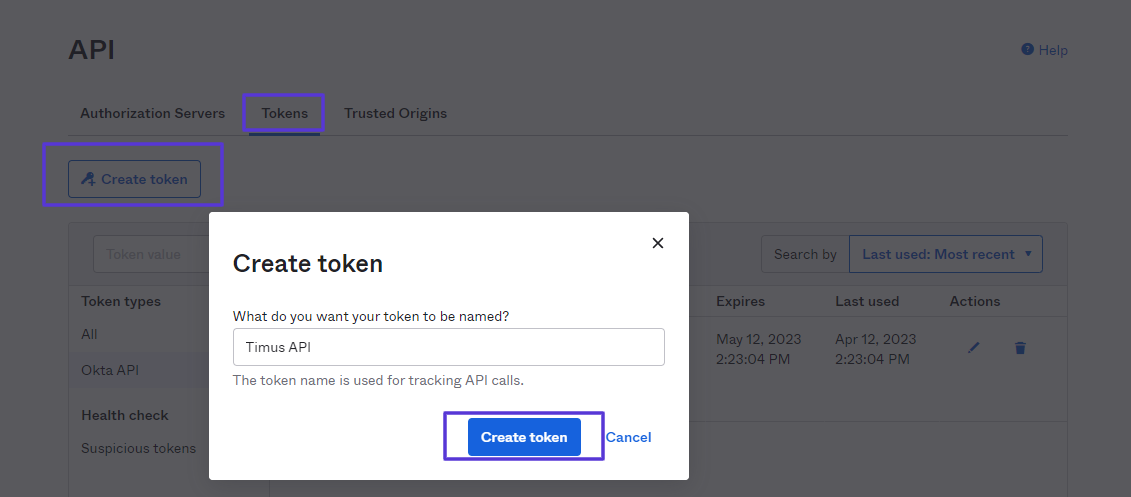
- You will display the Token created successfully! notification in the window.
- Copy the token by saying Copy to Clipboard.
You can close the window by clicking the Ok, Got it button.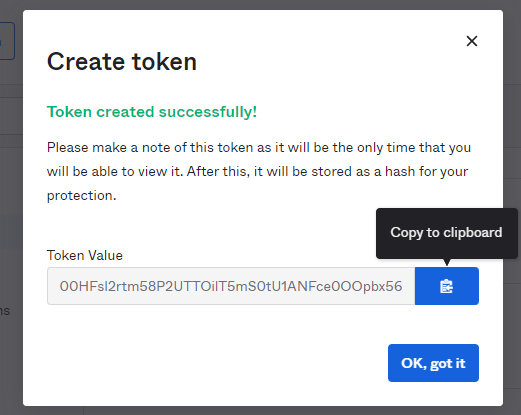 Create a user to log in to Timus applications such as Accounts or Connect via Okta Directory. After you add the user, you can assign them to apps and groups and manage their profile from Timus Manager:
In the Admin Console, go to Directory > People.
- Click Add Person.
- Select a user type in the User type list or accept the default.
- Complete these fields:
- First name — Enter the user's first name.
- Last name — Enter the user's last name.
- Username — Enter the user's username in email format.
- Primary email — Enter the user's primary email if it's different from their username.
- Secondary email — Optional. Enter a secondary email to allow the user to access information when their primary email is unavailable.
- Password — Select Set by user to allow the user to set their password or select Set by admin and enter a password.
- Send user activation now — Optional. This check box is available when set by user is selected as the password option. Select this check box to send a user activation email to the user.
- User must change password on first login — Optional. This check box is selected by default when you select Set by admin as the password option. Clear this check box if you do not want the user to change their password when they first sign in.
- Click Save or click Save and Add Another to add another user.
OKTA Integration
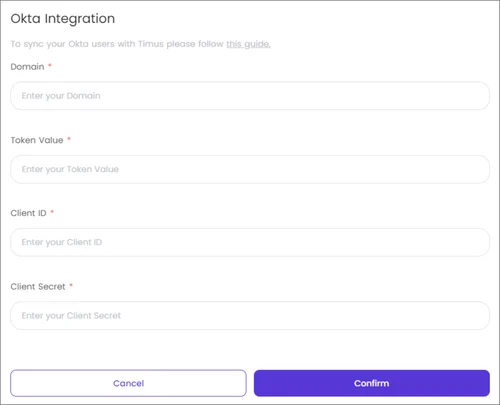
The group you created will be visible on Timus Manager in about 5 minutes.The name of the user you create will appear as the first part of the e-mail address you provide via Okta in the Timus interface.- Go to Timus Manager > Settings > Integrations > Okta > Enable > Okta Integration screen.
- Paste the information you copied and saved before: Client ID, Client Secret, API Token and Okta Domain.
- Click Confirm.
- In the Okta Integration window, you will see the two tabs, Preferences and Configuration.
-
Enable Synchronization Status ON from the Preferences tab.
- Under Mapping, Choose the Okta groups you want to synchronize. Users in the groups you choose will be added to the Okta Users team on Timus.
- Under Allowed Sites section, select Remote Sites.
- Click Confirm.
- You can disable the integration with the Disable Integration button from the Integrations page.
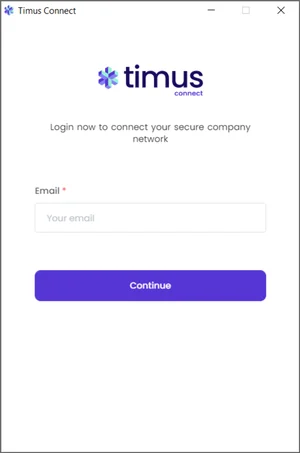
You have integrated your Timus and Okta Users.The synchronization process may require up to 30 minutes, but it could potentially take longer.The duration of the synchronization depends on the amount of information you are synchronizing from Okta.You will be able to log in to the Timus Connect app with your new admin credentials over the remote network that you assigned to the user’s group you have created in Okta Directory, from the Manager Okta integration screen.- When you open the Connect app, you will see the e-mail address screen.
- Please enter your e-mail address here.
- You will see the networks allowed for your user account.
- After the network is selected, the app will direct you to the sign-in screen of Okta.
-
Single Sign-On Integration with SAML Guide
See moreSAML Integration for Microsoft Entra ID(Azure AD)
Introduction to SAML 2.0
What is SAML 2.0?
Security Assertion Markup Language (SAML) 2.0 is an open standard for authentication and authorization between an Identity Provider (IdP) and a Service Provider (SP). It enables Single Sign-On (SSO) by allowing users to authenticate with their IdP and gain access to various services (like Timus) without needing separate credentials for each.
How SAML 2.0 Works
- User Requests Access: A user attempts to access a service (e.g., Timus).
- Service Provider Redirects to IdP: The service provider redirects the user to the IdP for authentication.
- User Authenticates: The user logs in using their IdP credentials.
- IdP Sends Assertion: Upon successful authentication, the IdP sends a SAML assertion back to the service provider, containing user attributes and authentication information.
- Access Granted: The service provider processes the SAML assertion, and if valid, grants the user access.
Common Configuration Elements
When configuring SAML for Timus, you'll typically encounter the following key parameters:
- Service URL: This is the IdP login URL that the user enters. When a user attempts to sign in, they are redirected to this URL for authentication.
- Identifier: Issuer value ****provided by the IdP. It ensures that the SAML response is intended for your service.
- X.509 Certificate: Used to verify the authenticity of SAML assertions. This certificate is provided by the IdP and needs to be configured in Timus.
- Audience ID: This value must be identical to the Issuer provided by the IdP. If the Audience ID doesn't match the Issuer, the authentication request will fail because Microsoft expects these values to align for proper validation.
-
Timus Single Sign-On URL: This URL is used by the IdP to send authentication responses bak to Timus. You should enter
https://auth.timuscloud.com/user/external/samlfor prod,https://auth-beta-us-01.timuscloud.com/user/external/samlfor beta.
Mapping User Attributes
User attributes such as
firstname,lastname, andnameID(email)are critical in SAML configurations. These attributes are mapped between the IdP and Timus to ensure that the correct user information is transmitted during authentication. This is usually done in the "Attributes & Claims" section of the IdP configuration.Encryption (Optional)
For enhanced security, SAML assertions can be encrypted, which requires the exchange of encryption keys between Timus and the Identity Provider (IdP). Specifically, you will need to input a private key into Timus, while providing the corresponding public key to the IdP. This setup ensures that sensitive information within the SAML assertion is securely encrypted during transmission, safeguarding it against unauthorized access.
Testing and Verification
After completing the configuration steps, it's important to remind users that their first login must be initiated through the application in your Identity Provider (IdP). This initial login via the application is necessary to create the user account within Timus. Once the user is created, they will be able to sign into Timus. Direct sign-in to Timus without first accessing it through the IdP application will not work, as the user account needs to be established through the SAML integration process.
Support and Troubleshooting
- Error Handling: If users face issues during sign-in, verify the SAML response from the IdP, ensuring that all fields are correctly mapped and the certificate is valid.
-
Notes:
- A SAML integration credentials (Identifier and Service URL) can only be used in one SDN. Therefore, the same SAML integration should not be configured in multiple SDNs. If this occurs, an error message should be displayed in the interface to inform the admin.
-
SAML Integration for OKTA AD
See moreFollow these steps to integrate Okta with Timus using SAML 2.0 for secure Single Sign-On (SSO).-
Creating an Okta Application
- Navigate to Applications:
- Log in to your Okta admin console.
- Go to Applications under the Applications tab.
- Create a New Application:
- Click Create App Integration.
- Select SAML 2.0 as the sign-on method.
- Click Next.
- Navigate to Applications:
-
Configuring Okta Application with Timus SAML Information
- App Setup:
- Enter a custom name for the application under the App name.
- Click Next to proceed.
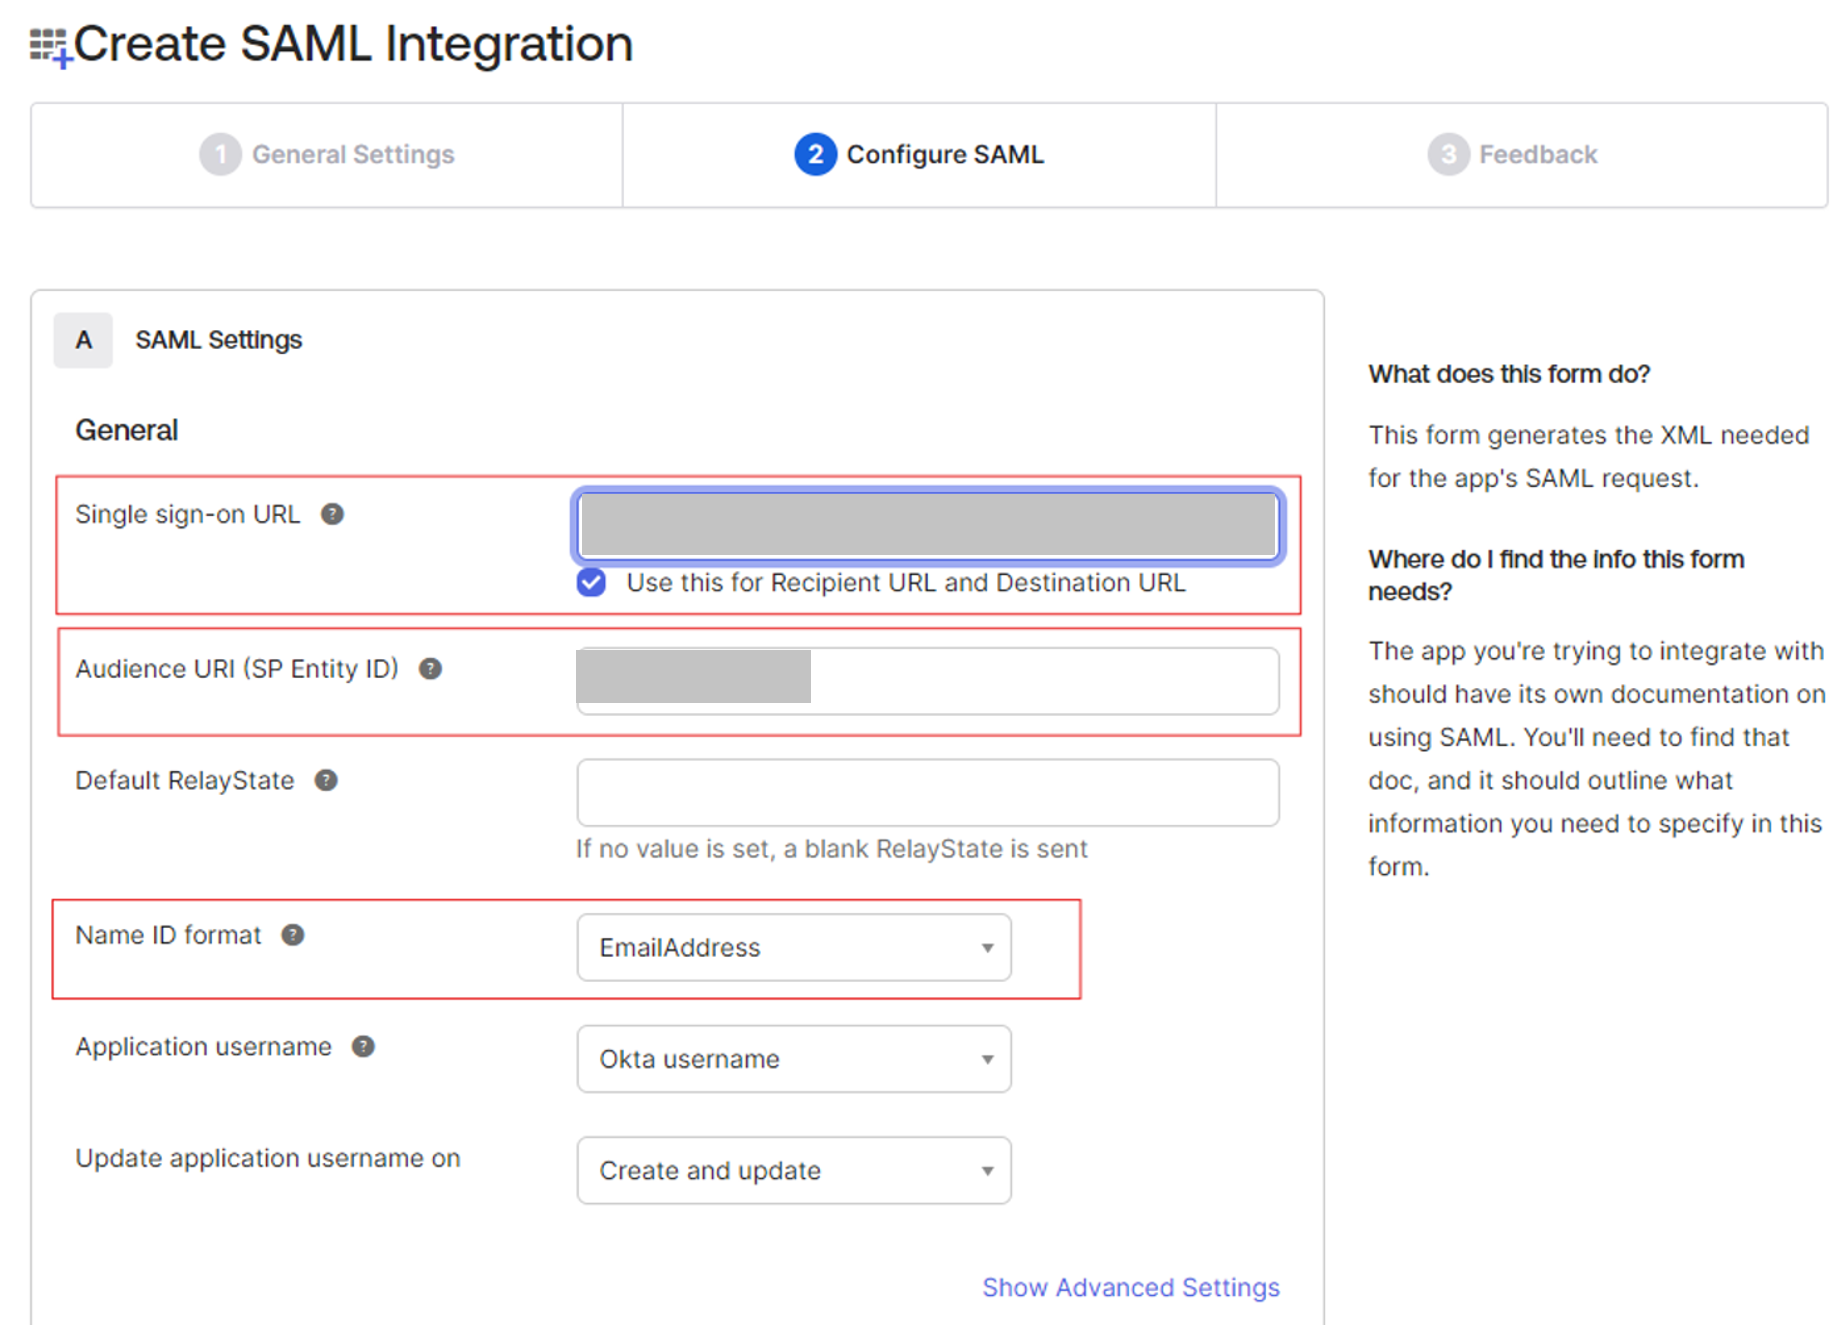
- SAML Settings:
- Single Sign-On URL: Enter https://auth.timuscloud.com/user/external/saml
- Audience URI (SP Entity ID): Initially enter http://okta.com (you will modify this after generating the issuer URL).
-
NameID Format: Select EmailAddress.
- Attribute Statements:
- Add firstname and lastname as attribute statements.
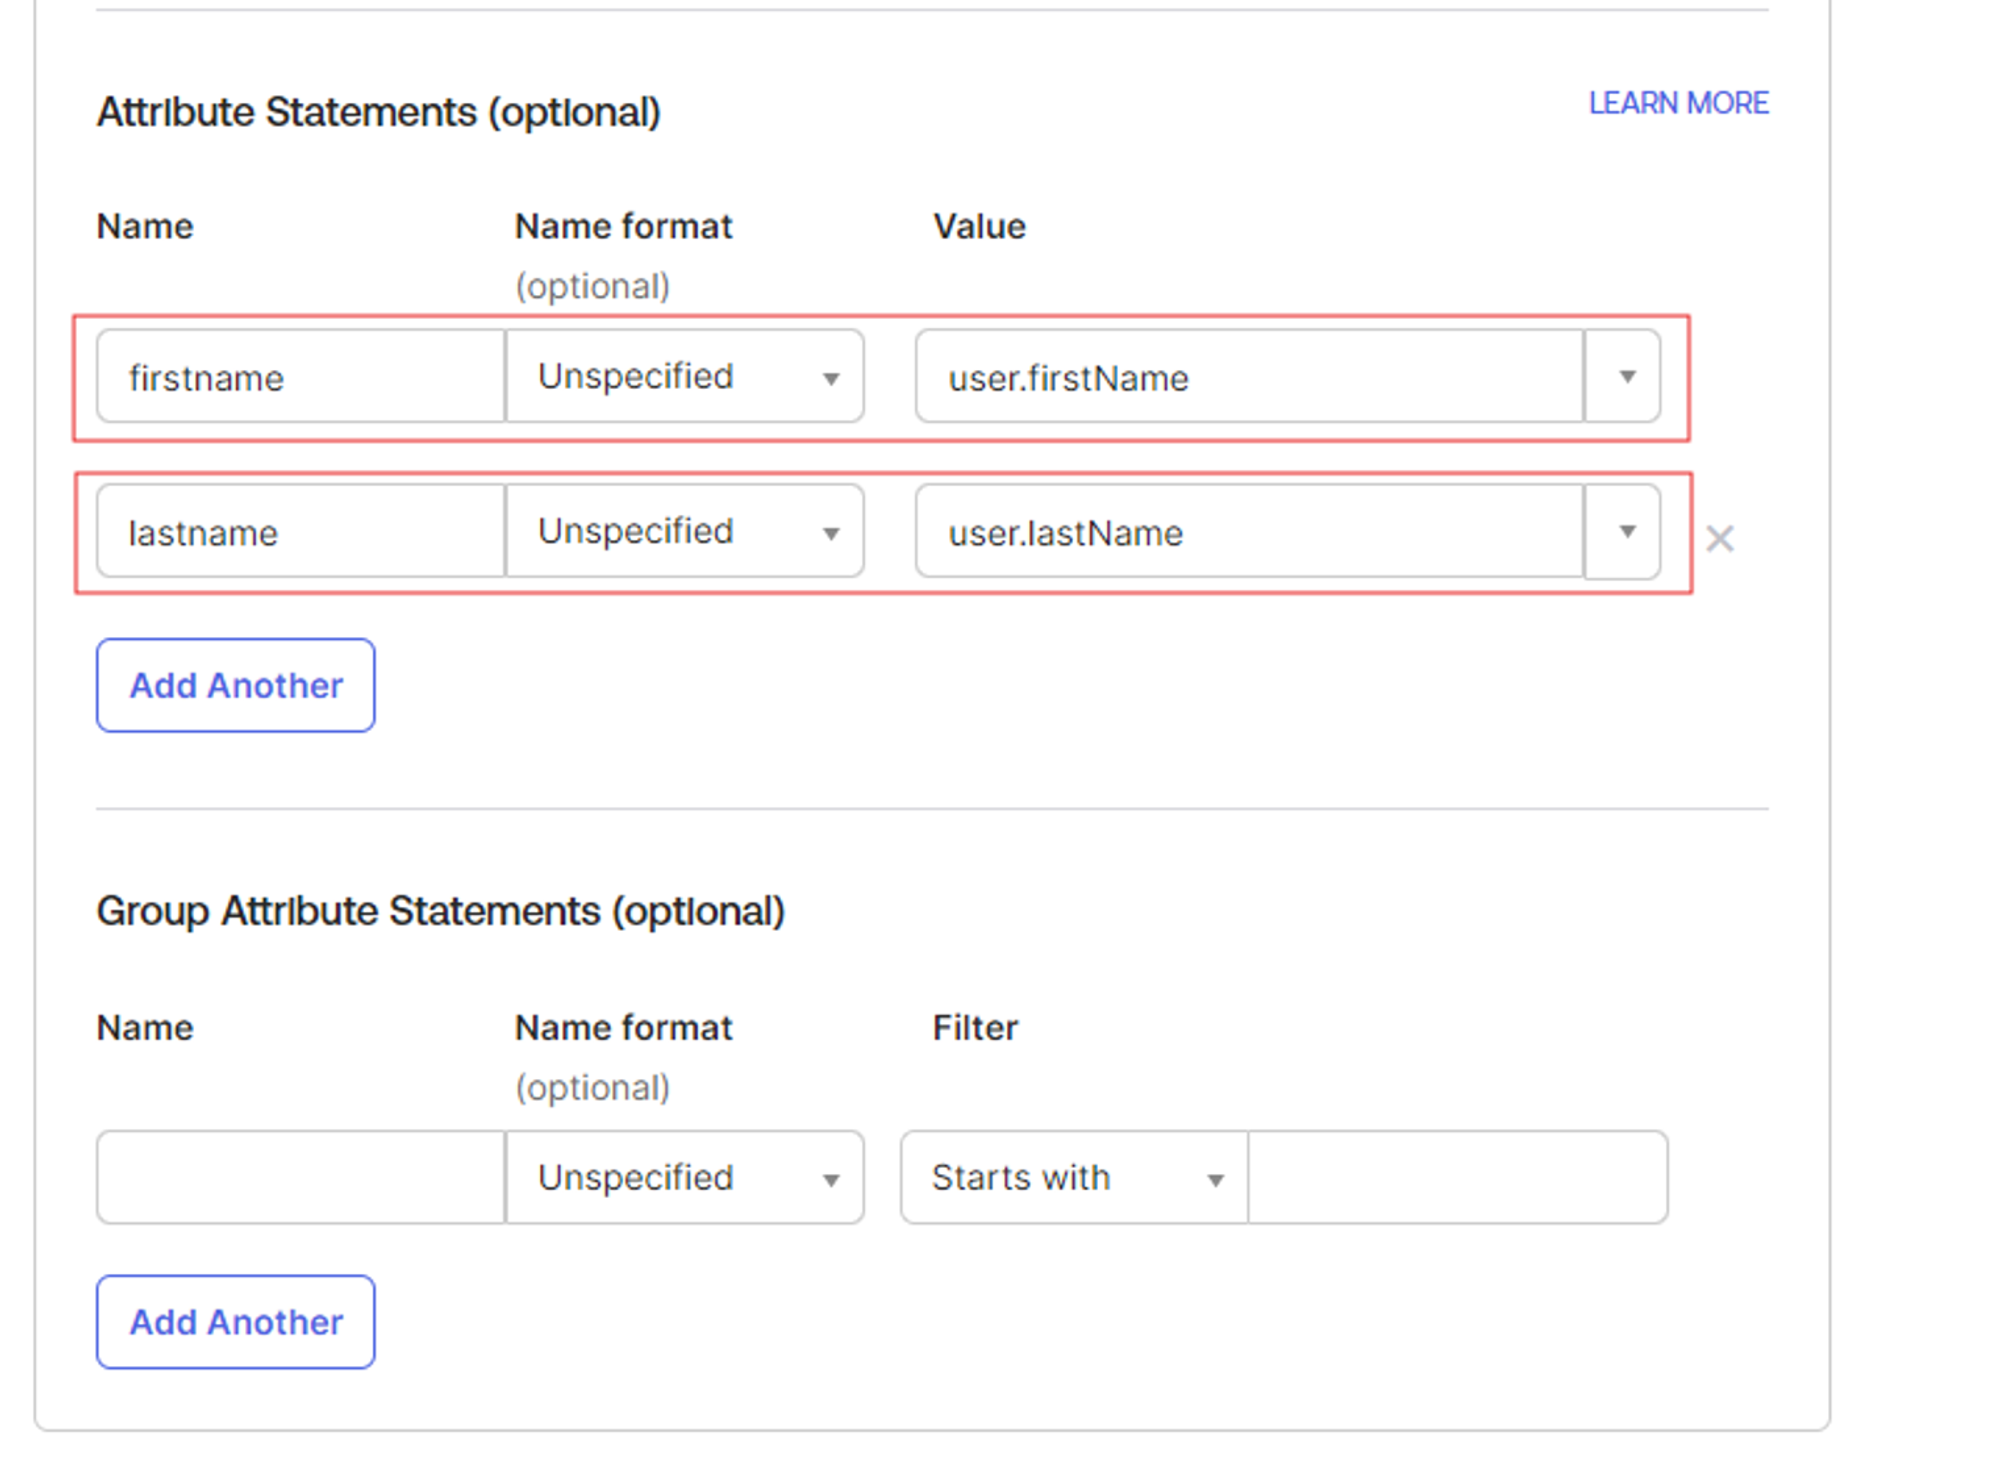
- Add firstname and lastname as attribute statements.
- Finalize Setup:
- Scroll down and click Next.
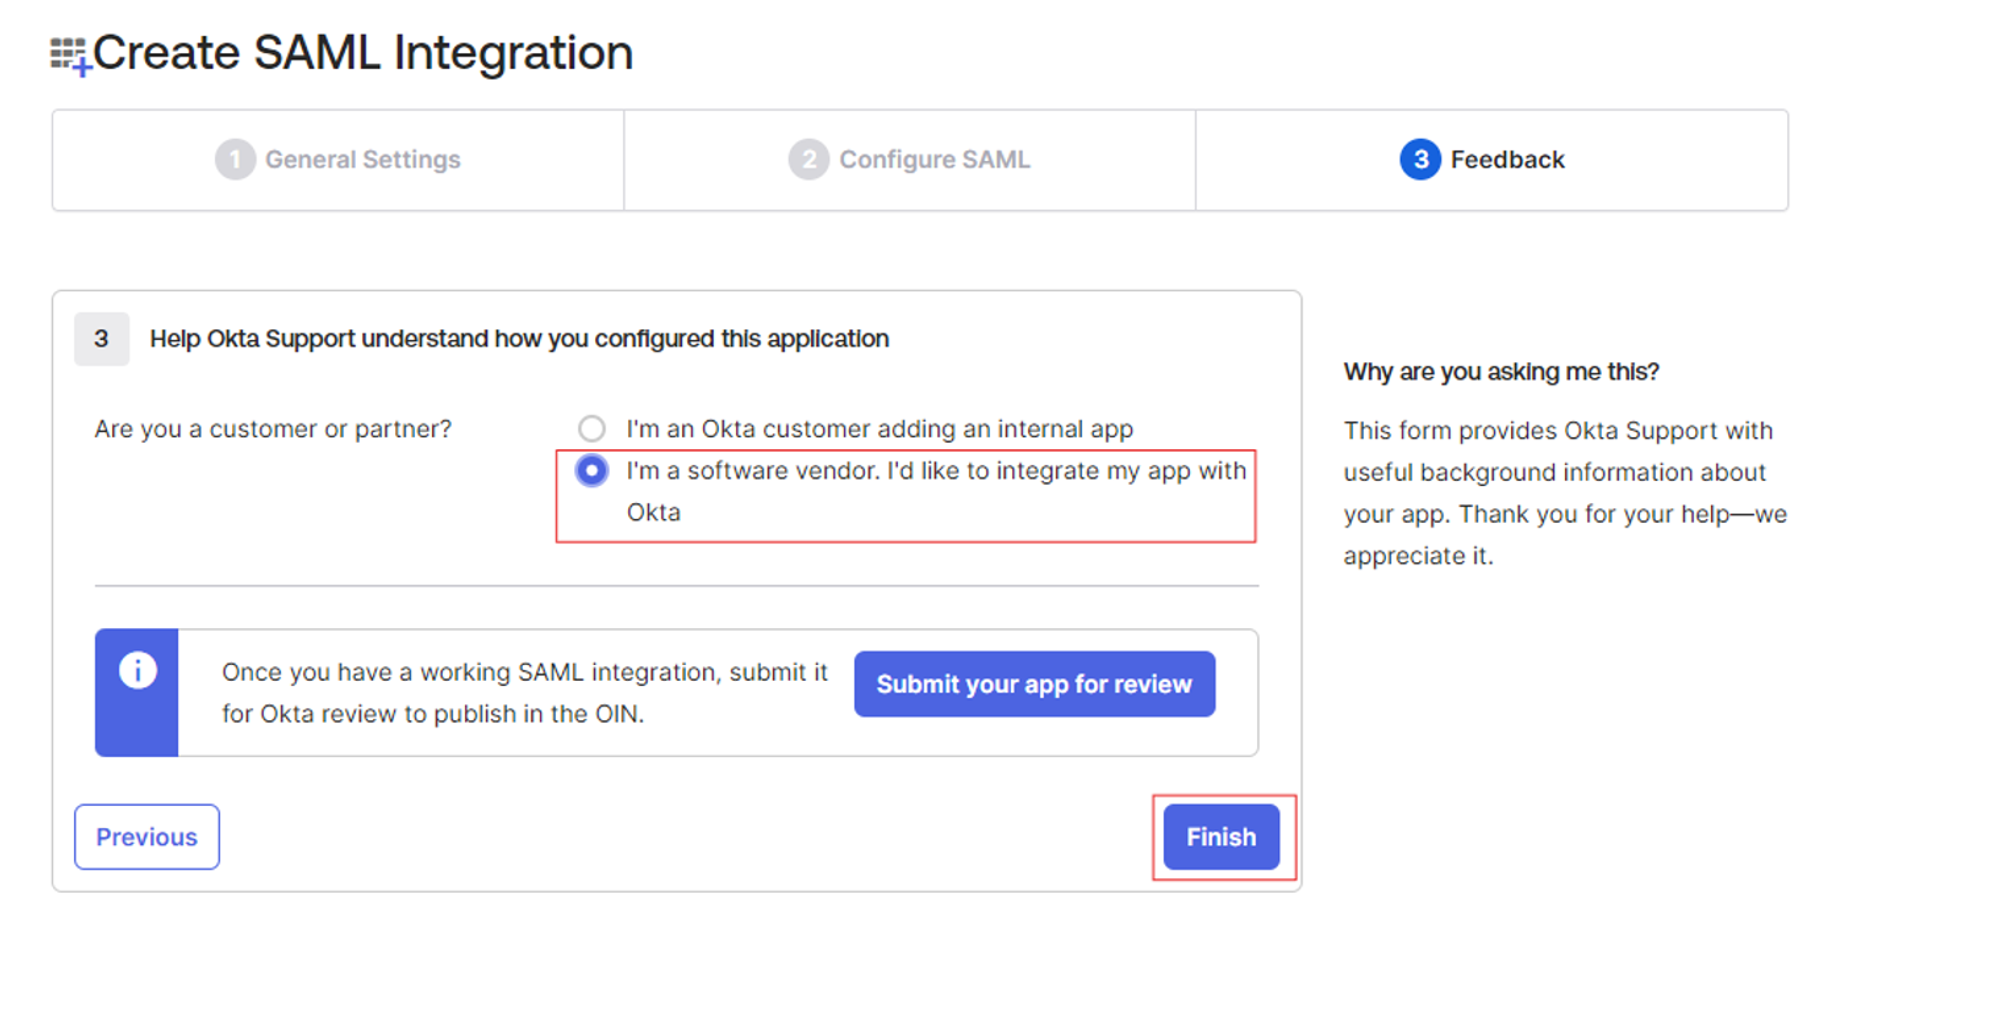
- For quick setup, select the appropriate option and click Finish.
- App Setup:
-
Displaying Okta Information
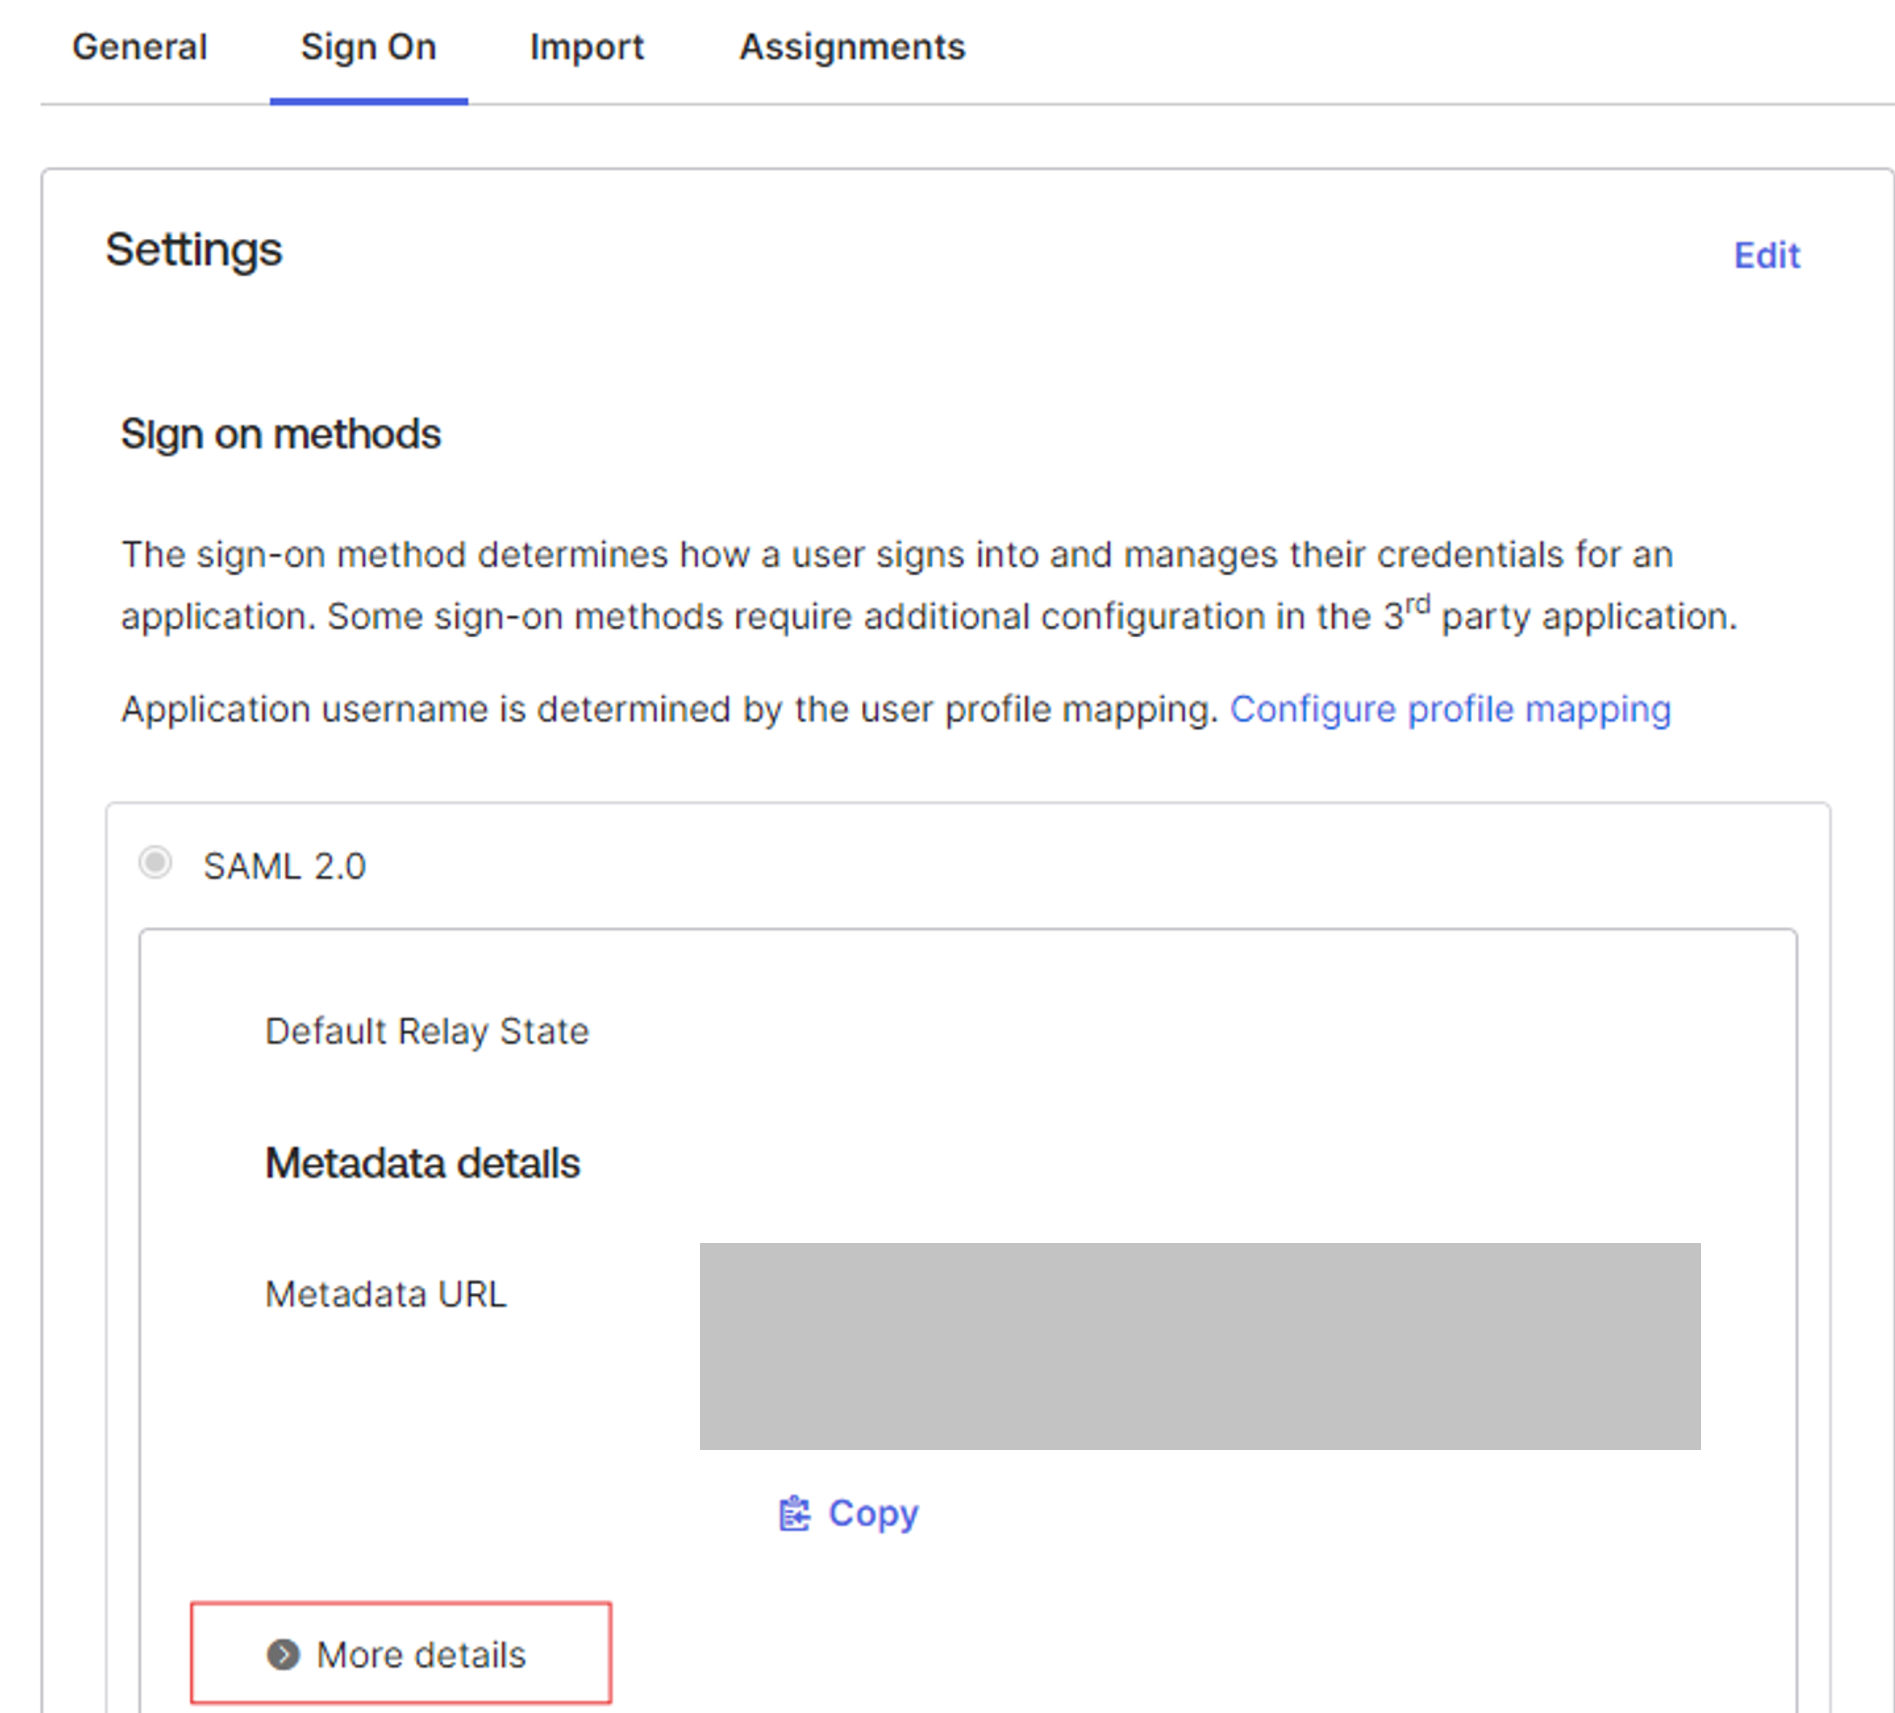
- View SAML Details:
- Click View Setup Instructions to display the Issuer, Sign-On URL, and X.509 Certificate.
- You’ll use these details to configure Timus.
- View SAML Details:
-
Editing Okta Application for Audience URI
- Modify Audience URI:
- Copy the Issuer URL and paste it into the Audience field.
- Copy the Issuer URL and paste it into the Audience field.
- Save Changes:
- After updating, proceed by clicking Next and Finish to save your changes.
- Modify Audience URI:
-
(Optional) Enabling Assertion Encryption
- Enable Encryption:
- Edit the SAML application in Okta.
- Click Show Advanced Settings.
- Configure Encryption:
- Set Assertion Encryption to Encrypted.
- Enter the Encryption Certificate and Signature Certificate as needed.
- Finalize Encryption:
- Click Next and then Finish to complete the setup.
- Enable Encryption:
-
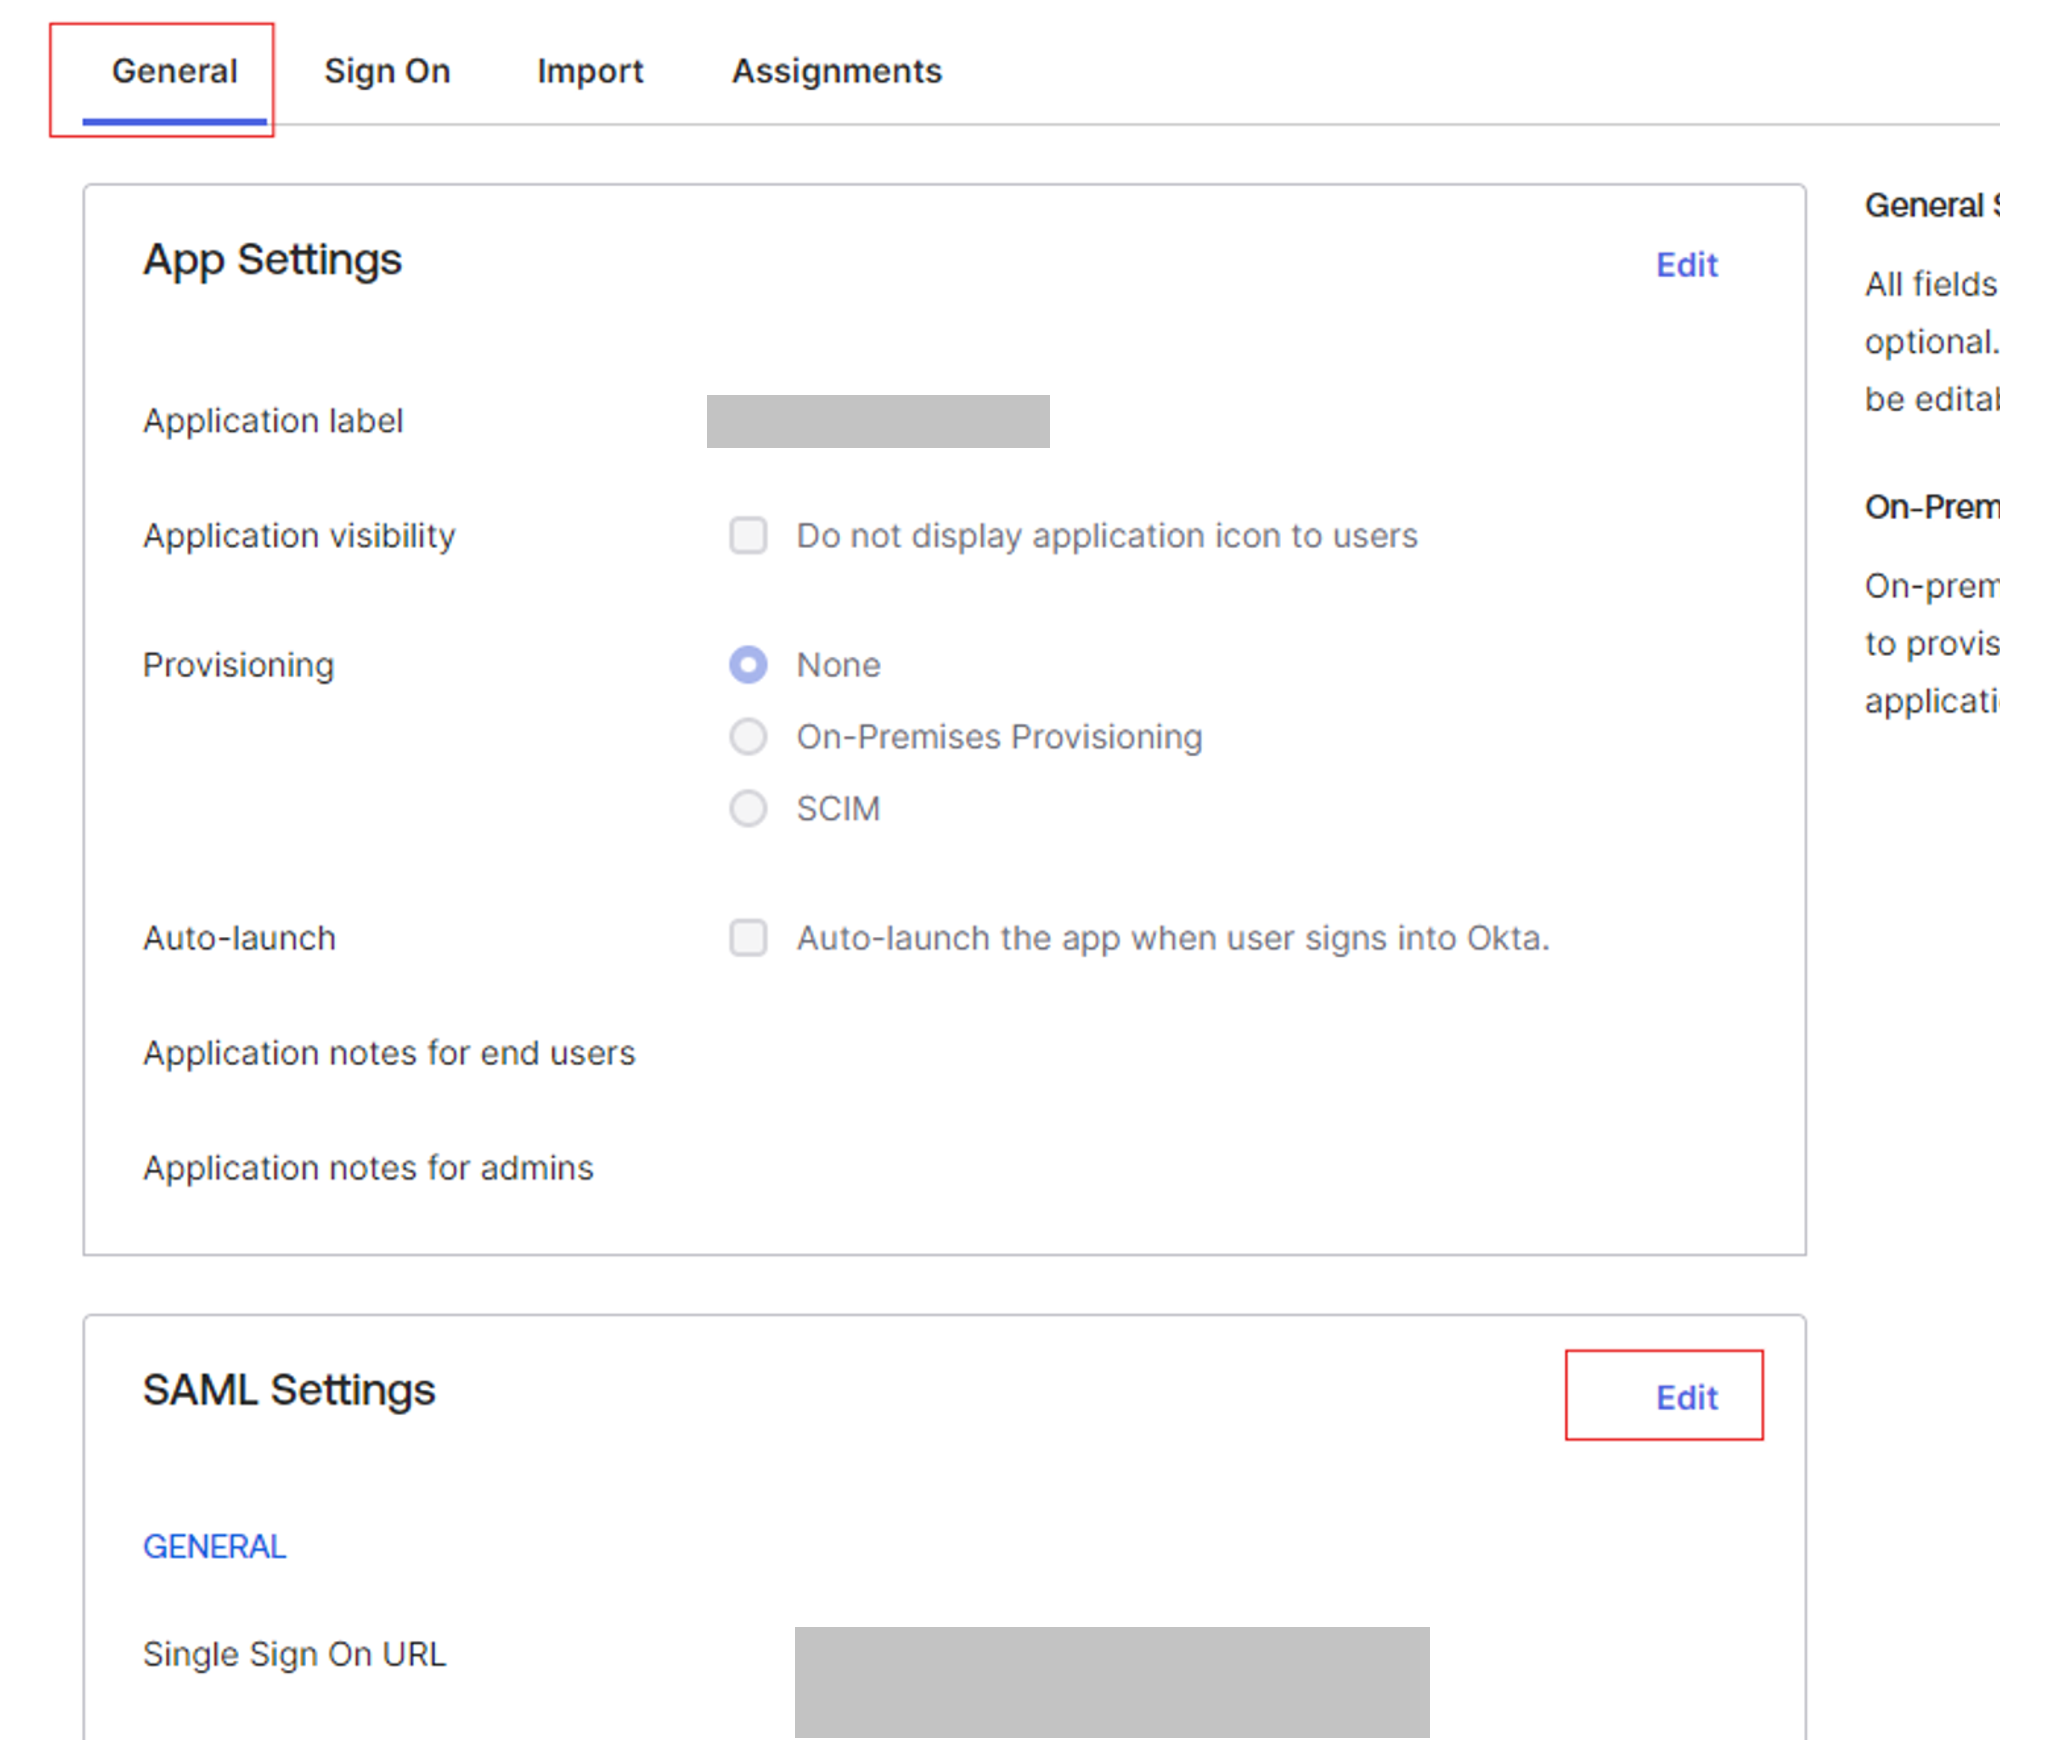
Configuring Timus SAML Integration
- Access Timus Manager:
- Sign in to Timus Manager.
- Go to Settings -> Integrations.
-
Manage SAML 2.0 Integration:
- Click Manage under SAML 2.0.
- Fill in the fields according to the mapping provided in the table below.
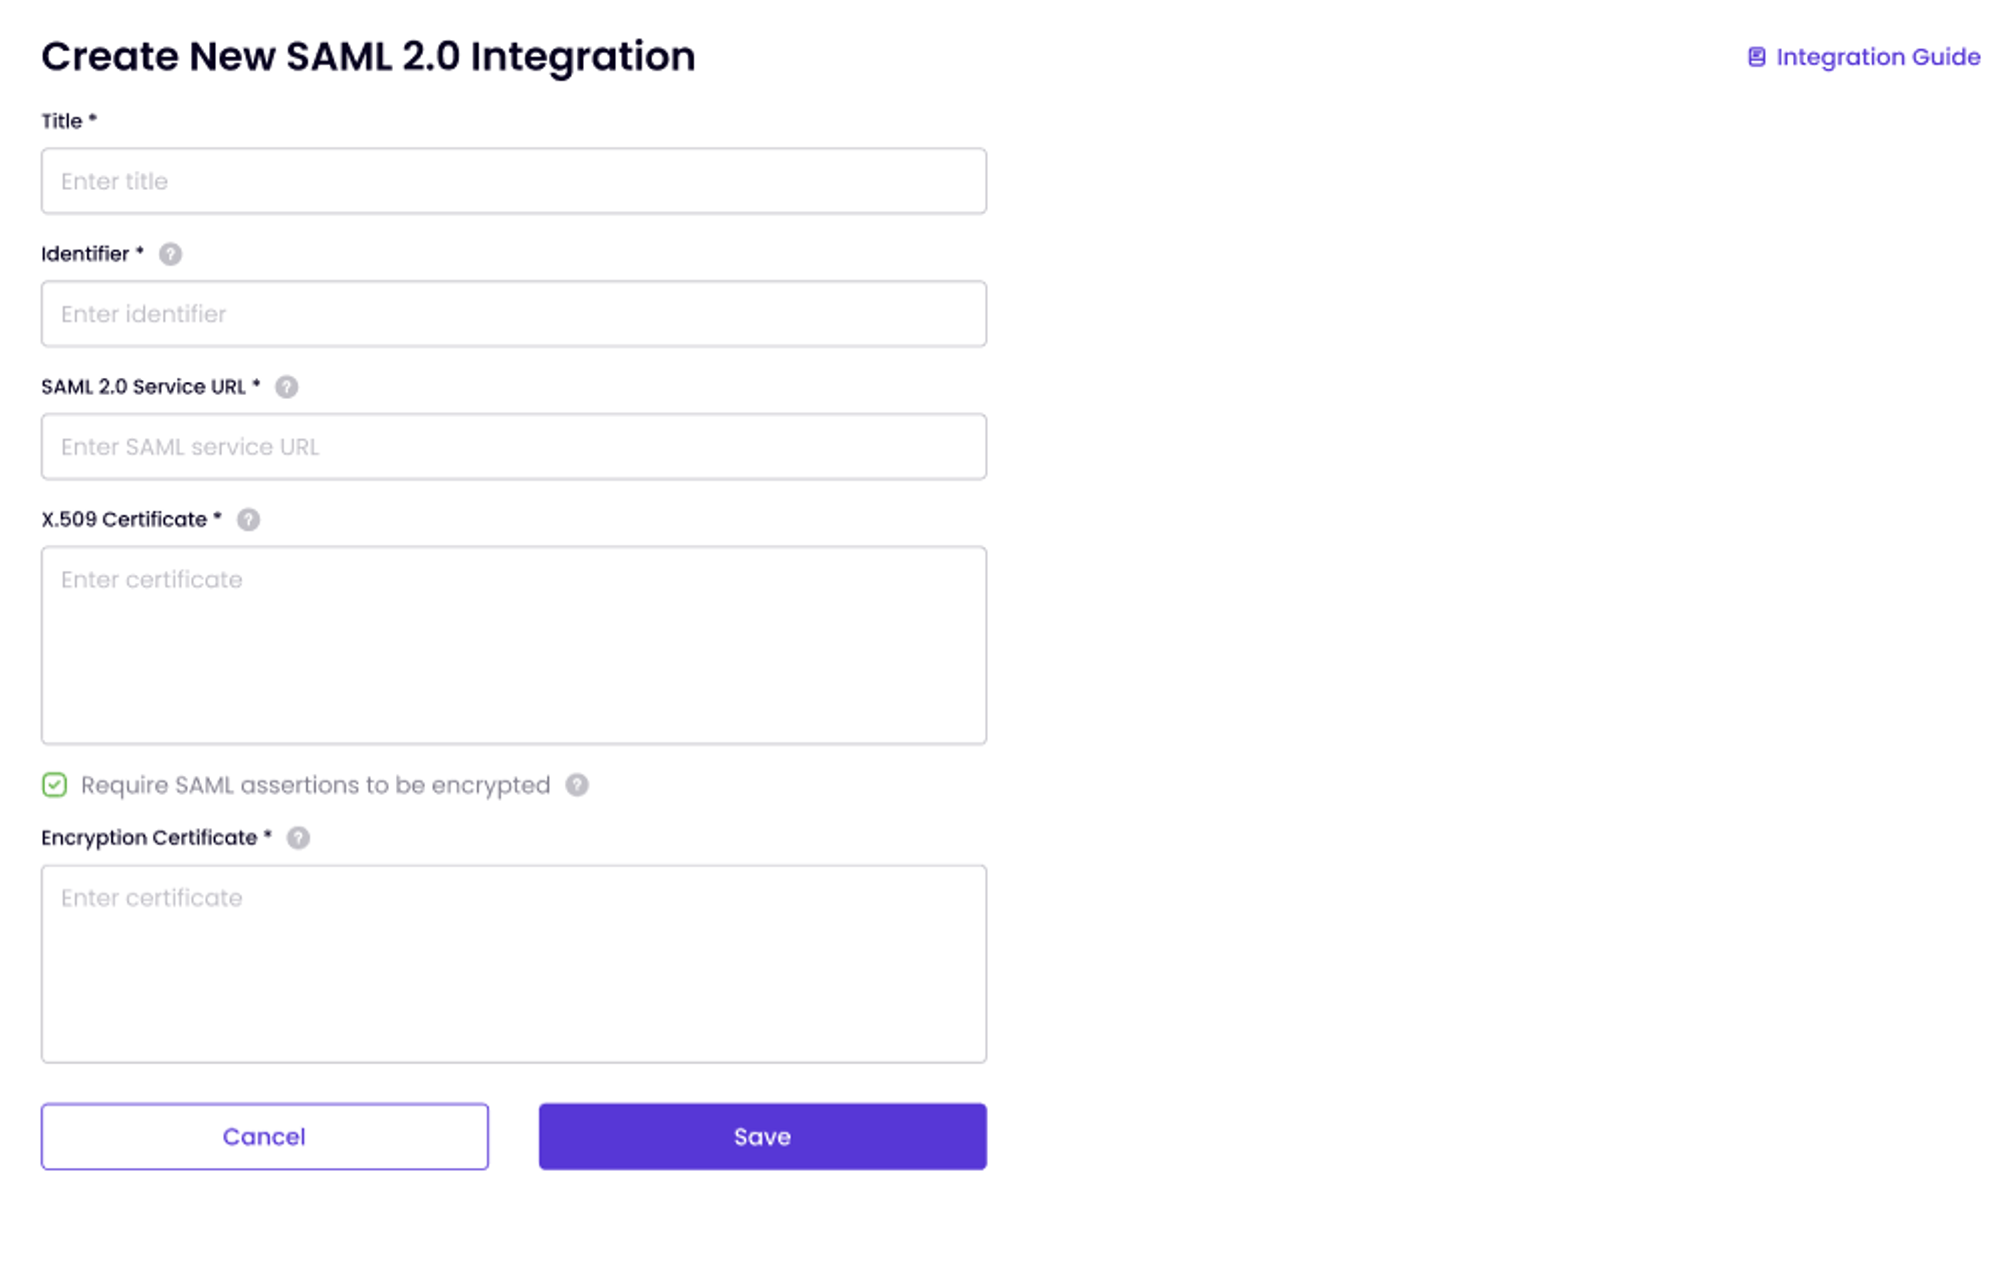
Okta Name Timus Equivalent Sign-On URL Service URL Issuer Identifier Signing Certificate X.508 Certificate 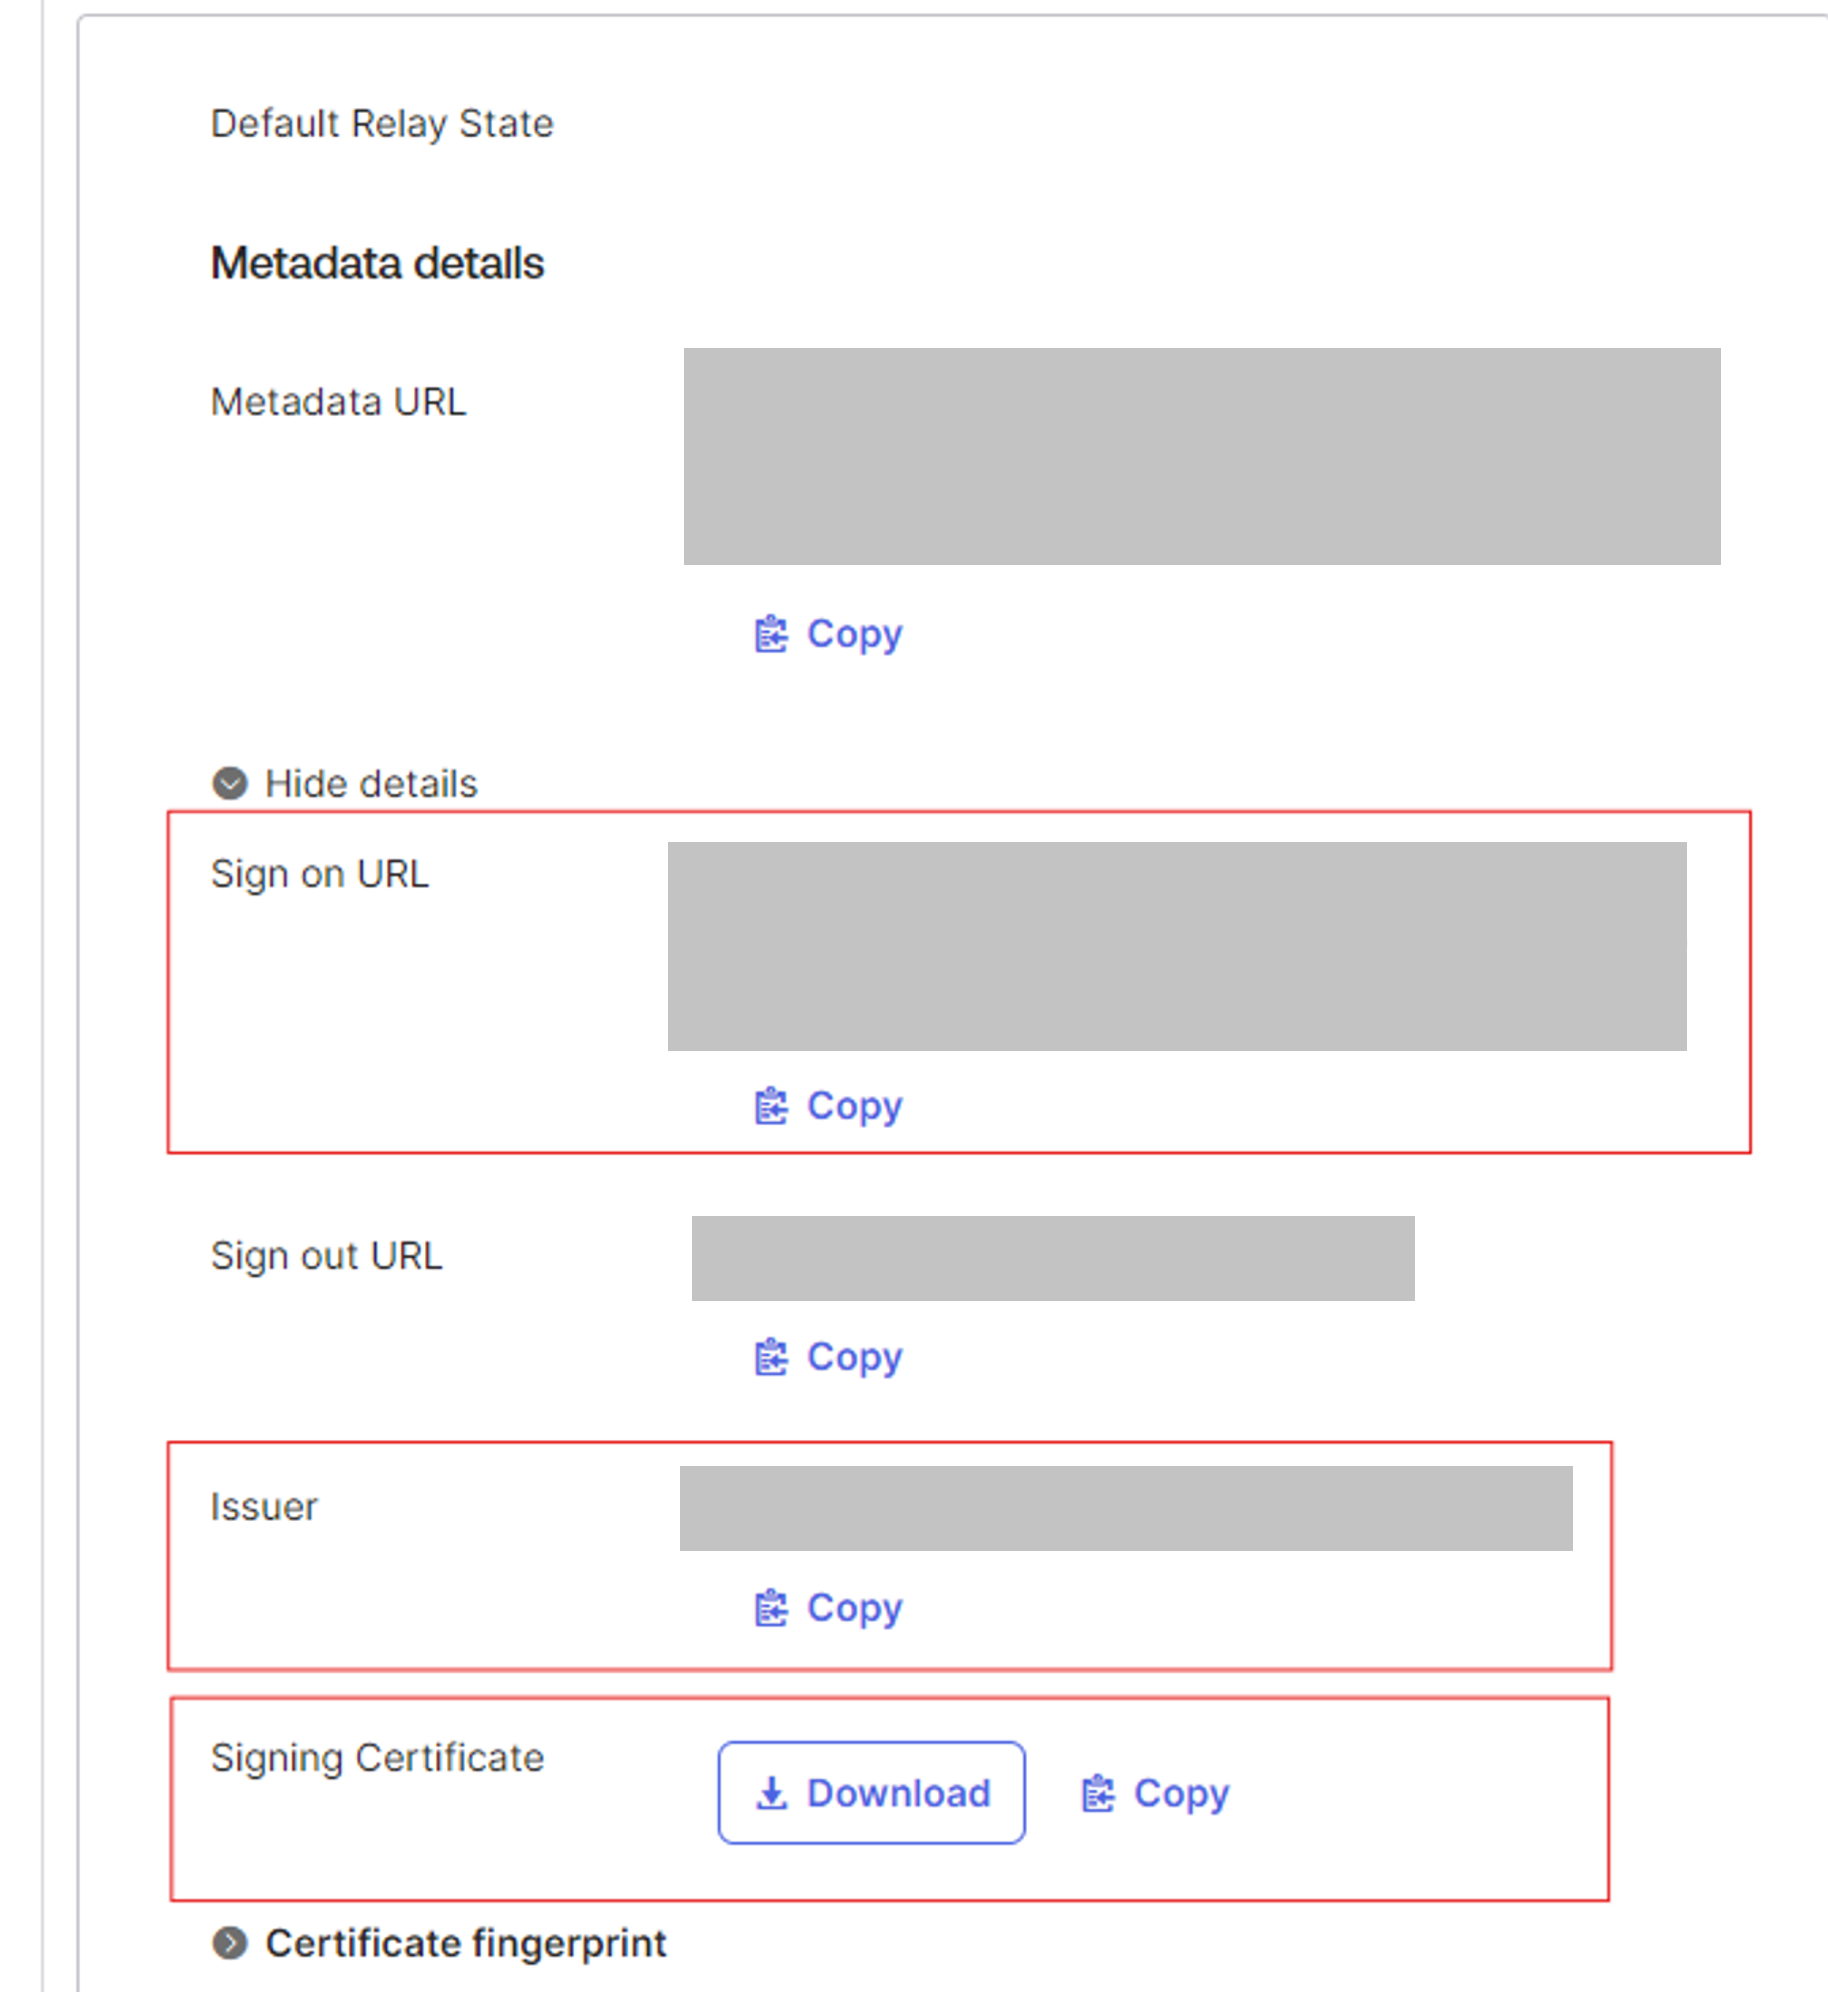
- Complete the Setup:
- Save the configuration. Your SAML integration is now ready.
- Access Timus Manager:
-
Assigning Users and Testing Integration
- Assign Users to the Application:
- In Okta, navigate to Assignments.
- Click Assign and add the required users.
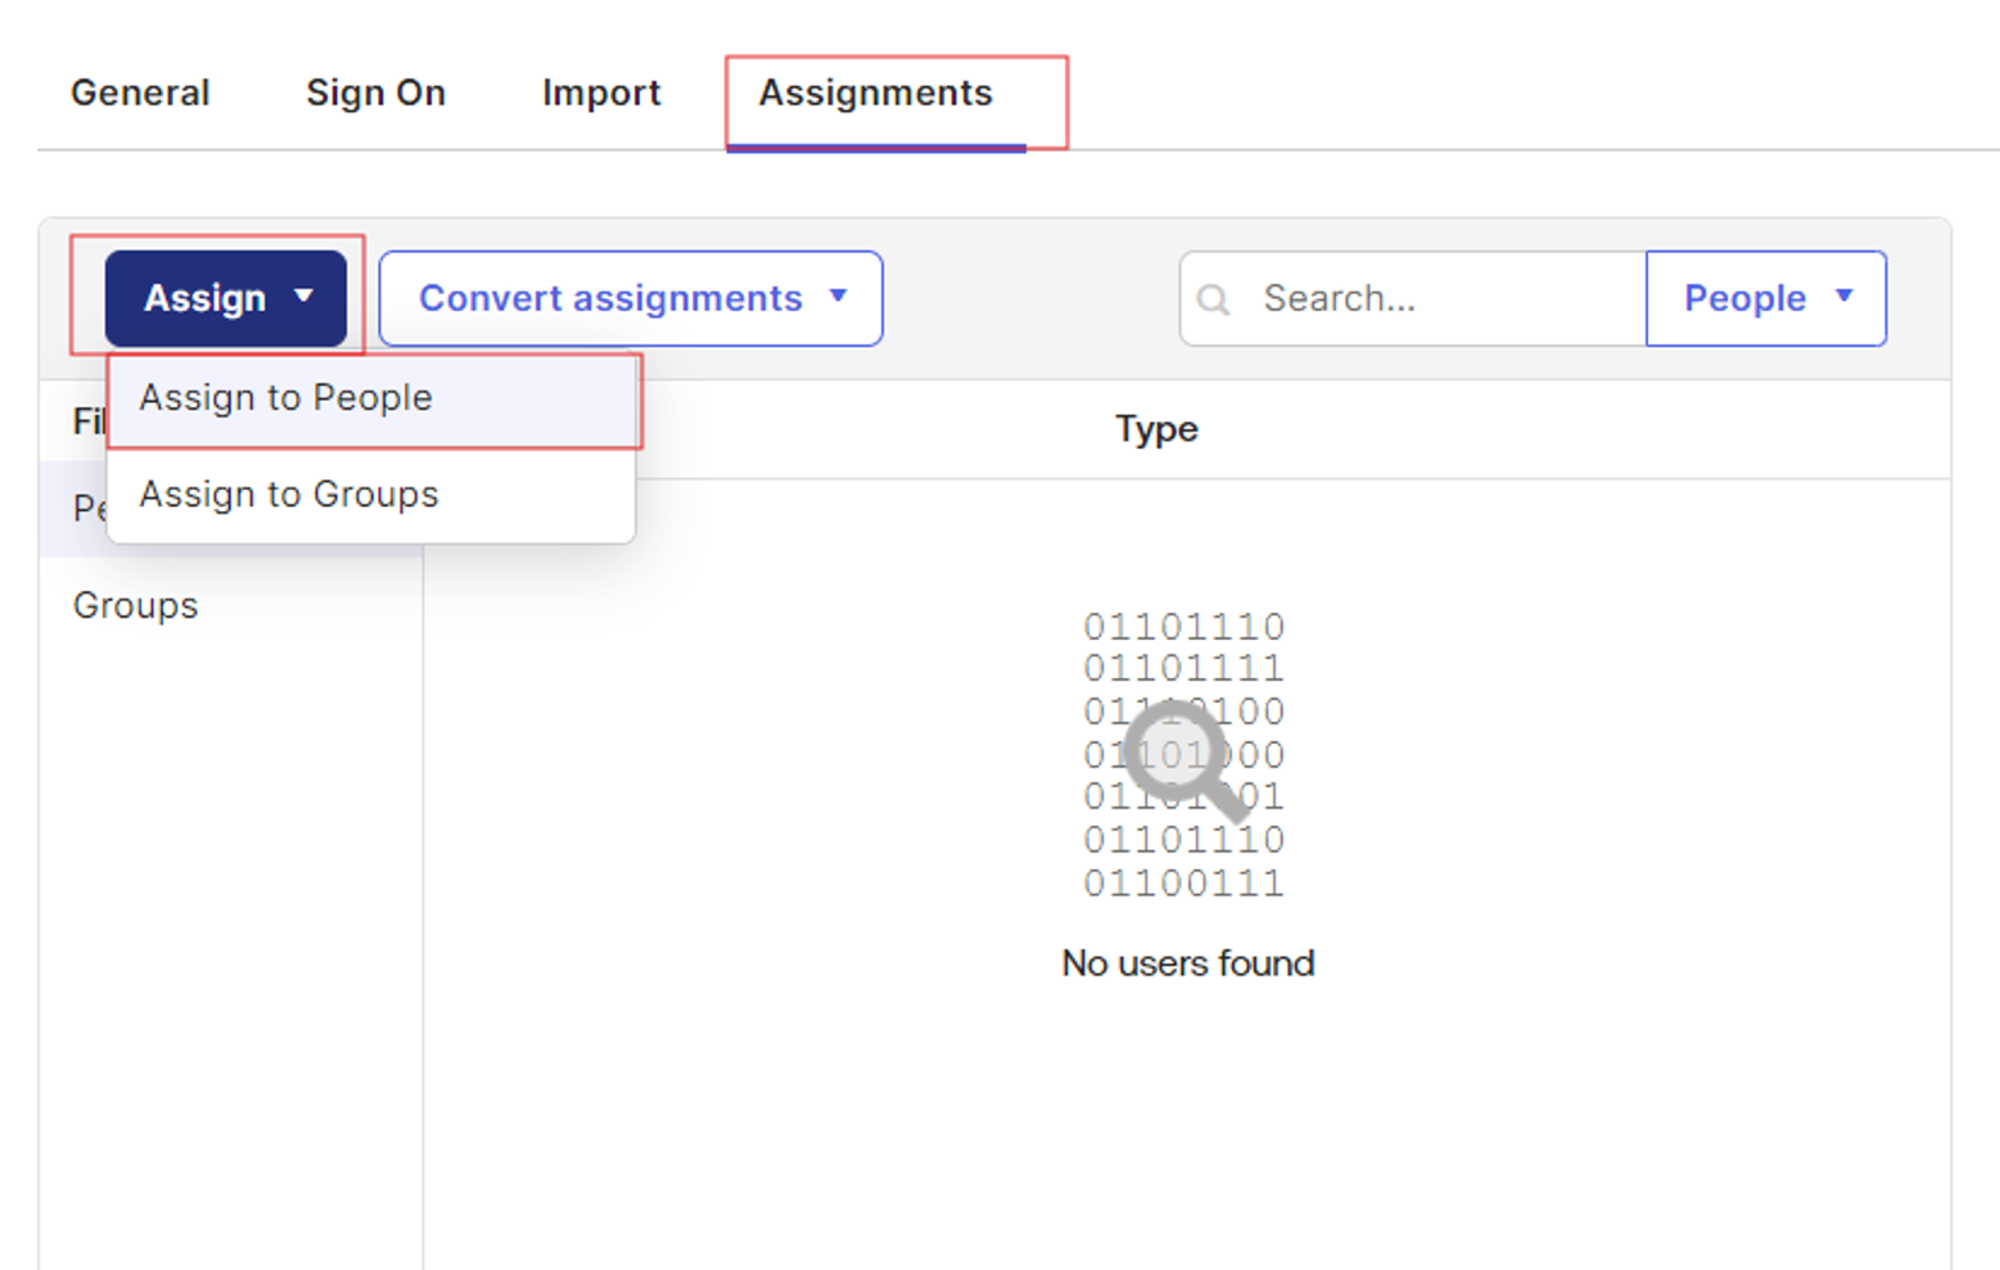
- Test the Application:
- Use a different browser or incognito mode to test the SSO process by logging in as an assigned user. After completing the configuration steps, it's important to remind users that their first login must be initiated through the application in your Identity Provider (IdP). This initial login via the application is necessary to create the user account within Timus.
- Upon successful authentication, users will be redirected to Timus.
- Assign Users to the Application:
This completes the SAML configuration for Okta with Timus. Your users can now authenticate securely through Okta to access Timus applications.
-
-
SAML Integration for Microsoft Entra ID (Azure AD)
See moreFollow these steps to integrate Microsoft Entra ID with Timus using SAML 2.0 for secure Single Sign-On (SSO).-
Creating an Entra ID Application
- Navigate to Entra ID:
- Click on Microsoft Entra ID from the home page.
- Click on Microsoft Entra ID from the home page.
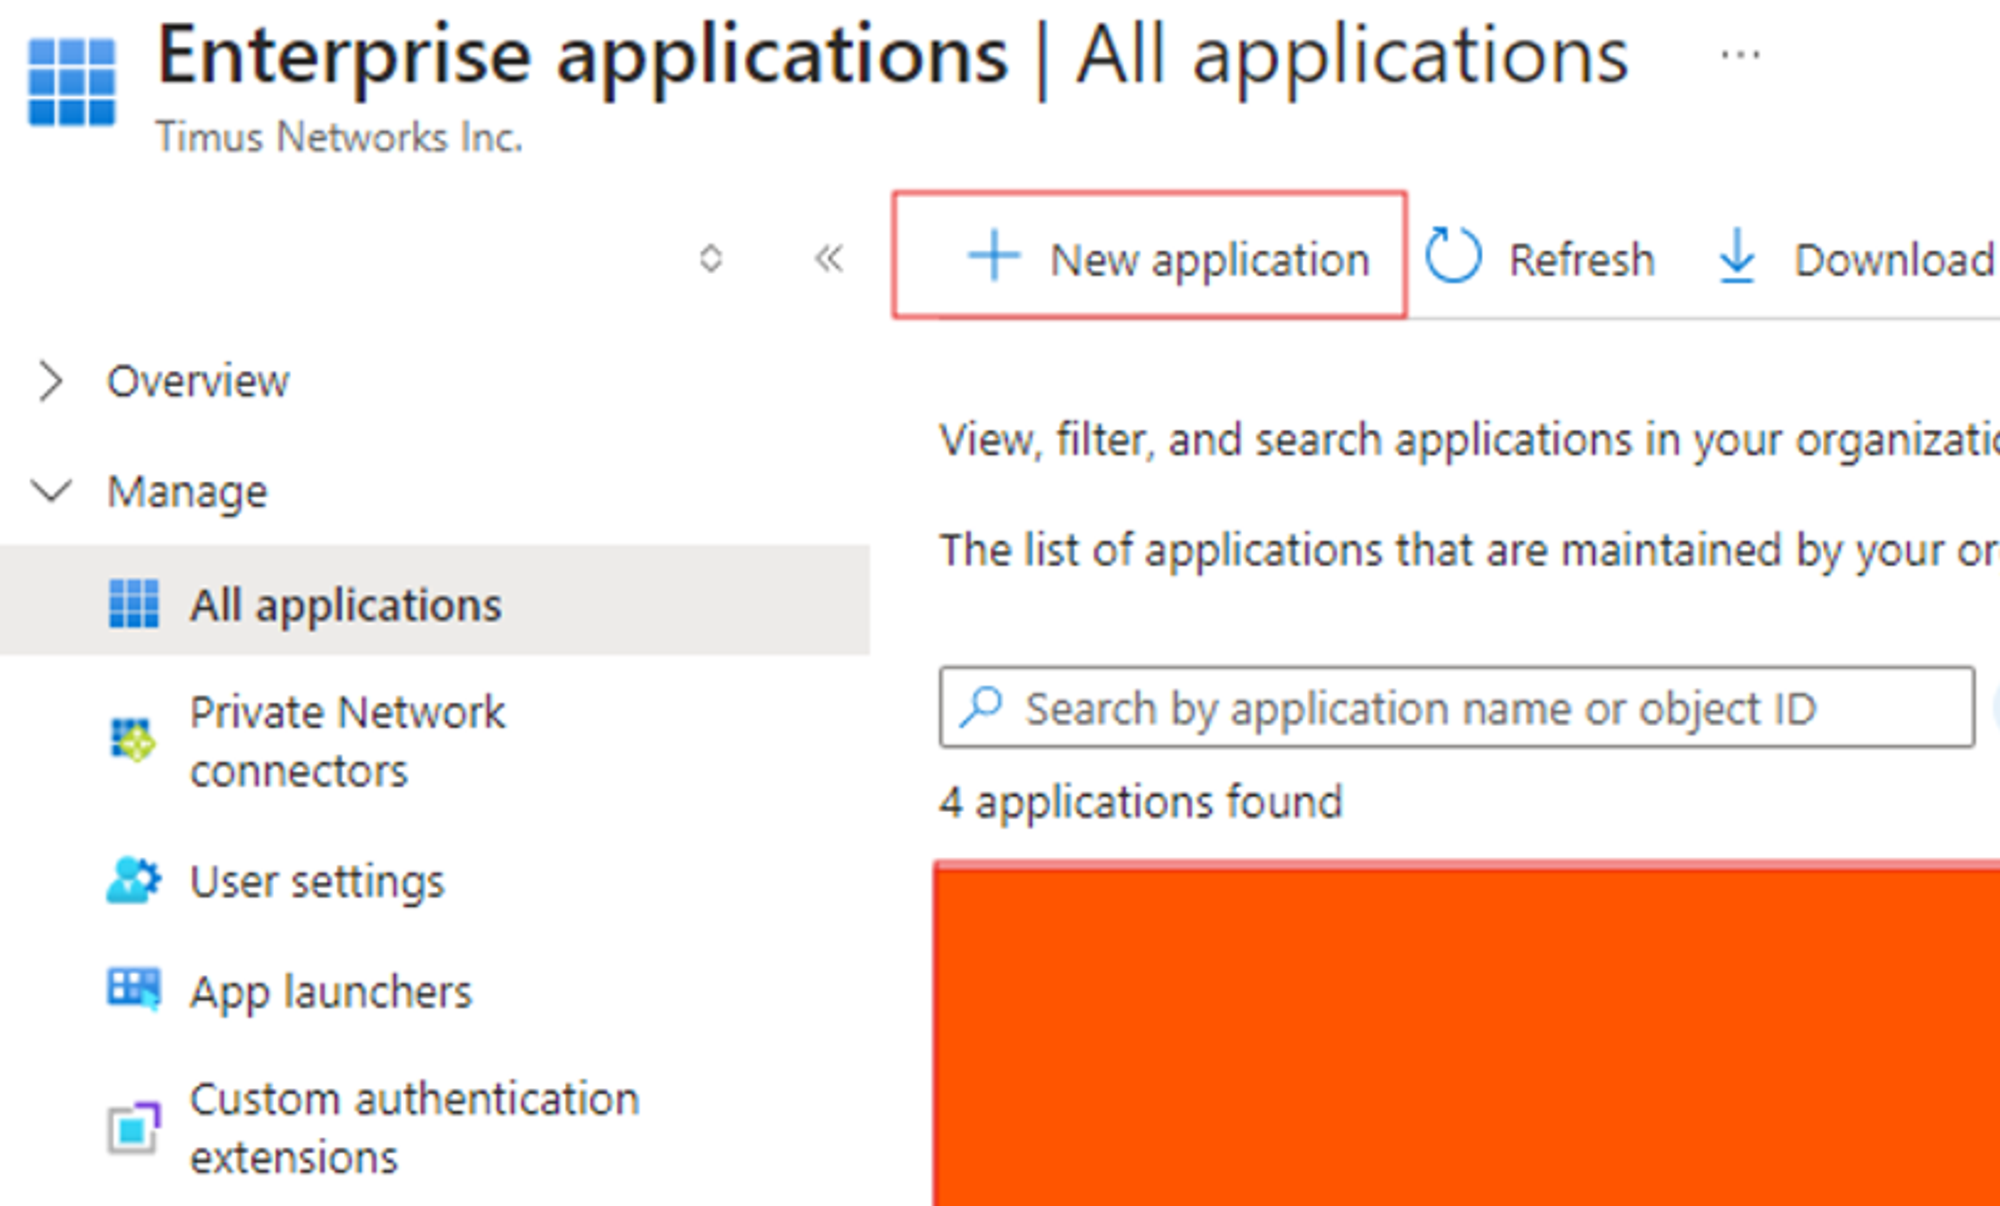
- Access Enterprise Applications:
- In the sidebar, click Manage and select Enterprise Applications.
- Create a New Application:
- Click New Application.
- Select Create your own application.
- Fill in the Name field and create the application.

- Click New Application.
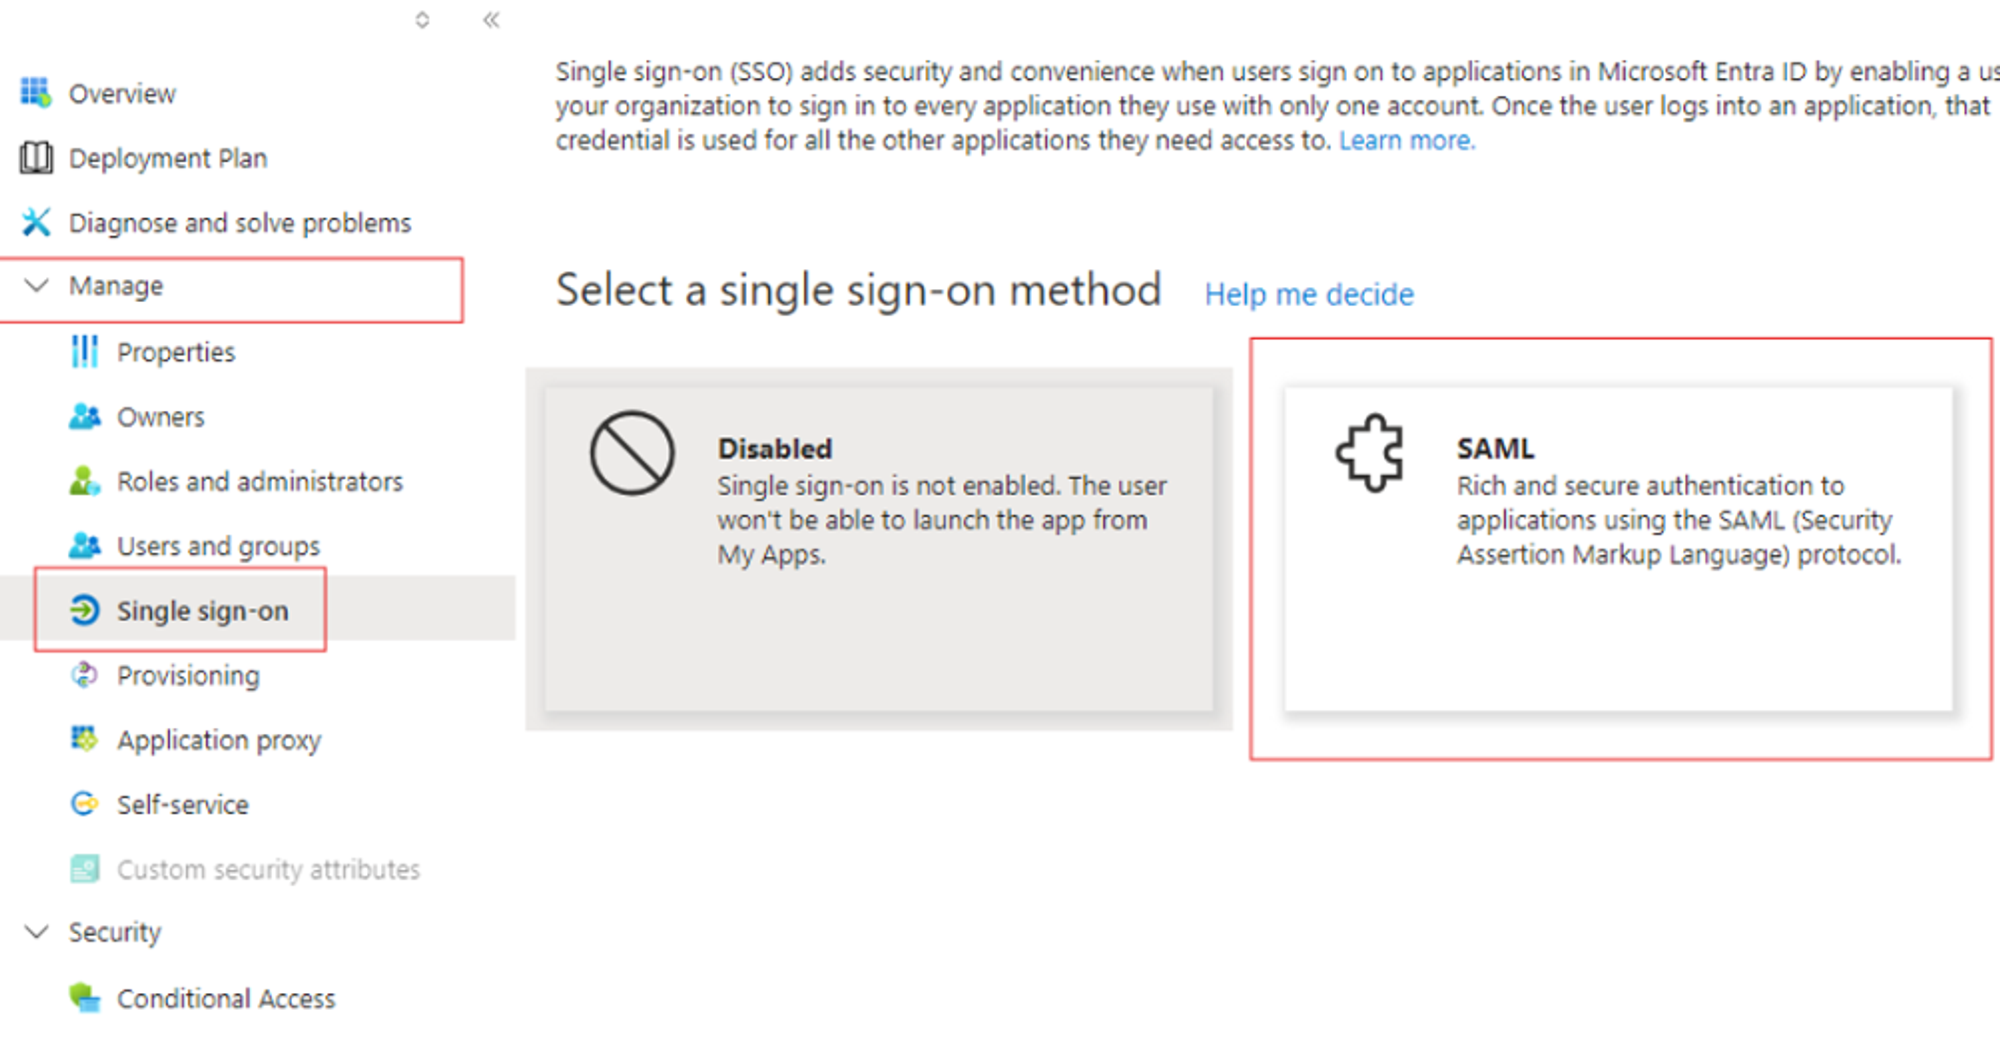
- Configure Single Sign-On:
- Click Single Sign-On.
- Choose SAML as the integration method.
- Navigate to Entra ID:
- Configuring SAML 2.0 in Entra ID
- Edit Basic SAML Configuration:
- Click Edit in the Basic SAML Configuration section.
-
Identifier: Ensure it matches the Microsoft Entra Identifier.
- Why: The Identifier (Entity ID) should be consistent with the issuer provided by Microsoft Entra ID. This prevents conflicts and ensures unique configuration for each tenant.
-
Reply URL (Assertion Consumer Service URL): Enter
https://auth.timuscloud.com/user/external/saml
- Edit Attributes & Claims:
- Click Edit under Attributes & Claims.
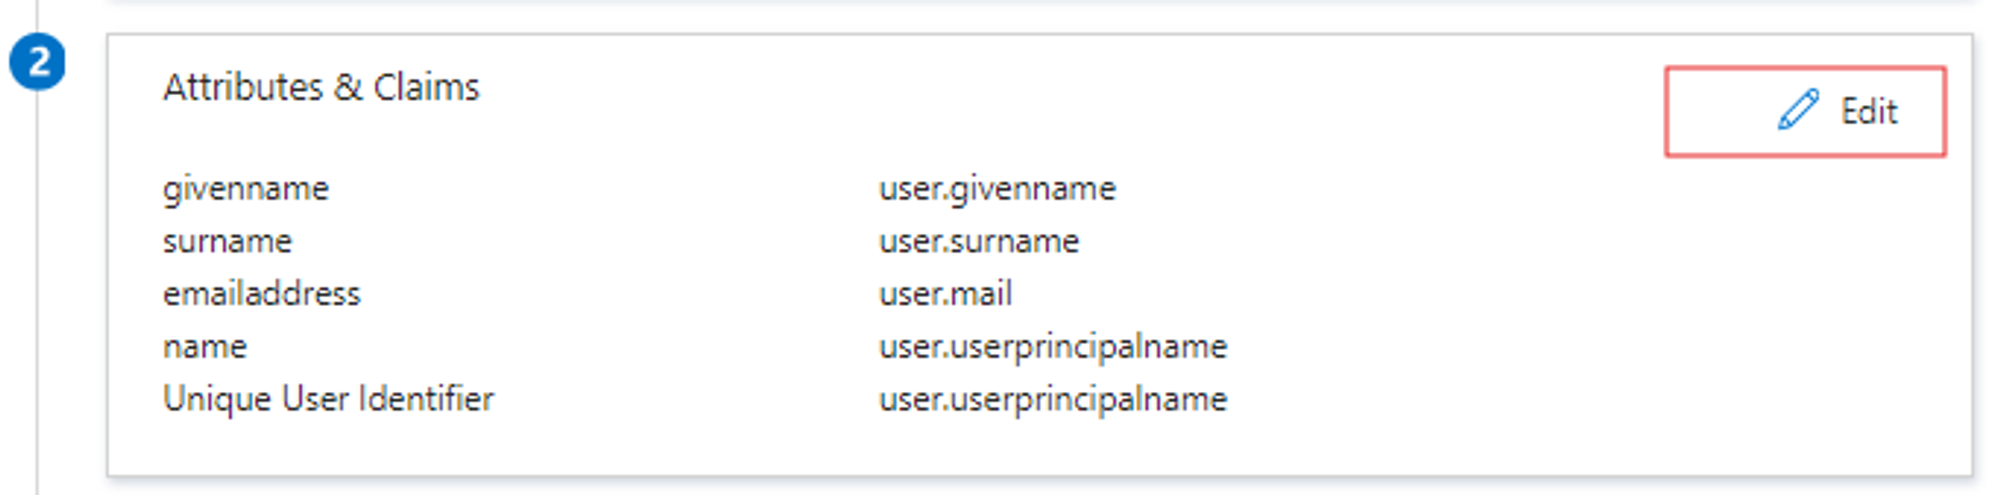
- Ensure attributes like firstname and lastname are included.
- The NameID should remain as userPrincipalName (which represents the user’s email).
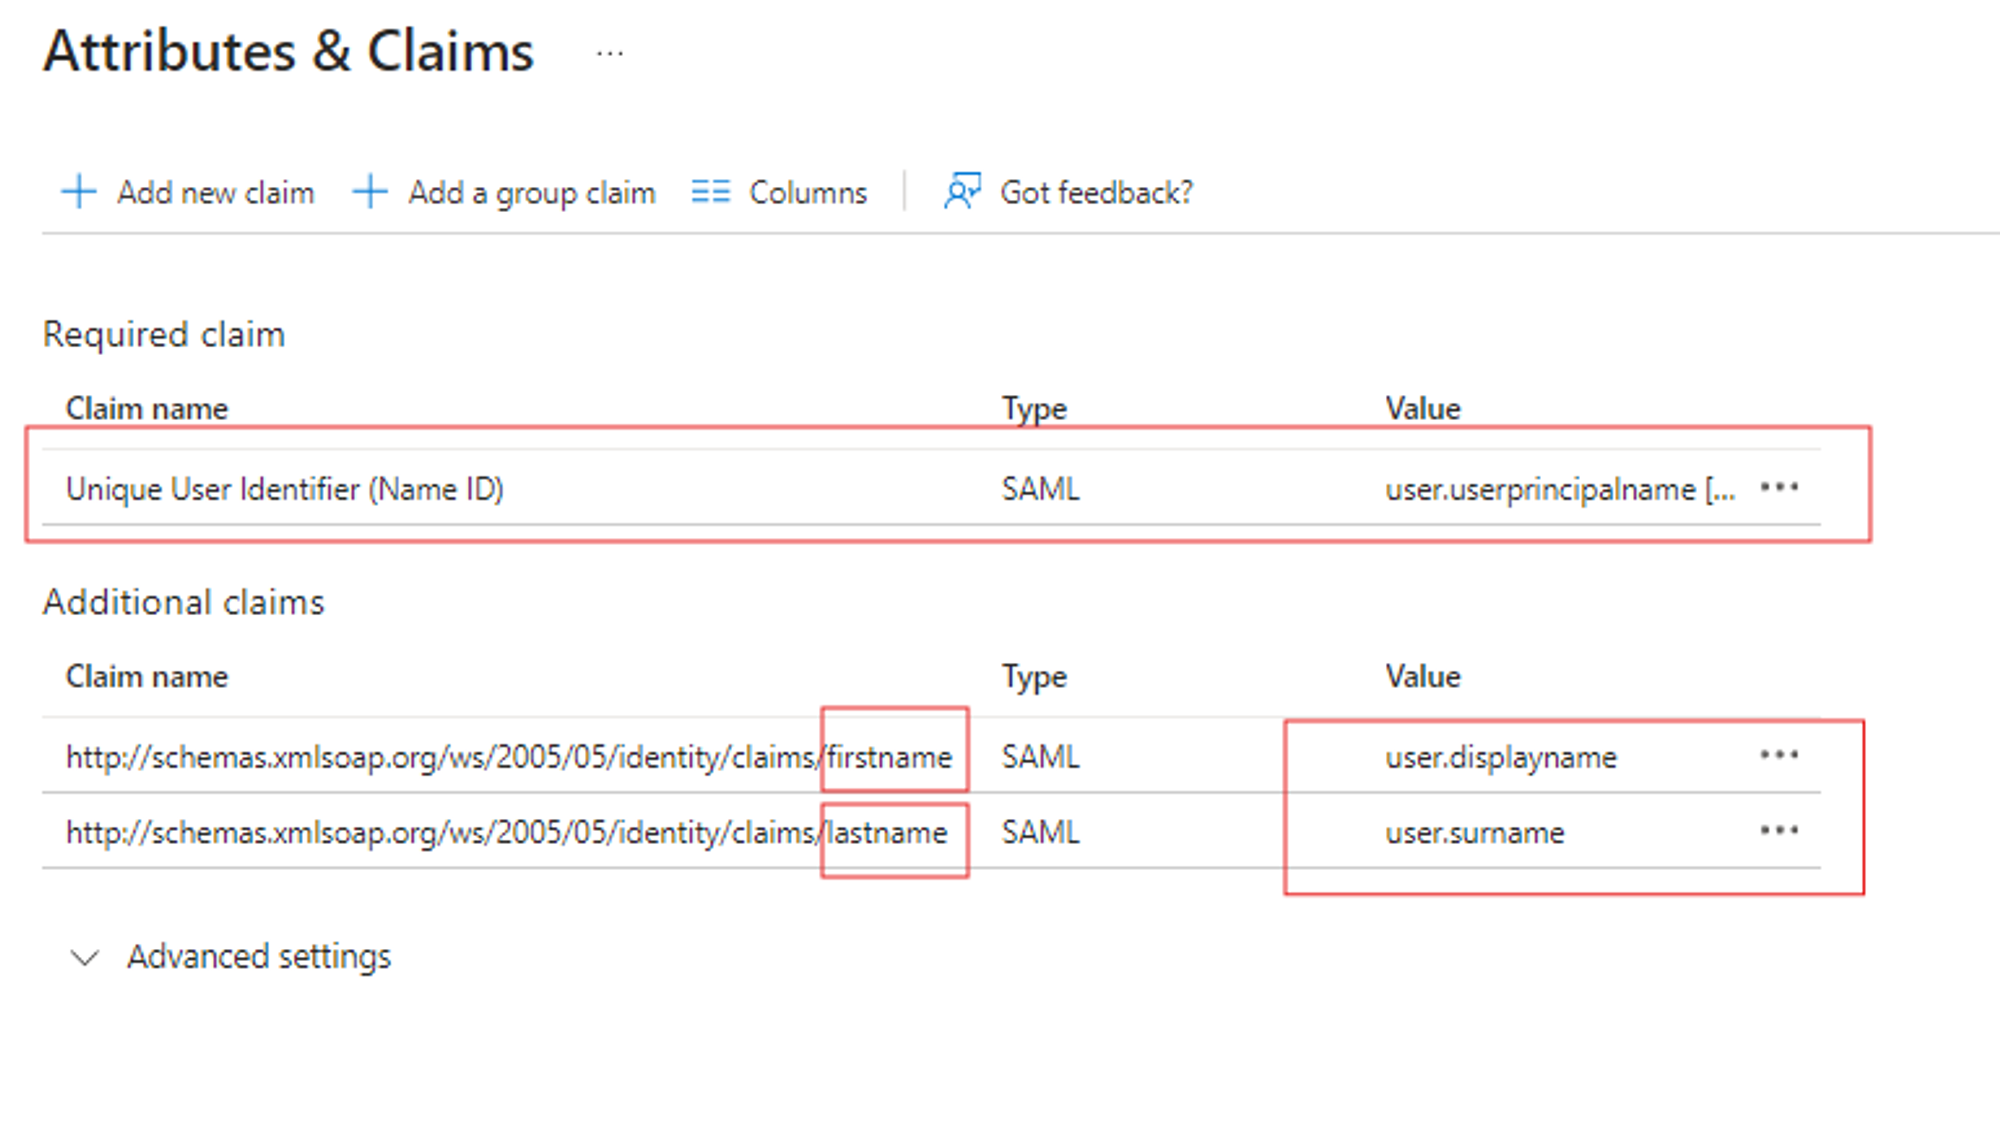
- Click Edit under Attributes & Claims.
- Edit SAML Certificates:
- Ensure that both Sign SAML response and Sign SAML assertion options are selected.

- Ensure that both Sign SAML response and Sign SAML assertion options are selected.
- Edit Basic SAML Configuration:
-
(Optional) Enabling Encryption
- Enable Token Encryption:
- Click Token Encryption.
- Import your public key here, and paste the private key in the Timus encryption key field.
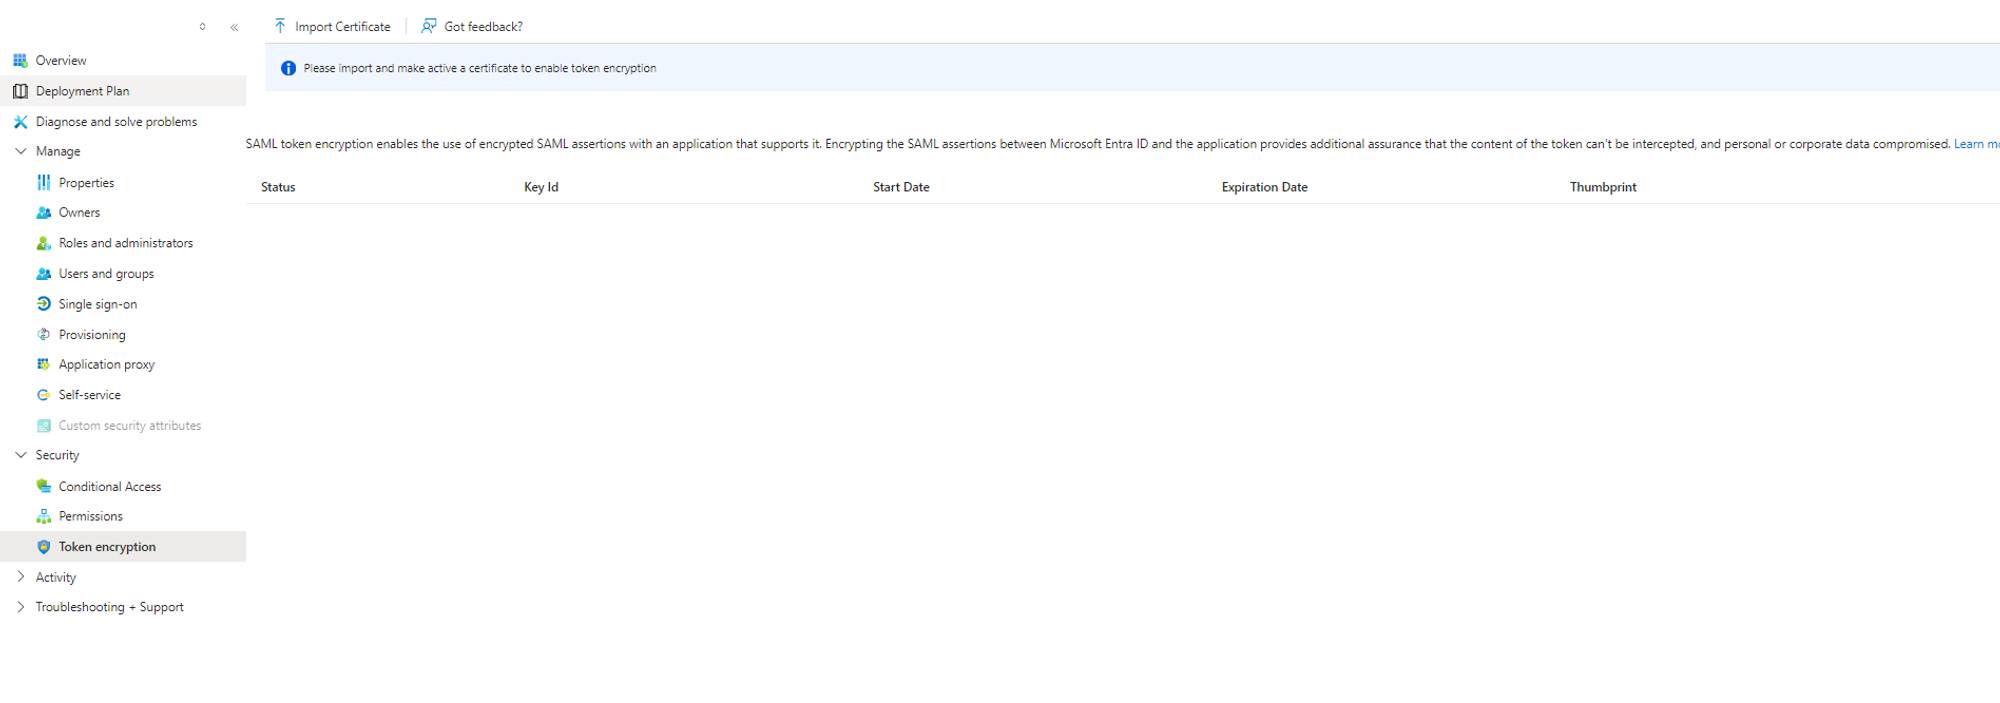
- Enable Token Encryption:
-
Configuring Timus SAML Integration
- Access Timus Manager:
- Log in to the Timus Manager portal.
- Go to Settings -> Integrations.
- Manage SAML 2.0 Integration:
- Click Manage under SAML 2.0.
- Fill in the fields according to the mapping provided in the table below.

-
Entra ID Field Timus Equivalent Login URL Service URL Microsoft Entra Identifier Identifier Certificate X.509 Certificate
- Complete the Setup:
- Save the configuration. Your SAML integration is now ready.
- Access Timus Manager:
-
Assign Users and Test the Integration
- Assign Users to the Application:
- In Entra ID, navigate to Users and Groups.
- Assign users to the application.
- Test the Application:
- Use a different browser or incognito mode to test the SSO process by logging in as an assigned user.
- When configuring SAML with Microsoft Entra ID, be aware that settings may take some time to propagate across the system. After making any changes, users should wait a few minutes and then refresh the application page before attempting to sign in again. This delay ensures that all configurations are correctly applied before users are redirected to Timus upon successful authentication.
- Assign Users to the Application:
-
-
SentinelOne for Endpoint Integration Guide
See more-
Log in to the SentinelOne Management Console:
- Access the SentinelOne console using your credentials. This is usually accessed via a web URL provided when your account was set up.
-
Navigate to the My User section:
- You need to click your profile on the top right and select “My User” button.

-
Create the API Key:
- Click on “Actions -> API Token Operations -> Generate API Key”
- Note that this API Key is valid for only 30 days. After that you need to change it manually.
-
Find the Management URL:
- The Management URL is typically the base URL you use to access your SentinelOne Management Console in the browser. It could look something like https://companyname.sentinelone.net
Now, you are ready to integrate with Timus. Please continue the article below to complete the integration: Device Posture Check and EPP -
Log in to the SentinelOne Management Console:
-
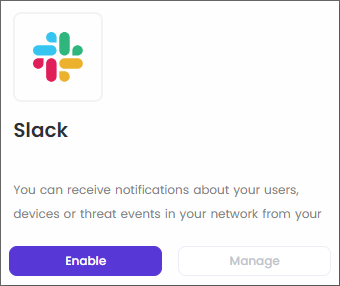
Slack
See moreThis article explains the process of enabling the Slack integration on Timus Manager.
The app integration for Slack enables you to receive notifications regarding your users, devices, or threat events in your Timus network through your Slack channel.- Click Enable button.
- Authorize in the page that opens.
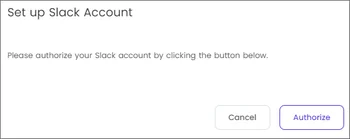
- This action will take you to Slack's sign-in screen.
- Enter the requested information.
- Click Continue.
Your integrated configuration is completed. -
Telegram
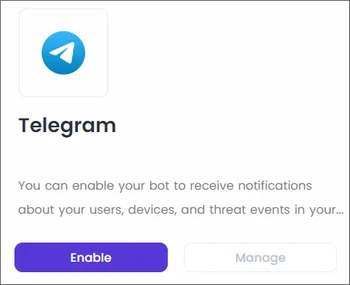
See moreThis article explains how to enable Telegram integration on Timus Manager.
The app integration for Telegram allows your Telegram bot to receive notifications about events occurring in your Timus network.- Click Enable button.
- Send the code below to Timus Telegram Bot to associate your Telegram account,
- Click Confirm.
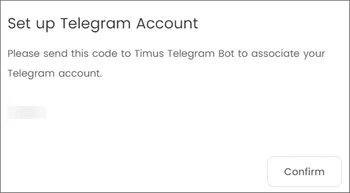
- Open your Telegram Account and make a search for Timus Telegram Bot.
- Click the Start button.
- Enter the code you receive from the platform and wait a while the integration is setting up your account.

- Click Enable button.